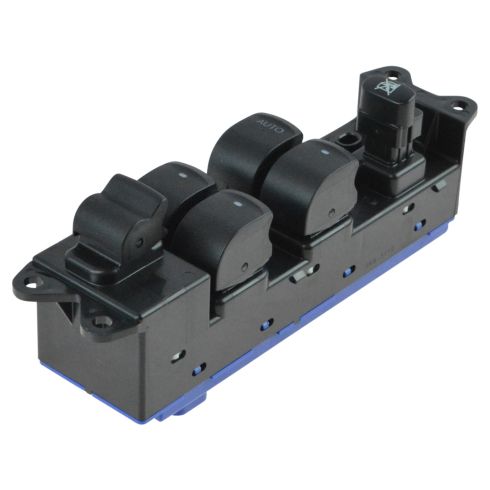
Genuine original equipment part (OEM) that was factory installed on your vehicle by the manufacturer.
Item Condition:New
1 Year Warranty
This item is backed by our 1-year warranty. In the event this item should fail during intended use, we will replace the part free of charge. This warranty covers the cost of the part only.
FREE Shipping is standard on Orders shipped to the lower 48 States (Contiguous United States). Standard shipping charges apply to Hawaii, Alaska and US Territories. Shipping is not available to Canada.
Expedited is available on checkout to the United States, excluding Alaska, Hawaii and US Territories as well as P.O. Boxes and APO/FPO/DPO addresses. Final shipping costs are available at checkout.
How To Replace Front Power Window Switch 2004-09 Subaru Outback
Created on:
Tools used
Phillips Head Screwdriver
Trim Tool Set
1. Removing the Front Door Panel
Pry off the sail panel from the mirror
Pry out the trim door behind the door handle
Pry off the door pull
Remove the two Phillips screws from the door pull
Remove the Phillips screw from the door handle
Pry out the door panel with a trim tool
Lift the door panel off
Disconnect the electrical connector
Disconnect the cables from the door handle
2. Removing the Front Power Window Switch
Remove the Phillips head screws from the window switch
Pry up the retainers on the switch with a flat blade screwdriver
Remove the switch
3. Installing the Front Power Window Switch
Press the switch into the bracket
Tighten the Phillips head screws to the window switch
4. Installing the Front Door Panel
Connect the cables to the door handle
Connect the electrical connector
Lift the door panel on
Tighten the Phillips screw to the door handle
Tighten the two Phillips screws to the door pull
Press on the door pull trim
Press on the door handle trim
Press on the sail panel
Hi, I’m Mike from 1A Auto. We’ve been selling auto parts for over 30 years!
In this video we will be removing and installing a front power window switch in a 2008 Subaru Outback. We'll start by opening the door. First we're going to take this little trim piece off. We'll use a flat blade tool carefully behind the panel, pull it, and then you can use your fingers and pull it back. There's three little clips. Next, we're going to take this trim piece off here with a flat blade tool. A little area you can put your screwdriver, push down, and pull it out. Hooks on the back. Next, we're going to take this trim piece off. Going to pry it down right here with a flat blade tool, being careful not to damage any of the surfaces. We're going to pull it out. This is difficult to come out. There are clips, retainers, that hold it in. We're going to start with a Phillips head screwdriver—we have three screws. One there, one here, and then one up here. Next, we're going to use a door panel trim tool. We sell these at 1AAuto.com. We're going to go in behind, pop off the clips, and you just lift and pull back. On the inside, we're going to pull the inner door and latch mechanism off. You have to pull this cover up. You have to disconnect these cables. We're going to pull out and then you're going to pull up. A little ball will come up. And then remove this one. Next, we have to disconnect our connector for the window switches. You're going to push this little tab here and pull it down. And then we're going to disconnect our door light. We're going to push down on this tab and it's going to pull right out.
Let's pull the switch out. Take this Phillips head screw out and take this top one out on the right. You can leave that bottom one in for now because it's hard to get to. Take this one out. Take this Phillips head screw out. Then the switch will pull out of the door panel. And we'll take this last one out. And we're going to uncover these little retainers here, these clips that hold it down. There's two there and two there. You can pry up underneath with a flat blade screwdriver. Pry out on the front part. You can peel it away. And there's your switch.
We're going to install this back in the bracket. Line it up. Line the holes up. Make sure all the switches are lined up. Just lock it in place. And this felt tape is like an insulation. It's just going to help for to prevent rattles or noise. That's about it. It's not mandatory. It's not going to change the way the vehicle works or not or anything. The switches will still do their job. You really don't have to re-tape this or anything. Just leave it the way it is. Before we put this in, because of this screw is difficult, we'll start with that. Now, we'll line this back up in the door panel.
Now we're going to reinstall the door panel. We're going to start where we left. We're going to reattach the door light. Just push it in. We're going to reattach the connector for the window switches. Just push it in. And we're going to reattach the lever and lock mechanism with the cables. The small cable goes on the top. Take this ball, it goes in there first, like that. And then you slide it over like that. And same with this one. Ball goes in this hole and then goes through the slot like this. Goes down like that. And then we'll slide this cover down.
Next, you want to take this going from the top. Get it in up top here, there's a groove. And once that's lined up, should be able to line the pins up and just push, just like that. Phillips head screws and a Phillips head screwdriver, start screwing in the panel. And we're going to install this cover. Slide in like that. And this last cover up top. Now we're going to use our last one with these three tabs in.
Thanks for watching. Visit us at 1AAuto.com for quality auto parts, fast and free shipping, and the best customer service in the industry.
83071-AG05B
In Stock
Product Reviews
Loading reviews
5.00/ 5.01
1review
5 Stars
4 Stars
3 Stars
2 Stars
1 Star
1
0
0
0
0
Subaru 2008 Master Power Installation
Gilbert
October 9, 2022
The main switch snapped as if a spring broke inside the master and as such needed to be replaced.
At first it looked intimidating but installation was a breeze thanks to easy and clear video instructions.
By doing this myself I definitely saved a bunch if I had my mechanic done the job.
Customer Q&A
No questions have been asked about this item.
Customer service
877-844-3393
Monday - Friday 8:00am - 9:30pm ET Saturday - Sunday 8:00am - 4:30pm ET
Subaru is a registered trademark of Fuji Heavy Industries Co., Ltd. 1A Auto is not affiliated with or sponsored by Subaru or Fuji Heavy Industries Co., Ltd.See all trademarks.
Enter Vehicle Year Make Model
Specify your vehicle's year, make and model to guarantee fit.
Year
Make
Model
Options
Drivetrain
This part doesn’t fit a . Select from parts that fit.