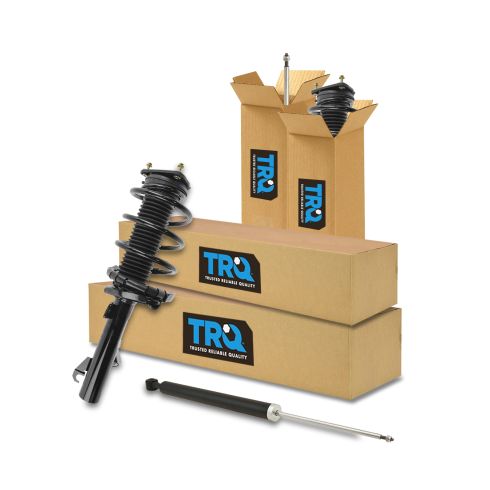
1ASSP01679-2010-13 Mazda 3 Front & Rear 4 Piece Complete Strut Assembly & Shock Absorber Kit TRQ SKA52319

Replaces
2013 Mazda 3 S Front & Rear 4 Piece Complete Strut Assembly & Shock Absorber Kit TRQ SKA52319

Product Reviews
Loading reviews
4.43/ 5.0
7
7 reviews
Just what I needed when I needed it.
February 21, 2020
The part came in on time and was installed without issue. Would order from 1AAuto again.
Shock/Strut Kit
December 8, 2020
Parts arrived quickly and in perfect condition. Fit my Mazda with NO problem! I'm never disappointed with 1-A Auto!
Rear shock failed after one week
March 6, 2021
Had all sorts of issues with the install from there being no boot, bumper, or shock mount. Once I had them installed, I took the car in for standard maintenance today and they pointed out that the driver's side rear shock was soaked in oil and had failed.
Not wanting to risk putting potentially faulty parts into my car, I chose to return the front assembly, but that will cost me $50 bucks to do so, which is far too much of a cost for a $250 set. Furthermore there is no way to obtain a refund on a damaged part only a part replacement. This is null and void as I want no part of this product I would much rather have my money back and for 1AAuto to pay for the shipping.
I cannot not recommend and will not be ordering from this company again. Pay the extra money and get higher quality parts.
December 8, 2021
When I received the package 1 of the front rotors was not there. I called the toll-free number and they sent me another 1 out the next day. Thanks for the great customer service.
February 16, 2023
Quick shipping, doing the job
June 22, 2023
Everything fitted perfectly on my car. Thank you 1A Auto.
the products i bought are amazing
September 24, 2024
best oe replacements out thier
Customer Q&A
Does this kit come with the rear shocks?
February 11, 2020
10
Yes. It came with everything my mechanic needed to replace front and rear. Rear doesn't have springs.
February 11, 2020
T H
10
Yes, this is a 4 piece set. It includes the 2 rear shocks and the 2 front strut and spring assemblies. Thank you for the inquiry!
February 11, 2020
Andra M
Will it fit 2010 mazdaspeed 3?
June 29, 2020
10
Thank you for the inquiry! These parts are not listed to fit the 2010 Mazda 3 Speed model. At this time, we do not carry the correct parts. Try searching www.partsgeek.com or eBay Motors.
June 29, 2020
Andra M
Is this kit fit the Mazdaspeed3 2011 models?!
July 9, 2023
10
Yes
July 10, 2023
Jeff B
10
Hello,
This kit is listed to fit 2010-2013 Mazda 3 S Front & Rear 4 Piece Complete Strut Assembly & Shock Absorber Kit.
July 11, 2023
Ricale A
Do the rear shocks come with the rubber bumps at the top that seat into the mounts, and if not do you sell them?
January 30, 2024
10
The rear shocks do not include the rubber bumps at the top, but we may carry them separately. Please provide your 17-digit VIN so we can confirm if we carry the correct parts.
January 31, 2024
Jessica D
Mazda is a registered trademark of Mazda Motor Corporation. 1A Auto is not affiliated with or sponsored by Mazda or Mazda Motor Corporation.
See all trademarks.


