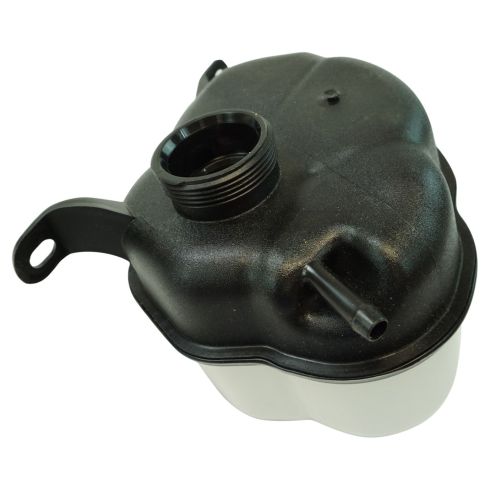
Hey friends, it's Len here at 1A Auto. Today I'm working on a 2015 Chevy Equinox. We're going to be replacing the coolant reservoir. It's going to be a very easy job. I want to be the guy that shows you how to do it. If you need this or any other part you can always check us out at 1AAuto.com. Thanks.
Okay. So one of the first things that we're going to do is we're going to relieve pressure right here. If the vehicle has been running and it's hot there might be a lot of pressure and there's going to be hot coolant in there, so when you go to release this it might want to release pressure towards your face, so make sure that everything is cool. This engine hasn't been running in a while so it should be good to go.
I'm just going to hold it down while I go just if there is pressure. Cool. We'll remove that. We'll take a look at it. Check to see if it looks like the gasket in there looks like it's torn or ripped or cracked. It looks pretty decent. Don't worry about any of that. It's no big deal. We'll set this aside.
Take a peek inside. I don't see any creamy colors or anything like that. Sometimes if you look inside your coolant system you'll see like a cream. That could be oil or some other type of contaminant inside your cooling system, at which point you'd want to make sure that you flush it, okay? This one looks great, so we don't have to worry about that.
Now we're going to go ahead and remove this clamp, just get it wiggling here. I'll see if I can wiggle the hose. It wiggles around pretty good. Let's see if we can push it off. I'll just try and use what I've got in my hand here. Nice. Cool beans. 10 millimeter. I'm going to take both these bolts right out. There's one bolt, two bolts, exact same as the other one. Can't mix those up. That's always nice.
Now I can wiggle this around quite a bit. Let me get this hose off of here. It's just the washer fluid hose. It runs over there. Okay. There's one last hose, which is down in there. It's going to be a little harder to get to. You might need something such as long nose pliers, needle nose pliers or whatever you want. This is the negative, so you don't have to worry about touching on it too much. This one right here, you want to make sure that you have it covered though. That's the positive, or a positive connection.
You'll grab that clamp and just try to push it down after I squeeze it. I'm going to grab it, squeeze it, twist it, push it, do anything we can. There we go, and there's our radiator fluid reservoir.
All right friends, a quick product comparison for you. Over here we have our original coolant reservoir and over here we have our quality 1A Auto part. As you can tell, they're both the exact same. We've got our hose nipple up here, hose up there. Down bottom, down bottom. We've got all the same mounting areas. As you can tell, it's an exact replica, which means I wouldn't feel bad putting this quality part in this vehicle. So if you need this part or any other part you can always check us out at 1AAuto.com. Thanks.
So right down along the wall here there's a little slot. Okay, you can see where my little doodad is right there. That's where this goes in, right? So it's going to go like this. It's going to slide in the slot right there like that, and then our mounting bolt, mounting bolt, okay?
As we're sliding down something else that we want to pay attention to is we're going to have to try to hold that hose with our pliers with the clamp and everything, slide this down and on, and hopefully have everything bottomed out, the hose all the way up against here, and put that clamp on so it's in its original spot while putting this into that little thing, okay? So wish me luck. Good luck to you, and off we go.
I'm going to grab my clamp first. I'm going to try to get as close to the edge as possible on it. That'll give me the most pressure. See if I can get down in here. Get this washer fluid hose... I should have pulled that up first. It looks like it's starting to go on. Come on baby. Okay. So it started on, as you can see. We definitely don't want to leave it that way. We have bottomed out all the way up against the coolant reservoir. This is going to be under pressure. This is the way that you're going to fill your cooling system, and all the pressure from your cooling system goes in through here. There's no radiator cap. This is the radiator cap.
So we'll just do the best we can, and the best you can, well it better be good enough. No, I'm just kidding. I'm just going to do the best I can and do it right. I'm trying to do it... Oh, yeah, love it. Take a look in there. It's right up against.
Now I'm going to go ahead and I'm going to check to make sure that's in its little slidey spot, and it is. I'm going to get my little hook into the little slide, and my two bolts. I'm going to start them both in. I don't want to tighten either of them until the other one is tight as well, okay? If you want to you could put your washer fluid hose running underneath there or up above, whatever you want to do. It's up to you.
I'm going to go ahead and take it out, take this bolt out again real quick. I'm just going to run it underneath there, just because I kind of like it better under there, just like that. Put that back in its little slidey spot. Looks good. It likes it there. I'm going to go ahead and put in my two 10 millimeter headed bolts. Once again I'm not tightening either of them until they're both started. I want to make sure that we don't pinch that washer fluid hose. Feels good. Feels good. Grab our hose. It moves around. I know it's not pinched. I'm happy with that.
Pick up this hose. It goes on here. Just push it on. I'm going to bottom it out right up against the container. Grab my clamp. Get my pliers on there and bring it over. I'm going to line the clamp up exactly where I got it from. I can see the grooves where it was and that's right where I want it to be again. Happy there. It's home.
There we are. Now we can go ahead and fill this up to up above where the cold fill is. When it's hot it should be up inside here, so it looks like we're nice and full. Perfect. We got our cap. We already checked it. Looks good. Just go ahead and close it up. Now we're clear for a nice road test.
Thanks for watching. Visit 1AAuto.com for quality auto parts shipped to your door, the place for DIY auto repair. If you enjoyed this video please click the subscribe button.