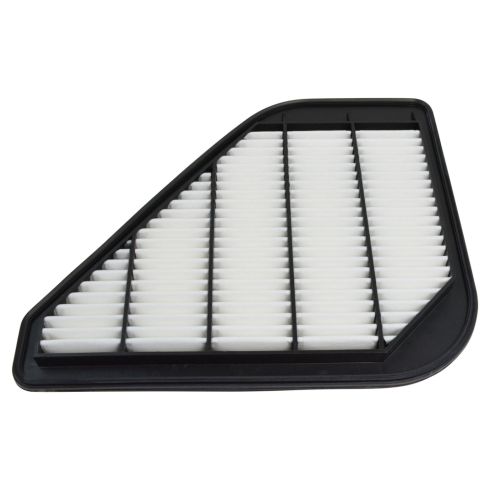
This item is backed by our 1-year warranty. In the event this item should fail during intended use, we will replace the part free of charge. This warranty covers the cost of the part only.
FREE Shipping is standard on Orders shipped to the lower 48 States (Contiguous United States). Standard shipping charges apply to Hawaii, Alaska and US Territories. Shipping is not available to Canada.
Expedited is available on checkout to the United States, excluding Alaska, Hawaii and US Territories as well as P.O. Boxes and APO/FPO/DPO addresses. Final shipping costs are available at checkout.
How to Replace Engine Air Filter 2009-15 Chevy Traverse
How To Replace Engine Air Filter 2007-13 Chevy Silverado 1500
Created on:
Tools used
Socket Extensions
T20 Driver
8mm Socket
Ratchet
1. Removing the Engine Air Filter
Disconnect the MAF sensor
Remove the four T20 Torx screws from the air filter housing
Remove the 8mm bolt from the hose clamp
Pull the intake tube from the air box cover
Lift the air box cover off
Remove the air filter
2. Installing the Engine Air Filter
Insert the air filter into place
Press the air box cover on
Press the intake tube to the air box cover
Tighten the 8mm bolt to the hose clamp
Tighten the four T20 Torx screws to the air filter housing
Connect the MAF sensor
Hi, I’m Mike from 1A Auto. We’ve been selling auto parts for over 30 years!
Disconnect the mass airflow sensor, and push out the red lock, until it unlocks. Then push in on the black tab, and then pull it straight off. I'm going to put that aside. We're going to use a long extension, a ratchet and a T20 Torx bit. You could also use a T20 Torx driver. There are one, two, three, four, five and six. You have to remove all these Torx bits to remove the air box cover. They are not captured in the plastic, so I'd be careful not to drop them. Well loosen them up, and as they get close to being loose, I'm going to reach down and grab onto it, so I don't drop it. I'm going to put those aside. Just repeat this for all of them.
I'm going to loosen this clamp, so I can take the airbox cover off the intake duct. You can use a flat headed screwdriver, or an eight millimeter socket. You don't have to remove the clamp fully, just loosen it. That should be perfect. You can pull the hose back, just separate it from the airbox cover. Now the air box cover can lift up and out. I'll put that out of the way. There's the air filter. It just sits in the air box. It can only go in one way. It's going to lineup with the box, the shape of it. It'll sit right on top there. Take the air box. I'm going to turn the cap, just so the hinge part is out of my way. There. We're going to maneuver this down into place.
Watch the mass airflow sensor connector. I'm actually going to put that under here, so I don't accidentally break it, and kind of push it past. Maneuver the box down in here to get it past the hose, past that. There's some flex in that. Push this down underneath. Push it past the hose. Watch for these hoses down here. Get this lined up. This does have a keyway in it. It's got a couple keyways, but if you find the keyway where it fits like that, you can have access to the tightening screw right here. I'm going to get that lined up. Push it in. I'll stop at those stops. Now it's in place. Push the box down so it seats nice. I'll get one of these started here, and then I'll work on the hard to get to ones.
I put this down in here. Use the extension with just the T20 Torx bit on there. Put my ratchet on. We'll tighten it down. I'm going to go for this hard to get. Don't forget to tighten this hose clamp if you took it off. I'm going to hold it in place so it stays by that keyway is. When I feel it get tight, I'll stop. Plug the mass air meter back in. Click the locks in place, and push the red lock in.
Thanks for watching. Visit us at 1AAuto.com for quality auto parts, fast and free shipping, and the best customer service in the industry.
Tools used
T25 Torx Driver
1. Removing the Air Filter
Remove the four T25 Torx screws from the air box
Lift the air box cover
Remove the air filter
2. Installing the Air Filter
Insert the air filter into the air box
Close the air box
Insert the four T25 Torx screws to the air box
Brought to you by 1AAuto.com, your source for quality replacement parts and the best service on the Internet.
Hi, I'm Mike from 1A Auto. I hope this how-to video helps you out, and next time you need parts for your vehicle, think of 1AAuto.com. Thanks.
In this video, we're going to show you how to replace the air filter on this 2011 Silverado 1500. It's a pretty easy operation, and it is the same for most GM trucks from 2007 up to 2013. You only need a T25 Torx Bit.
You'll see that this is your intake box right here. You will see in the four corners of it, there are four T25 Torx bolts. You're just going to remove those.
Here we are using a T25 bit with an extension and a ratchet. You can also use a regular T25 driver.
Once those bolts are removed, you can lift the top part of the air intake box off and pull the air filter right out.
Then you put your new one right back into the same place. Just press it down in. Place that air intake box lid, and then replace those four T25 bolts, and that's it.
We hope this video helps you out. Brought to you by www.1AAuto.com, your source for quality replacement parts and the best service on the Internet. Please feel free to call us toll-free, 888-844-3393. We're the company that's here for you on the Internet and in person.
A3083C
In Stock
Product Reviews
Loading reviews
There are no reviews for this item.
Customer Q&A
No questions have been asked about this item.
Customer service
877-844-3393
Monday - Friday 8:00am - 9:30pm ET Saturday - Sunday 8:00am - 4:30pm ET
Enter Vehicle Year Make Model
Specify your vehicle's year, make and model to guarantee fit.
Year
Make
Model
Options
Drivetrain
This part doesn’t fit a . Select from parts that fit.