What's up, guys? I'm Andy from 1A Auto. In this video, I'm going to show you how to replace the air intake boot on this 2001 BMW 325xi. If you need this part or other parts for your vehicle, click the link in the description. Head over to 1aauto.com.
With the trunk open, over on the right side or the passenger side, there should be a cover that goes right here. This vehicle doesn't have one, but you're going to want to remove that cover. Battery is located right here. First thing I'm going to do is take a 10 millimeter socket and ratchet, loosen up this nut for the negative terminal. That's loose. Slide off the cable, slide it out of the way.
I'm going to take these push pins out right here. I'm just going to use some side cutters. Get this center pin, pull that up, and then slide it out. Be careful not to cut that. Get those out. Just grab this piece, slide it out. I'm just going to disconnect this connector to the mass airflow sensor. Push down on this tab. Wiggle it out. Take a straight blade screwdriver, loosen up this clamp right here. Should be good. You can push that snorkel off right there, and there's all these clips, pulling the top of the airbox off. I'm just going to take the top off. And this last one over here. That one's kind of tricky to get to. Pull the dipstick out of the way. You just grab the airbox, pull the air filter out.
I'm going to take these two bolts out and use a 10 millimeter socket extension and an electric ratchet. You can use a regular ratchet if you don't have an electric one or an air powered one. Loosen them up. Take them out. Now we'll just grab the airbox. Slide it up. This wire is on it, this little grommet right here. Let's try to slide that out. Right. Take that off. Slide this out of the way.
I'm going to take this cover off right here. Just take these clips, twist it to the side, just like that. Grab this and slide it out. This weatherstrip might be in the way. It should slide forward. Can take the cabin filter out. It slides out as well. I need to remove these wires from this housing right here. You can either take the cover off or you can slide it up right there. I like to take this cover off. Just take a screwdriver, slide that off like that, pull that out of the way, grab these wires, pull that down, pull this one down.
Now I'm going to use a T30 socket extension and a ratchet, and I have four screws right there. Take those off. So it's all loose. You can just slide this panel up, slide it out of your way.
To get this snorkel off, it's going to be a lot easier if I take this panel out. You can try to sneak your hand in there and try to get it off, but generally it's pretty difficult to get that off. So I'm going to take this panel off and go from there. I'm just going to take this weatherstrip off and just slide it up. There's a retainer right here, slide this retainer out, and then slide these hoses off here and the wiring. You should be able to slide this up. You might have something holding this in near the firewall, but this vehicle doesn't have it that, so. All right, and just sneak it passed the hose and then slide it out. Disconnect this connector right here. There's a little push retainer right there. Slide that off.
Now I'm going to take this valve out. I'm going to use a T30 and a socket and a electric ratchet. You can use a regular ratchet if you don't have an electric one. There's a screw right here on top and there's another one underneath here, right about there. Just like that, take those out. Just grab the valve and just slide it out.
Now I'm going to disconnect these vacuum hoses. Just take a pick, get underneath, slide it around, and then you should be able to twist the hose. Try to get it off, just like that. Then the same at the bottom one, twist it. Set those aside. Take a straight blade screwdriver. We're going to loosen up on this worm clamp right here. Just hold it, keep it from spinning, and then underneath is another worm clamp. It's not quite as easy to get a screwdriver in there. Might be better off using a socket.
All right, to get that bottom worm clamp off, I'm going to use a six millimeter socket and a ratchet, and I'm just going to do this blindly because I can't see. Just feel for where the clamp is. Okay, that should be loose enough. Now I can just grab the snorkel. I'll just slide this off, and then slide it off right there. Oh, I dropped the clamp. There's the snorkel.
All right. Before I take this apart, what I'm going to do is just mark this. There's no key way for this part of the snorkel to attach to this part of the snorkel, so find something that's common, and right here, the new snorkel has that same ridge right there, so I'm just going to try to line that up like that. I could always adjust it later. Once it's in the vehicle, I can loosen these clamps up and twist it accordingly, but it's a good way to at least get a base point.
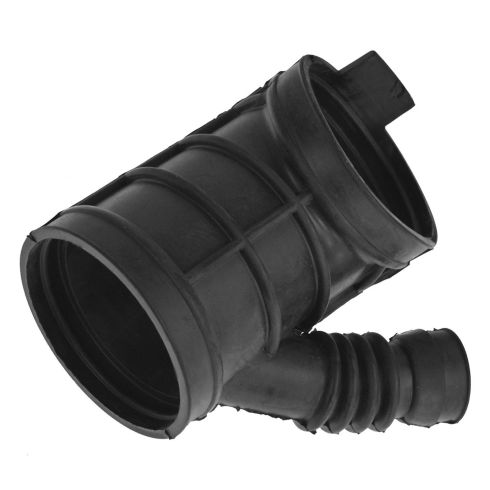
Just take a straight blade screwdriver, loosen up this worm clamp. And just twist and separate. Here's the old part. Here's the new intake boot from 1aauto.com. It's got the same sheet. It's got the same intake port. A lot of times, these rip over time, the rubber breaks down. Get yours at 1aauto.com and you'll be ready to rock and roll.
Now with the old air intake boot, I'm just going to take the clamps off, transfer them over to the new one. Try to keep them going in the same direction. It's going to make it easier to install them. Just like that. This one goes right here. Now we can take this piece, and we have our line marking where we want to line that up right there. Slide that in position. Just work it back and forth. You should be able to pop it over there just like that. And then that's lined up good. So we can either leave this loose or we can just snug this up a little bit right now. I'll snug it up, and then if I have to, I can loosen it up. All right, that's good.
All right, now we're going to line this up. I'll line this boot up first up top, and then line the lower one up. If you have to, you can loosen up the worm clamp a little bit more. Take my six millimeter socket and ratchet, and I'll tighten up the worm clamp down below. It's a little bit tricky. You can't see what you're doing. Just snug it up.
Now I'm going to use a straight blade screwdriver, tighten up the worm clamp up top. And just snug it up, not too tight, and then just give it a wiggle and it looks like it's good. It's not going to come off, so we're good. Take these vacuum lines, reinstall those, that one right there and this one right here.
All right, now we'll take this and just slide this back into position, just like that. Take the two screws. I'm just going to use my T30 socket to help get these screws started. And then same underneath here, and then I'm just going to take my electric ratchet and just snug these up, not too tight. Looks good, and that's good. Take the electrical connector, and line it up and plug it back in.
So now we're going to reinstall this panel. Just slide these wires and this vacuum line up, and if you struggle to get this in, you can always pull the vacuum line off the brake booster. Just pop that out. There's a couple of coolant hoses over here. So underneath here, there's a clip that has the coolant hoses on. That's going to actually clip to the cover, so you just slide that up. That's good. Slide these hoses back in position like that and like that. Pop that back in the brake booster. Take this clip retainer, slide this into position. Press it in and twist it just like that, and if you have another one, put that one in as well. Slide the weatherstrip over here, just like that, and then you can reinstall that cover up top.
Now we're just going to slide this side of the lower airbox in here. Yours may have something that this connects to. This vehicle doesn't. It just slides into position, and then this lower part slides there, and make sure these holes are lined up. Take these two bolts, get these started. Take a 10 millimeter socket and a ratchet and tighten these down. I'm using an electric ratchet. If you don't have an electric ratchet, just use a manual one.
Take the air filter, reinstall it. Now take the top part of the airbox. We're going to slide it onto the snorkel first, just like that, and then there's all these clips. Take these clips, lock this part down. Connect the mass air flow sensor, or air flow meter. I'm going to slide this clamp right here. Take a straight blade screwdriver and tighten it down. Just snug, not too tight. Give it a shake. Make sure it's good. Take this piece, slide this into the airbox, just like that. There's retainers right here. Take those push pins, lock them down.
All right, now we want to install this. Just get this lined up. Get these screws started. I'm going to take a T-30 socket extension and a ratchet. Tighten these up. Now reinstall these wires in this cover right here, just like that. Take this cover, and line it up, and that's good. Take the filter. We're going to slide it in with the curved side towards the vehicle, so the bode side more towards the out of the vehicle. Just slide that in position like that. We'll take this cover. It's going to just slide in underneath this weatherstripping. Let's push it in. Get these lock tabs to line up and lock them down. They're spring loaded, and the last one, and you're good to go. Now we can take the negative side, connect the negative side. Take the same 10 millimeter socket and ratchet, tighten it up. That's good. At this point, if you had that cover, you're going to want to put the cover back where it goes.
Thanks for watching. Visit 1aauto.com for quality auto parts shipped to your door, the place for DIY auto repair. And if you enjoyed this video, please click the subscribe button.


