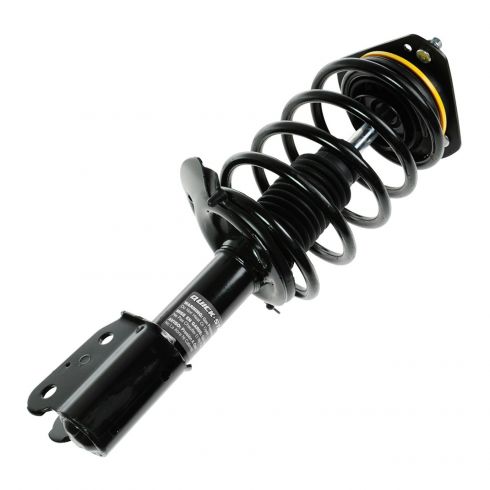
Monroe Quick-Strut assemblies are high quality and easy-to-install. Some of its benefits include:
Application specific technology
Restores factory ride height and feel
Quicker installation time than bare strut assemblies
Pre-assembled and no compression tool required
Includes new mount, bearing, coil spring, isolators, boot, and strut
Nitrogen gas charged
Item Condition:New
Lifetime Warranty
This item is backed by our limited lifetime warranty. In the event this item should fail due to manufacturing defects during intended use, we will replace the part free of charge. This warranty covers the cost of the part only.
FREE Shipping is standard on orders shipped to the lower 48 States (Contiguous United States). Standard shipping charges apply to Hawaii and Alaska.
Shipping is not available to a P.O. Box, APO/FPO/DPO addresses, US Territories, or Canada for this item.
Expedited is available on checkout to the United States, excluding Alaska, Hawaii.
Final shipping costs are available at checkout.
How to Replace Front Struts 2006-13 Chevy Impala
How to Replace Front Struts 2000-07 Chevy Monte Carlo
Created on:
Tools used
21mm Socket
13mm Socket
Pry Bar
Jack Stands
19mm Socket
Ratchet
Floor Jack
1/2 Inch Breaker Bar
1. Remove the wheel
Loosen the lug nuts
Raise and secure the vehicle
Remove the lug nuts and wheel.
2. Remove the bottom of the shock
Unbolt the two bottom bolts securing the shock.
Use a breaker bar and a 21 mm socket and some penetrating oil.
You might need a hammer to work the bolts out once you have removed the nuts.
Use a pry bar to pry the spindle free from the strut
3. Remove the top of the strut
Pop the hood and secure it.
Use your 13 mm socket and ratchet and some penetrating oil to remove the three bolts securing the top of the strut.
Pull the strut down and out.
4. Install the new strut
Work the strut into place and bolt in the top three 13 mm bolts
Torque the three 13 mm nuts to 35-45 ft lbs
Bolt in the bottom two nuts and bolts and torque to 100 ft lbs.
5. Replace the wheel
Put the wheel back on and hand tighten the lug nuts
Lower the vehicle and torque the lug nuts to 100 ft lbs
Brought to you by 1AAuto.com your source for quality replacement parts and the best service on the internet. Hi I'm Don from 1A Auto. I hope this how-to video helps you out. And the next time you need a part for your vehicle think of 1AAuto.com. Thanks.
In this video we're going to show you how to replace the front struts on a 2006 Chevy Impala. It's the same operation for the left side and the right side and we always recommend that you do replace struts in pairs. In order to do this repair you're going to need some new struts from 1A Auto. A 21 and 19 and 13 millimeter socket and socket wrench. A hammer. A pry-bar. A pipe for extra leverage if you need it. As well as a torque wrench.
Remove the hubcap by hand using a 19 millimeter socket. If you don't have the benefit of air-tools you'll want to loosen the lug-nuts with the vehicle on the ground first. Then raise and support the vehicle and remove the lug-nuts from the tire. Locate the two 21 millimeter nuts. Using a 21 millimeter socket, a socket wrench and a pipe for extra leverage to remove the two nuts on the strut. I will go ahead and fast-forward as I remove those.
Use a hammer to knock free the two bolts that go through the strut and spindle. Use a long screw-driver or pry-bar to pry the spindle free from the strut. Locate and remove three 13 millimeter nuts on the strut-top. As you're removing the last nut, hold the strut so that it doesn't just come falling down. Here you see a side by side of the old part and the new part from 1A Auto. Going back in with the strut. Start from the bottom. Line up the three holes. And then start your three 13 millimeters nuts up top. Once you get them all started go ahead and tighten them up and I'll fast-forward as I do that. Now line up the strut with the spindle and match up the holes. You might have to pull down or push up on the spindle and hub assembly there to line them up. Go ahead and put in your two bolts. Then once you get the bolts in use a hammer to seat them into that spindle and lower strut assembly.
Now reinstall the two 21 millimeter nuts and go ahead and tighten them down. Torque the two nuts to a hundred foot pounds. Reinstall the wheel and the five lug-nuts. Torque your wheel lug-nuts to a hundred foot pounds. Once you're done torqueing the lug-nuts in a star pattern reinstall your hubcap. And make sure you see the little notch in the hubcap and put it over the valve-stem. And once you've done that you can start with just the socket itself tightening up those five 19 millimeter lug-nut cap-covers. And after you replace your struts it is recommended that you get an alignment on your vehicle. We hope this helps you out. Brought to you by www.1AAuto.com your source for quality replacement parts and the best service on the internet. Please feel free to call us toll-free 888-844-3393. We're the company that's for you on the internet and in person.
Tools used
21mm Socket
Flat Blade Screwdriver
Ratchet
15mm Socket
Torque Wrench
Rust Penetrant
18mm Wrench
Hammer
19mm Socket
Jack Stands
1. Removing the Wheel
Loosen the lug nut covers with a 19mm socket
Pry off the center cap with a flat blade screwdriver
Loosen the lug nuts with the vehicle on the ground
Raise the vehicle with a floor jack
Secure the vehicle on jack stands
Remove the lug nuts
Pull off the wheel
2. Removing the Front Strut
Spray the lower and higher strut bolts with penetrating oil
Remove the two of the upper 15mm strut bolts
Remove the two 21mm nuts from the bottom of the strut and knuckle
Hammer the bottom of the strut to loosen the bolts
Remove the nuts and hammer the bolts out
Pull the wheel knuckle forward and push the strut back
Remove the two of the upper 15mm strut bolt
Remove the rear shock strut
3. Inserting the Front Strut
Insert the strut into place
Replace the upper 15mm strut bolts by hand
Push down on the knuckle and place the strut behind it
Push the strut onto the knuckle
Insert the 21mm bolts into the bottom of the strut and knuckle
Hammer the 21mm bolts in and tighten them
Torque the 21mm bolts to 130 ft/lbs
4. Reattaching the Wheel
Slide the wheel into place
Start the lug nuts by hand
Tighten the lug nuts preliminarily
Lower the vehicle to the ground
Tighten the lug nuts
Tighten the lug nuts to 100 ft/lbs in a crossing or star pattern
Tighten the three 15mm bolts at the top of the strut
Tighten the lug nuts to 30 ft/lbs
Reattach the center cap
Tighten the lug nut covers with a 19mm socket
Brought to you by 1AAuto.com, your source for quality replacement parts and the best service on the Internet.
Hi, I'm Mike from 1A Auto. I hope this how-to video helps you out, and next time you need parts for your vehicle, think of 1AAuto.com. Thanks.
In this video, we're going to show you how to replace a front strut on this 2003 Chevy Monte Carlo. It's the same part and similar process on these Monte Carlos from 2000 to 2005. We show you on the passenger's side, but the driver's side is the same procedure. The items you'll need include a new front strut from 1AAuto.com, a 15mm, 19mm, and 21mm socket and ratchet, an 18mm wrench, a hammer, a torque wrench, penetrating oil, and jack and jack stands.
Start off by using a 19mm socket to loosen up these lug nut caps and pull your hubcap free. If you have air-powered tools, you want to lift the vehicle and remove the lug nuts. If you don't have air-powered tools, you want to keep the vehicle on the ground, loosen the lug nuts, raise the vehicle, and then remove the lug nuts the rest of the way. Then just pull your wheel free.
Spray these two strut bolts with some penetrating oil, and do the same thing for these three up here. Remove the nuts on top. You want to leave one of them in place just to hold the strut until you take the lower part apart. Put an 18mm wrench on one side, and use a 21mm socket and ratchet on the other. You may need a piece of pipe for some extra leverage. Then just loosen up those two nuts.
Just another quick note here our car does not have ABS. If you do have ABS, there will probably be another couple of brackets you need to remove first. Hammer the knuckle in between the two posts of the strut, and then remove those nuts the rest of the way. Then just hammer out the bolts. Pull the bolts the rest of the way free. Now, pull your wheel knuckle forward, push the strut back and angle it down, and then remove that nut that you put back on finger-tight up top. Then pull your strut down and out.
On the bottom is the old strut; above it is the new strut from 1A Auto. You can see they're identical and they'll fit exactly the same. Take your new strut, feed it back up into place, and just replace those nuts by hand at the top of the strut. Push the strut back behind the wheel knuckle, and then push the wheel knuckle into it.
Then replace those two bolts as far as you can. You will have to maneuver it around a bit to get the holes to line up. Then use a hammer and put them in. When they have about this much space left, you can just use the nut to pull them the rest of the way through. So just replace the nuts and then tighten these up. Now torque these two bolts to 130 foot-pounds.
Replace the wheel and then replace and tighten up those nuts in a crossing pattern. Torque each of them to 100 foot-pounds in a crossing pattern. We'll fast-forward as Mike tightens those three nuts at the top of the strut. Torque each of these to 30 foot-pounds. Replace your hubcap, tighten up your lug nut caps, and then you're all set.
We hope this video helps you out. Brought to you by www.1AAuto.com, your source for quality replacement parts and the best service on the Internet. Please feel free to call us toll-free, 888-844-3393. We're the company that's here for you on the Internet and in person.
171661
In Stock
Product Reviews
Loading reviews
There are no reviews for this item.
Customer Q&A
Will this fit the 2003 Monte Carlo SS model with ABS?August 5, 2022
Gary M
10
Hello, this is listed to fit 200-2007 Chevrolet Monte Carlo (without 18 Inch Wheels)
August 5, 2022
Ricale A
Customer service
877-844-3393
Monday - Friday 8:00am - 9:30pm ET Saturday - Sunday 8:00am - 4:30pm ET
Enter Vehicle Year Make Model
Specify your vehicle's year, make and model to guarantee fit.
Year
Make
Model
Options
Drivetrain
This part doesn’t fit a . Select from parts that fit.