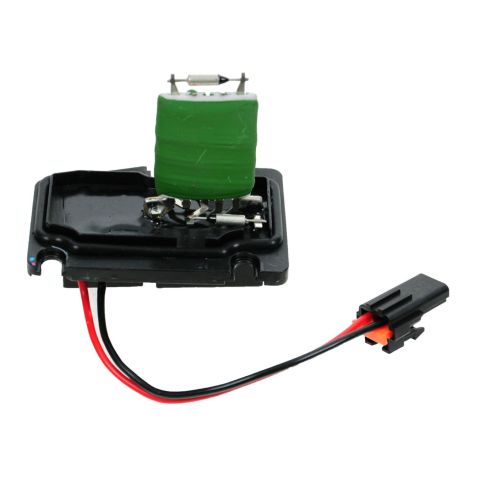
1AHBR00018-Chevrolet Buick Pontiac Olds Blower Motor Resistor TRQ HCA41507

Replaces
1997 Buick Century with Manual Temperature Control Blower Motor Resistor TRQ HCA41507

Frequently bought together
Difficulty:
Product Reviews
Loading reviews
4.20/ 5.0
15
15 reviews
Blower Motor Resistor
January 26, 2017
The fan works on all speeds again and wasn't to hard to put in as long as you have the right tools.
the end of the resister bent and the solder broke off
August 11, 2017
This damage could of happen in shipping. I was able to solder the end of the resister back on. I had the under dash apart so I could not wait to have a new one shipped so I was able to repair the part. So far the Blower Motor fan speeds work fine at this time.
I value the videos that 1AAuto has and it is of great help to repair my vehicle.
second resistor worked
September 18, 2017
The first resistor came quickly and blew fuses when the fan was turned to high. The second resistor came and has worked as is it supposed to. Customer service was good. Delivery time each time was quick. Just wish the first resistor would have worked.
Great
November 2, 2017
Item was exactly what I needed. Contacted customer service with few questions. I got a quick respond. The website is also easy to navigate. Prices are very reasonable also compared to the big name part stores.
Excellent Replacement Part
January 5, 2018
Did the replacement and it works perfectly. Be advised though that trying to remove this part, which is located right against the firewall, behind the blower motor is very difficult. I eventually had to go to a Goodyear auto place where a much younger, shorter and more flexible fellow was able to get it out. One of the screws is almost completely hidden by the part itself and right against the firewall and you will have a tough time getting at it but it is possible. VERY awkward to get at the screws to take it out!
Fixing 2000 Chev Impala Blower Switch
March 6, 2018
Part works as described and I am a very happy customer. Thank you. ;)
hard to install
September 16, 2018
I enjoyed the video on installing the part and realize all cars have little differences but this part is hard to extract on my model. I was able to disconnect the wires and plug in this new part with no success in blower function. I'm still trouble shooting the problem . I might need to order a blower motor from you.
November 5, 2018
They sent the correct part , it snapped right in. Sales people were very helpful . I will buy from you guys again . Recommend 1Aauto to my friends.
2002 Chevy Impala blower motor resistor and air filter for cabin
May 5, 2020
The products that I receive from A1 Auto are great and they fit with no problems. I watch their videos to make sure it is something that I can fix. A1 Auto is an awesome company that I recommend to everyone that ever needs parts to fix their automobile. Thank you for providing great products and customer service.
Replaced the resistor on Chevy Monte Carlo SS
August 18, 2020
I followed the 1A Auto instructions on U-tube for a ez fix on my Chevy Monte Carlo SS. Love my AC again.
October 11, 2021
Cured my crazy blower in my 2000 Corvette
Fire Hazard
January 9, 2022
Original resistor in my 2000 Monte Carlo went bad. Replaced with this one. Worked for 4 days and then not only quit working but also started smoking and nearly caught my vehicle on fire.
From "In Over My Head" to "Shining Moment"
May 7, 2022
I am definitely way too large to be diving under the glovebox in my car but after a few existential crises, I was able to swap the part no problem.
PRO TIP: I watched the accompanying video for how to swap these parts, and I found that the list of specific socket sizes needed was a little inaccurate (but close enough). If this is a repair that also causing you to buy your first set of auto tools, be sure to get an wide range of socket sizes.
Worked great
January 3, 2023
Worked great for me. Unfortunately I should have replaced the blower motor too and burnt out the new resistor. Will order again.
Don't go to ebay to save fifty cents. Use 1A.
August 17, 2024
Great price and it worked perfectly.
Customer Q&A
So if you need a motor in your car will this fix it?
August 7, 2017
10
No this will fix the resistor
August 8, 2017
Aaron S
10
No. When this resistor fails it causes the motor to work on high speed only. If the motor doesn't work at all then check the fuse at your fuse panel or check for voltage at motor plug with volt meter. If the fuse is good and or you have 12 volts at the motor plug then motor is probably no good and needs to be replaced.
August 8, 2017
Jeff G
10
I've changed the resistor, and the motor
but it did not help me.
August 8, 2017
Frank L
10
Depending on the reason for fault, this will replace the resistor. There is a separate component for the blower motor but in some cases the motor will not operate on certain speeds because of this resistor.
August 8, 2017
Alex P
10
Ok, so if your blower motor only works on one or two of the motor speeds or if it went out gradually then its probably the resistor. Seldom does the motor go out. Its a fairly easy fix, but watch the video on utube it really helps.
August 8, 2017
William M
Does this fit a 2000 Impala 3.8V LS ?
August 31, 2017
I have a 03 Monte Carlo SS and i need a blower motor resistor with climate control do I have to get one with climate control what will happen if I dont get that one?
May 27, 2019
10
The resistor adjusts the fan speed by altering the amount of current to the blower, I would get the proper resistor if it is available. Be advised, replacing the resistor in my 99 Buick Century was a bitch as it is located right against the firewall and was VERY hard to replace. Hope yours is more accessible.
May 27, 2019
Richard M
Buick is a registered trademark of General Motors Company. 1A Auto is not affiliated with or sponsored by Buick or General Motors Company.
See all trademarks.


