WARNING: Cancer and Reproductive Harm - www.P65Warnings.ca.gov.
Lifetime Warranty
This item is backed by our limited lifetime warranty. In the event that this item should fail due to manufacturing defects during intended use, we will replace the part free of charge. This warranty covers the cost of the part only.
FREE Shipping is standard on Orders shipped to the lower 48 States (Contiguous United States). Standard shipping charges apply to Hawaii, Alaska and US Territories. Shipping is not available to Canada.
Expedited is available on checkout to the United States, excluding Alaska, Hawaii and US Territories as well as P.O. Boxes and APO/FPO/DPO addresses. Final shipping costs are available at checkout.
How to Replace Cabin Air Filter 2000-13 Chevy Impala
How to Replace Cabin Air Filter 1998-2002 Oldsmobile Intrigue
How to Replace Cabin Air Filter 2000-13 Chevy Impala
How to Replace Cabin Air Filter 2000-07 Chevy Monte Carlo
Created on:
Tools used
Adjustable Wrench
Flat Blade Screwdriver
1. Remove the Cabin Air filter
Pop the hood.
Clear out the upper cowl area of debris.
Remove the plastic thumb screw at the top of panel above the cowl.
Pry the push clip at the corner up, laying down your wrench to give your flat blade screwdriver leverage.
Pull up the plastic cover and remove the filter.
2. Install the new filter.
Put the new filter in, lining up the filter in accordance to the arrows.
Secure the plastic panel with the push clip and thumb screw.
Close the hood.
Brought to you by 1AAuto.com, your source for quality replacement parts and the best service on the Internet. Hi, I'm Mike Green. I'm one of the owners of 1A Auto. I want to help you save time and money repairing and maintaining your vehicle. I'm going to use my 20+ years' experience restoring and repairing cars and trucks like this, to show you the correct way to install parts from 1AAuto.com. The right parts, installed correctly; that's going to save you time and money. Thank you, and enjoy the video.
In this video, we're going to replace the cabin air filter in this 2002 Chevy Impala. The only tools you'll need are a screwdriver and maybe a wrench for some leverage. This is similar for various GM vehicles. Start by vacuuming out the upper cowl area, just to get that debris out, so it doesn't end up falling in. I'm going to pull this weather strip off about half way. This is your washer line; just kind of take that off. Then there's a clip right here, and you just kind of spin. It's got a little mark for a screwdriver, if you need to. There's a little clip right up here in the corner, OK? I'm just going to take a wrench. Take any old wrench, and just kind of put it there. It just gives me a point to pry with, with my screwdriver. There's a little tab right in the middle of that clip. I'm trying to pry that up with the screwdriver.
You have to work it up, and then that pin comes out. You get down in there, and pry the clip out as well. I've got my new filter. I take a screwdriver and just kind of gently pry up on this plastic. It just kind of sticks a little bit. Your filter's right down here. Pull it up. You can see, this one's pretty ugly. Here's the new one from 1A Auto. It does have an air flow indicator. The air obviously goes down and in, so you want to make sure that the air flow arrows are pointing down. You just kind of put that in place. Just kind of reaching in, and lifting up on that corner a little bit. You just kind of just do that, kind of reach in there and muscle it just a little bit. You can see it's all down and in correctly. It pretty much just sits in there, and the suction from your fan just kind of holds it in place. Put this back down. You just put it on; press it right on. Take the larger part of your clip first, push it in. The pin locks it. Take your washer hose, make sure it's back in its clips. Put your gasket back on.
We hope this helps you out. Brought to you by www.1AAuto.com, your source for quality replacement parts and the best service on the Internet. Please feel free to call us toll free, 888-844-3393. We're the company that's here for you on the Internet, and in person.
Tools used
Flat Blade Screwdriver
1. Accessing the Cabin Air Filter
Pull off the hood cowl gasket
Pull the windshield washer fluid tube out of its clips
Remove the rubber plug from the cowl with a flat blade screwdriver
Remove the second plug, if you have one
Pull the cowl aside
2. Removing the Cabin Air Filter
Pull the air filter panel up and out
Pull the air filter up and out
3. Installing the New Cabin Air Filter
Push the new cabin air filter into place with the black tabs on top
Push the air filter panel into place
Clip in the air filter panel
4. Reinstalling the Hood Cowl
Push the cowl down into place
Insert the rubber plug into the cowl
Push the washer fluid tub onto its clips
Push on the cowl gasket
Brought to you by 1AAuto.com, your source for quality replacement parts and the best service on the Internet.
In this video, we're going to replace the cabin air filter on this '99 Oldsmobile Intrigue. The only tool you'll need is a flat blade screwdriver.
You want to pull this gasket up, and take your washer tube out of place. Use a regular screwdriver. For this little plug, turn it counterclockwise, and it comes off. Additionally, you'll see a red arrow there. It's pointing to a little hole. There may be another plug on your vehicle. I'm not sure. I kind of realized it afterwards. I just wanted to point it out. My vehicle did not have a plug there, but maybe yours will. I'm not sure if somebody took mine apart before and then forgot to put it back in. Then, starting up on this corner here, you pull this up, and there's some adhesive that sticks it to the windshield. Pull it up. Pull this out right here. At this point, now you can see down in, grab hold of the cabin air filter. It's got you a little tab right here. There it is. This one is pretty ugly.
The new one from 1A Auto is going to go in there. It's going to allow a lot more air in, a lot cleaner. Put it down in, the black tabs go up on top. You can see there it is, resting correctly. Now, you can see this panel clips in afterwards. So you're going to push this back down into place, and this little retainer just pushes on. Put your washer tube back into place.
We hope this video helps you out. Brought to you by www.1AAuto.com, your source for quality replacement parts and the best service on the Internet. Please feel free to call us toll-free, 888-844-3393. We're the company that's here for you on the Internet and in person.
Tools used
Flat Blade Screwdriver
Needle nose pliers
1. Removing the Cabin Air Filter
Remove the two plastic clips from the hood cowl with pliers or a flat blade screwdriver
Pull back the hood cowl weatherstrip
Pull off the hood cowl
Pull off the air filter panel
Pull out the cabin air filter
2. Installing the New Cabin Air Filter
Put the air filter into place with the air flow arrows pointing down
Put the air filter panel into place
Put the hood cowl into place, starting at the middle
Push the two plastic clips into the hood cowl
Push on the cowl weatherstrip
Brought to you by 1AAuto.com, your source for quality replacement parts and the best service on the Internet.
Hi, I'm Don from 1A Auto. I hope this how-to video helps you out, and next time you need parts for your vehicle, think of 1AAuto.com. Thanks.
In this video, we're going to replace the cabin air filter on this 2006 Chevy Impala. It's pretty much the same for any 2006 to 2013 Impala. You'll either need a pair of needle nose pliers or a flat blade screwdriver.
There are two clips. Actually, after you open the hood, there are two clips there, and then another one further over there. How you want to remove those is, we're going to use pliers. You can use a screwdriver. Pull up and pull out the middle of the clip. Then pull the clip up and out. Repeat that for the other one. Pull your rear hood lip weatherstrip back carefully. This panel lifts right up. You have to kind of slide it to the side and forward. Just be careful of the washer line, not to break it. There's another small panel there to pull out. Your cabin air filter's right there. You can see the one on this vehicle's quite dirty.
A new filter from 1A Auto is obviously nice and clean. The filter has air flow arrows on it. You want those arrows pointing down. Just place the filter back on top of its mounting area. Make sure it's seated down correctly. Then put the two plastic panels down in. Just make sure they seat correctly. The top panel can be a little difficult. You want to put it into the middle first and then pull that little leg by the hinge of the hood and get it into place. Then put your clips back in place. Finally, replace the rear hood weather strip.
We hope this video helps you out. Brought to you by www.1AAuto.com, your source for quality replacement parts and the best service on the Internet. Please feel free to call us toll-free, 888-844-3393. We're the company that's here for you on the Internet and in person.
Tools used
Flat Blade Screwdriver
Vacuum
1. Removing the Cowl Panel
Remove the weatherstrip
Remove the washer lines
Remove the clips from the cowl panel by prying up the center with a flat blade screwdriver
Place the cowl panel aside
2. Removing the Air Filter
Clean up the area with a vacuum
Pull the air filter up and out
3. Installing the New Air Filter
Insert the cabin air filter into its slot
Make sure the arrow is pointing down
4. Installing the Cowl Panel
Insert the cowl panel
Push the center down on the clips
Re-clip the washer hose
Re-clip the weatherstrip
Brought to you by 1AAuto.com, your source for quality replacement parts and the best service on the Internet.
Hi, I'm Mike from 1A Auto. I hope this how-to video helps you out, and next time you need parts for your vehicle, think of 1AAuto.com. Thanks.
In this video, we're going to show you how to replace a cabin air filter on this 2003 Chevy Monte Carlo. It's the same part and process on these Monte Carlos from 2000 to 2005. The items you'll need include a new cabin air filter from 1AAuto.com, a flat blade screwdriver, and a vacuum.
Remove your weatherstrip and your washer lines. Now, you want to remove that clip and the one over there, but you can see ours is missing. To remove these clips, just pry up the center, pull it up, and then pry out the bottom. Then for this clip right here, you want to twist it out with a flat blade screwdriver while prying up with another screwdriver. You only need to pry lightly; you don't want to break the clip. Then it pulls free, and then you can lift this panel up and tuck it aside.
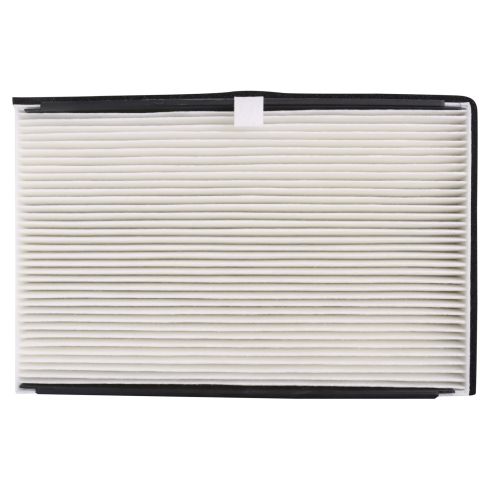
Right here is your cabin air filter. You can see ours is in really bad condition, and this is where we recommend you use a vacuum to clean up the area. In this case, just clean it with the vacuum. Then pull your cabin air filter up and out. On the left is the old cabin air filter; on the right is the new one from 1A Auto. You can see they're identical, and they'll fit exactly the same.
Take your new cabin air filter, and you want the arrow pointing down. Then feed it back into place. Then replace that cowl panel and this clip with the center still up, and then push the center down to lock it. Then re-clip your washer hose back onto those panels, and the same with your weatherstrip. Then push this clip back down into place.
We hope this video helps you out. Brought to you by www.1AAuto.com, your source for quality replacement parts and the best service on the Internet. Please feel free to call us toll-free, 888-844-3393. We're the company that's here for you on the Internet and in person.
CFA18316
In Stock
Product Reviews
Loading reviews
There are no reviews for this item.
Customer Q&A
No questions have been asked about this item.
Customer service
877-844-3393
Monday - Friday 8:00am - 9:30pm ET Saturday - Sunday 8:00am - 4:30pm ET
Buick is a registered trademark of General Motors Company. 1A Auto is not affiliated with or sponsored by Buick or General Motors Company.See all trademarks.
Enter Vehicle Year Make Model
Specify your vehicle's year, make and model to guarantee fit.
Year
Make
Model
Options
Drivetrain
This part doesn’t fit a . Select from parts that fit.