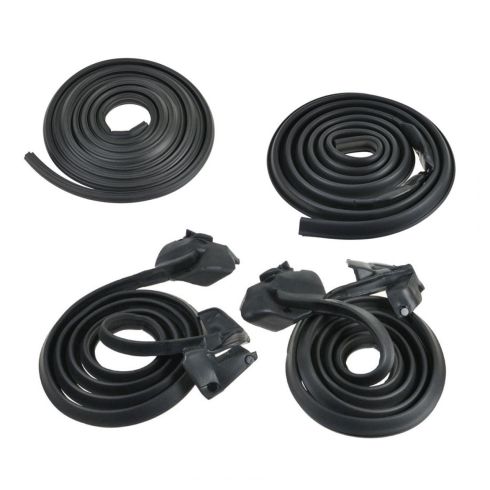
Kit Includes: (1) Trunk Weatherstrip Seal (2) Door Weatherstrip Seals (2) Roofrail Weatherstrip Seals
Specification
Body Type
Hardtop
Number of Doors
2 Door
Complete Repair in One Purchase - Stop searching for parts individually and complete your repair with a customized kit or set from DIY Solutions.
High-Quality Parts from Trusted Brands - DIY Solutions' kits and sets are selected from the best automotive brands and include hard-to-find and even obsolete parts you may need for your vehicle.
Guaranteed Fit - DIY Solutions ensures its selected parts are quality-tested to guarantee fit and function.
Item Condition:New
Attention California Customers:
WARNING: Cancer and Reproductive Harm - www.P65Warnings.ca.gov.
Lifetime Warranty
This item is backed by our limited lifetime warranty. In the event that this item should fail due to manufacturing defects during intended use, we will replace the part free of charge. This warranty covers the cost of the part only.
FREE Shipping is standard on Orders shipped to the lower 48 States (Contiguous United States). Standard shipping charges apply to Hawaii, Alaska and US Territories. Shipping is not available to Canada.
Expedited is available on checkout to the United States, excluding Alaska, Hawaii and US Territories as well as P.O. Boxes and APO/FPO/DPO addresses. Final shipping costs are available at checkout.
How to Replace Trunk Weatherstrip Seal w Adhesive 1982-92 Chevy Camaro
Created on:
Tools used
13mm Socket
8mm Socket
Ratchet
Assistant
1. Removing the Trunk Seal
Pull the trunk seal seam apart
Pull the seal off
2. Cleaning the Trunk Seal Mounting Area
Remove the four 13mm bolts from the trunk glass
Remove the two 8mm bolts from each hatch strut
Pull off the hatch struts
Lower the trunk
Have an assistant help you lift the trunk glass up and off
Clean the trunk seal mounting area
Remove any glue residue from the trunk seal mounting area
3. Installing the New Trunk Seal
Apply adhesive around the trunk seal mounting area
Press on the new trunk seal
4. Reinstalling the Trunk Glass
Have an assistant help you lift the trunk glass into place
Put the hatch struts into place
Insert the two 8mm bolts into each hatch strut
Insert the four 13mm bolts into the trunk glass
Brought to you by 1AAuto.com, your source for quality replacement parts and the best service on the Internet.
Hi, I'm Mike from 1A Auto. I hope this how-to video helps you out, and next time you need parts for your vehicle, think of 1AAuto.com. Thanks.
In this video, we're going to show you how to remove the rear hatch weather strip on this 1986 Camaro Iroc Z, same as any '82-'92 Camaro or Firebird Trans Am, etc. No tools are necessary. You will need some adhesive to put your new seal back on. We do show you how to remove the hatch so you can clean up in the upper area between the hatch and the roof of the vehicle which is sometimes hard to clean. For that you will need a 13 millimeter socket and ratchet, an 8 millimeter socket and ratchet, as well as someone to assist you in lifting off the glass.
This could be a really short video, and to some people it's going to be simple, but to some that don't know all this seal just does, there's usually a seam in it right here. Pull that seam apart. It looks like they did use some adhesive. Just pull the seal right up and off.
To remove this glass, there are four 13 millimeter bolts. I'm going to undo them up in here, in the top of the body of the car. Now, you may ask why I'm taking the hatch off. To be honest with you it's: 1, because we're going to paint this car, and 2, really in order to reinstall this seal correctly you should take the hatch off and really clean up, up above on the roof. Lots of times a whole bunch of debris and dirt and stuff gets in there. It just makes it easier to glue it down and get it on there right. Now, you might think with the third brake light on there, there's some wiring, but there's not. That's what this switch is right here. The third brake light is actually wired through the window and this switch just hits contact down on the vehicle. I've got those four bolts undone. Now I'm going to undo these. These struts won't come off until you take them off. What I mean by that is you can unbolt them and they're not just going to flop off. They'll stay there until you want them to come off. Disconnect the defrost lead. Disconnect the stop light lead. Now, probably, having a helper would be the best thing here. I'm going to remove this. Put the hatch down. Now, with an assistant, pull the glass up and off.
Now with the hatch off you can really clean this properly. You can see how much gunk builds up and stuff in there. Then put your weather strip back on. You'll want to do your best to get all this . it looks like it comes off pretty easy . all this residual glue off.
Then, you just put a bead of glue right up on top all the way around and then press your weather strip down on top of it.
We hope this video helps you out. Brought to you by www.1AAuto.com, your source for quality replacement parts and the best service on the Internet. Please feel free to call us toll-free, 888-844-3393. We're the company that's here for you on the Internet and in person.
WSS00632
In Stock
Product Reviews
Loading reviews
There are no reviews for this item.
Customer Q&A
No questions have been asked about this item.
Customer service
877-844-3393
Monday - Friday 8:00am - 9:30pm ET Saturday - Sunday 8:00am - 4:30pm ET
Chevrolet is a registered trademark of General Motors Company. 1A Auto is not affiliated with or sponsored by Chevrolet or General Motors Company.See all trademarks.
Enter Vehicle Year Make Model
Specify your vehicle's year, make and model to guarantee fit.
Year
Make
Model
Options
Drivetrain
This part doesn’t fit a . Select from parts that fit.