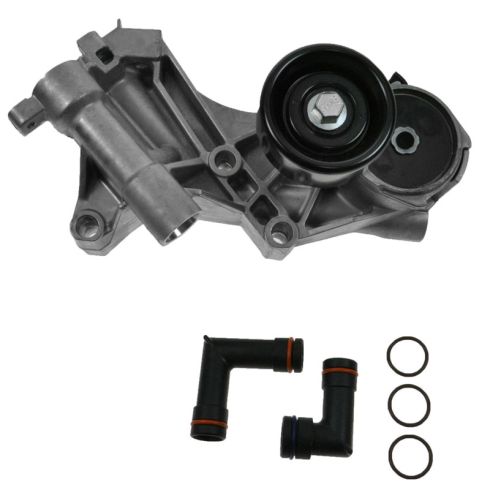
This item is backed by our limited lifetime warranty. In the event this item should fail due to manufacturing defects during intended use, we will replace the part free of charge. This warranty covers the cost of the part only.
FREE Shipping is standard on Orders shipped to the lower 48 States (Contiguous United States). Standard shipping charges apply to Hawaii, Alaska and US Territories. Shipping is not available to Canada.
Expedited is available on checkout to the United States, excluding Alaska, Hawaii and US Territories as well as P.O. Boxes and APO/FPO/DPO addresses. Final shipping costs are available at checkout.
How to Replace Serpentine Belt Tensioner with Heater Hose Elbows 2000-05 Chevy Impala
Created on:
Tools used
Funnel
13mm Socket
Socket Extensions
15mm Socket
Bent Tipped Awl
8mm Socket
Drain Pan
10mm Socket
Ratchet
1. Disconnect the battery
Disconnect the negative battery cable using your 8mm wrench
2. Move the coolant tank out of the way
Start out by removing the two 13 mm bolts that hold the strut brace on the passenger's side
Remove the two 10 mm bolts using your socket and ratchet.
Pull the coolant tank out and set to the side; there’s no need to disconnect it, just take care not to spill any coolant.
3. Loosen the alternator and tensioner
Remove the 15 mm nut on the top of the alternator.
Remove the oil cap.
Pull off the cover.
Use a 3/8 ratchet to release the tension on the serpentine belt and remove the belt.
Remove the three 15 mm bolts securing the belt tensioner.
Pull the alternator and tensioner pulleys out of the way a bit and remove the coolant elbow.
Remove the old O rings and any debris from the old coolant elbows.
4. Install the new coolant elbows.
Use some penetrating oil to help seat the O rings and install the new coolant elbows.
Bolt the tensioner and alternator in place.
Put the serpentine belt back on, using a ratchet handle on the tensioner to get it onto the pulleys.
Put the cover and oil cap back on.
Use a 10 mm and 13 mm sockets and ratchet to bolt the coolant tank back in place.
Reconnect the battery using an 8 mm socket and ratchet or wrench.
Brought to you by 1AAuto.com your source for quality replacement parts and the best service on the internet. Hi I'm Mike Green; I'm one of the owners of 1A Auto. I want to help you save time and money repairing and maintaining your vehicle. I'm going to use my 20 plus years experience restoring and repairing cars and trucks like this to show you the correct way to install parts from 1AAuto.com. The right parts installed correctly, that's going to save you time and money. Thank you and enjoy the video.
In this video we're going to show you how to replace the plastic coolant elbows. This is a 2002 Impala, 3.8 liter motor. This is the engine, the 3800 series engine that is in a whole bunch of different GM vehicles and when these things start to crack they just slowly drip coolant onto the engine and it evaporates so you have a leak and you loose coolant but it doesn't ever appear that you're leaking anywhere. Tools you'll need are 8, 10, 13, and 15 mm sockets with a ratchet and extension. You'll need a bent tip awl or a pick and that's to just kind of pull the broken pieces of the elbow out of either the intake manifold or the serpentine belt tensioner and then some extra coolant and a funnel and as well as a catch pan.
The one place you want to check for leaking fluid is this tube right here. It's a little elbow that comes from the intake manifold and goes into the belt tensioner. Disconnect your negative battery cables. Start out by removing the two 13 mm bolts that hold the strut brace on the passenger's side. Now there are two 10 mm nuts that hold the top of your coolant tank and then once you have those out you lift the tank up and you can actually just leave it connected and just lay it on the front of the engine. Just make sure you don't spill any coolant out of it.
Remove the 15 mm nut on top of the alternator. Untwist the oil fill tube, take this off and then loosen a 10 mm bolt right back here just on the other end of the brace. Then down here there are two bolts. You can see one 15 mm bolt right there and then there's one down lower as well. I'm sure I can really get the camera on it. From this angle here you can just see the head right here. Then there's also a bolt right down in here which I can't really film but it's just kind of down below and behind the alternator. Use a 15 mm socket with a ratchet and extension, this little one first.
Just going to fast forward here as we remove the three bolts that hold that tensioner in place. You can see that the whole when we remove ok you've got two connections, you've got that one up here you can see and then there's one down into the block right there. You need to kind of lift this up and out. See then there's our problem. You reach in and pull out the O ring that's in the manifold and this one is kind of broken here that in our tensioner I believe. The top elbow is broken both on the manifold side and the belt tensioner side so carefully you want to use the bent tipped awl and remove all the pieces of the elbow from both of the manifold and the tensioner. Luckily the bottom elbow came right out of both the engine and the tensioner with no problems.
Going to use our new lower elbow and just put a little bit of penetrating oil on it just to make sure that the O ring can go in there without catching. Just put it in, inserting with kind of a twist and it's all right there. Take my elbow and screw it into the intake manifold. I've got penetrating oil on both sides; little twist, goes right in nicely. Make sure both ends and the elbows are coated. Here I have my bolts in the bracket and I've guided it on to the elbows. Basically I'm using that flashlight looking in behind and that way I can see the upper bolt, I can see as it comes through the belt tensioner and look it right into the head and start it with my fingers.
Here I'm just going to fast forward, I'm going to put in my other two bolts and then just kind of snug tighten with the ratchet and socket and then I'll just show you everything as it's put together before we tighten it up. Now I've got that elbow in place, it's a little hard to see but it's the elbow down there in place and I've got my three bolts started. Now I'm just going to use the socket and ratchet to tighten those up and they should be torched up to anywhere between 25 and 30 foot pounds of torch. We're going to follow the serpentine belt diagram so we're going to put a loop down around the crank here and then around the AC pulley. Get it around our power string pump and up and over. The only thing we won't put on at first in the alternator. Take a loop and put it down around the crank pulley, continue it down around the AC pulley; it comes up from the crank pulley, goes around our water pump, around our tensioner and down around our steering pulley. Almost got it preliminarily routed, a little off here on our AC pulley, on the crank pulley directly and now on the power steering pulley correctly; I guess we'll just have to go up onto the alternator. If you don't have a long ratchet, what you can always do, put that 15 mm socket on there, put a nice big pipe right here that gives you a lot of extra leverage. That came off my power steering pulley. Pull that tight.
I do apologize here, you use the pipe and the ratchet to turn the belt tensioner counter clockwise and then put the belt up and around to the alternator. The belt is on my AC compressor correctly, down and around the crank correctly, power steering pump up and around. Just going to kind of speed through here, one of the last steps which is putting that coolant bottle back in place and then using the 13 mm nuts to hold down the brace and the 10 mm nuts to fasten the coolant bottle on. Now you want to fill the radiator directly on this Impala. It originally uses the Red Dex cool but it's already been changed over to the green so I'm just using the regular green antifreeze. You want to fill the radiator directly and then start it up, run it and check the fluid and just fill it the rest of the way through the overfill bottle. For the first few times you drive it just pay attention to it and make sure you keep the right amount of fluid in it.
Reconnect your negative battery cable. You can see engine is running, nothing dripping from there, I do see a little steam, that's just kind of the stuff burning off that spilled on the engine and stuff. No drips underneath, couple little residue in one spot, again from what spilled on the body and whatnot.
We hope this helps you out, brought to you by www.1AAuto.com your source for quality replacement parts and the best service on the internet. Please feel free to call us toll free 888-844-3393. We're the company that's here for you on the internet and in person.
419-014
In Stock
Product Reviews
Loading reviews
5.00/ 5.03
3 reviews
5 Stars
4 Stars
3 Stars
2 Stars
1 Star
3
0
0
0
0
proper install
John
August 14, 2016
I found after doing three of these type of jobs it is very easier to completely remove the alternator in order to install the tensioner. Also not shown in the video is to completely clean the sockets that the elbows go into. This can only be done with complete removal of tensioner. A repair video like this must show this procedure otherwise the person doing it will have a comeback due to improper install ( leaks )
1A auto is always my 1st choice.
Lawrence
January 1, 2019
I always look at 1A auto when looking for my automotive parts needs. Seems like I can always find what I am looking for. I love your videos also. You make my life easier and I do recommend
you often.
You deliver!!!
Thanks for all that your staff do for the public.
Larry
Kris
December 9, 2022
Worked perfectly
Customer Q&A
Does this part come with the heater hose fittings not the coolant bypass elbows?September 18, 2016
John Z
10
This part comes with the heater hose elbows as pictured.
September 20, 2016
Derek C
10
No. I had to transfer the heater hose fittings from the old Pulley.
September 20, 2016
Ted G
10
comes with elbows NO hose fittings
September 21, 2016
Iris G
How do you replace the 90 degree elbow ?June 28, 2021
John D
10
We currently do not have a how-to video on replacing the elbows, but they are just a press fit. We're constantly adding new installation video instructions. If we do not have one for your vehicle on the product listing page, please check again at a later time or check our Video Library to see similar repairs here: https://www.1aauto.com/videos
June 29, 2021
T I
does it enclude the elbow into the intake?August 28, 2023
Christopher B
10
Yes, this will include the elbow.
August 31, 2023
Emma F
Customer service
877-844-3393
Monday - Friday 8:00am - 9:30pm ET Saturday - Sunday 8:00am - 4:30pm ET
Buick is a registered trademark of General Motors Company. 1A Auto is not affiliated with or sponsored by Buick or General Motors Company.See all trademarks.
Enter Vehicle Year Make Model
Specify your vehicle's year, make and model to guarantee fit.
Year
Make
Model
Options
Drivetrain
This part doesn’t fit a . Select from parts that fit.