WARNING: This product can expose you to chemicals including Lead and Lead Compounds, which are known to the State of California to cause cancer, and birth defects or other reproductive harm. For more information, go to www.P65Warnings.ca.gov.
Lifetime Warranty
This item is backed by our limited lifetime warranty. In the event that this item should fail due to manufacturing defects during intended use, we will replace the part free of charge. This warranty covers the cost of the part only.
Returns: Parts with electrical components cannot be returned once installed.
FREE Shipping is standard on orders shipped to the lower 48 States (Contiguous United States). Standard shipping charges apply to Hawaii and Alaska.
Shipping is not available to a P.O. Box, APO/FPO/DPO addresses, US Territories, or Canada for this item.
Expedited is available on checkout to the United States, excluding Alaska, Hawaii.
Final shipping costs are available at checkout.
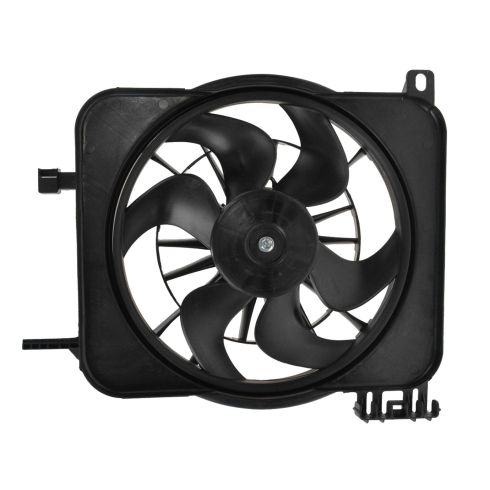
How to Replace Radiator Cooling Fan Assembly 1995-2003 Pontiac Sunfire
Created on:
Tools used
Flat Blade Screwdriver
8mm Wrench
10mm Wrench
1. Disconnect the battery
Use an 8 mm wrench to disconnect the positive battery terminal
2. Remove the AC condenser cooling fan
Remove the plastic panel at the edge of the engine bay above the radiator.
Use a pair of pliers or a screwdriver to pry up the pushclips to remove it.
Unbolt the four 10 mm bolts anchoring the radiator to allow for some extra room.
Raise and secure the vehicle.
Disconnect the AC cooling fan.
Remove the 10 mm bolts mounting the fan to the radiator.
Pull the old AC cooling fan up and out.
3. Install the new AC cooling fan
Put the AC cooling fan up and into place
Plug in the AC cooling fan to the wiring harness
Bolt the fan to the radiator and secure with the mounting rods.
Mount the Radiator back in and bolt in the four 10 mm bolts.
Clip the plastic cover in the engine bay above the radiator back into place.
Reconnect the battery with your 8 mm wrench.
Brought to you by 1A Auto.com, your source for quality replacement parts and the best service on the internet. Hi, I'm Mike Green. I'm one of the owners of 1A Auto. I want to help you save time and money repairing and maintaining your vehicle. I'm going to use my 20 plus years experience restoring and repairing cars and trucks like this to show you the correct way to install parts from 1AAuto.com. The right parts installed correctly, that's going to save you time and money. Thank you and enjoy the video.
In this video we'll be showing you how to remove and install the radiator fan in this 1997 Pontiac Sunfire, same as most '95 to '05 Cavaliers and Sunfires. You really only need a 10 millimeter wrench and a screwdriver or a set of pliers, and also an 8 millimeter wrench to disconnect the battery.
The first using either an 8 millimeter or a 5-16ths wrench, you want to disconnect the positive battery cables. That's the battery disconnected. You want to look here at the edge of the engine compartment. You want to remove this panel and it'll be a little different Cavaliers and what not. I'm just using the two screwdrivers I have here, using my flat edge screwdriver to pry up on these pins. Once you get the pins up the little clips come out and I'm going to get the right one with need a little pliers to I think 6 or 7 of these clips to this car. They've lost a few over the years. They've only have three left. Get this up and off. Now you want to remove these two 10 millimeter bolts at the outside of the radiator. This just allows your radiator to flex back and forth a little bit.
Now you want to look at now you want to see how the fan is installed. Basically right there you can see this there's a bar going across. That just pulls right out of this clip, okay. Then down there, there's another clip and this side of the fan can just pull up and off of the radiator. Then on this side underneath basically the radiator fan is just kind of hooked onto the radiator. Basically there's a bolt down bottom. You remove that bolt and then push the radiator fan up and it comes off of its mount. Now we'll raise and support the car and go from underneath. We are actually going to start up underneath the car and you can barely see with the camera angle, there's a 10 millimeter bolt right here that we're going to remove and have a socket and a ratchet with an extension like it's usually your best bet.
Then if you just want to use a regular screwdriver to help you remove the plug here. I'm filming the best I can. It's kind of a matter of lifting it up and off. I'm reaching up here to the top bar and kind of pushing it up and out of its mount. Then also pushing it up here, you just push that up and now you kind of have to push the fan up and get the top unhooked from the top of the radiator. Okay. Then once you do that, okay, just slowly bring it down. Be careful not to- the best way trying to get it down past here, this point here, without dragging against it against the fins of the radiator too much. Scoot it over so it comes down. Okay. Then it comes out. Then you can see you want to try and not let it scrape against the radiator and damage the fins too much.
Here's our original radiator fan. Here's our new fan from 1A Auto. You can see it's all exactly the same. These mounts over here are exactly the same. Okay. This clip up here where it goes over the radiator is exactly the same, and then where it plugs in, all the same. The new fan from 1A is going to plug in and works just like the original. This is car, there's nothing wrong with its fan. We install them and just put this old one back in.
You basically take the fan, first you want to make sure those get up over this brace here. You kind of feed it up in there a little crooked, and just pull that out of the way, get it back by your AC hose here. You can see it's a little tough getting it by the starter. I'm kind of trying to rotate the top backwards to keep it from scraping against the radiator, and just keep on kind of pushing it up in, and somehow push the top up so it clips onto the you may want to go up on top of the car to make sure that it clips onto the radiator correctly. Then over here make sure your top bars wind up and it just pulls right down in. Then while you're under here reconnect your switch. One note: this bottom bolt, okay, goes into a clip that actually clips to the bottom of the radiator. It fell off on this car. I'm actually going to have to try and lift up the radiator and get the clip back on. I'm going to up the radiator as much as I can and obviously if I'd done this before I'd put the fan on it would've been a lot better. And slide it in place. Just a regular screwdriver and wind it over some more and then get the bolt in, tighten it up. Now we can lower the car down. Go down from the top, I'm just grabbing the fan making sure it is one with the radiator and it is, so we can kind of put the radiator bracket back down in and 10 meter bolts should be tightened by about 15 foot pounds. Then put our plastic back on. Feed that underneath, sides are down in and then clip it in.
Okay, so we've reconnected the battery and I have the engine running and you can turn on the you can turn on your AC and I'll get the engine the fan going and you can see by those pliers down there and they're shaking, the fan is working correctly. Hit the AC button and then the fan will come on after probably about five to ten seconds.
We hope this helps you out. Brought to you by www.1AAuto.com. Your source for quality replacement parts and the best service on the internet. Please feel free to call us toll free 888-844-3393. We're the company that assists you on the internet and in person.
RFA83261
In Stock
Product Reviews
Loading reviews
5.00/ 5.04
4 reviews
5 Stars
4 Stars
3 Stars
2 Stars
1 Star
4
0
0
0
0
1A IS AWESOME
L
August 3, 2017
I thank you guys. You have encouraged us to repair our own vehicles. It really helps since one of our cars is a 2000 Sunfire.
Do you have repair video's on a 1985 corvette?
1ARFA00020-Radiator Cooling Fan Assembly
M
August 25, 2018
Installed and working straight off, Installed easy then taken off but that is another story.
Great replacement part
ALONZO
August 19, 2021
Fit perfectly and working well.
Works great.
John
February 1, 2022
Works great.
Customer Q&A
What kind of plastic is the cooling fan shroud made from??February 27, 2021
Angelia H
10
DIY solutions brand parts are manufactured by various aftermarket companies specifically for us and built to your vehicle's exact OEM specifications. We do not have the specifics available regarding the materials that are used for this product, but they are durable and will be similar to your originals.
March 3, 2021
T I
Customer service
877-844-3393
Monday - Friday 8:00am - 9:30pm ET Saturday - Sunday 8:00am - 4:30pm ET
Pontiac is a registered trademark of General Motors Company. 1A Auto is not affiliated with or sponsored by Pontiac or General Motors Company.See all trademarks.
Enter Vehicle Year Make Model
Specify your vehicle's year, make and model to guarantee fit.
Year
Make
Model
Options
Drivetrain
This part doesn’t fit a . Select from parts that fit.