WARNING: This product can expose you to chemicals including Lead and Lead Compounds, which are known to the State of California to cause cancer, and birth defects or other reproductive harm. For more information, go to www.P65Warnings.ca.gov.
Lifetime Warranty
This item is backed by our limited lifetime warranty. In the event that this item should fail due to manufacturing defects during intended use, we will replace the part free of charge. This warranty covers the cost of the part only.
FREE Shipping is standard on Orders shipped to the lower 48 States (Contiguous United States). Standard shipping charges apply to Hawaii, Alaska and US Territories. Shipping is not available to Canada.
Expedited is available on checkout to the United States, excluding Alaska, Hawaii and US Territories as well as P.O. Boxes and APO/FPO/DPO addresses. Final shipping costs are available at checkout.
How to Replace Engine Mount 1995-2005 Pontiac Sunfire
Created on:
Tools used
15mm Socket
Rust Penetrant
Ratchet
Needle nose pliers
1. Removing the Lower Engine Mount
Spray the bolts on the mount with penetrating oil.
Remove the pin from the wheel well to the mount.
Remove the two 15mm bolts.
Pull the engine mount free.
2. Replacing the Lower Engine Mount
Fit the engine mount into place.
Replace the two 15mm bolts.
Replace the pin in the wheel well.
Brought to you by 1AAuto.com your source for quality replacement parts and the best service on the internet.
Hi, I'm Mike Green. I'm one of the owners of 1A Auto. I want to help you save time and money repairing or maintaining your vehicle. I'm going to use my 20-plus years experience restoring and repairing cars and trucks like this to show you the correct way to install parts from 1AAuto.com. The right parts, installed correctly that's going to save you time and money. Thank you and enjoy the video.
In this video, we'll be showing you how to replace the lower engine mount, or engine isolator, on this 1997 Pontiac Sunfire, same as any '95 to '05 Sunfire or Cavalier. The only tools you'll need are some penetrating oil, a pair of pliers or a screwdriver, and a 15 mm wrench or socket and ratchet.
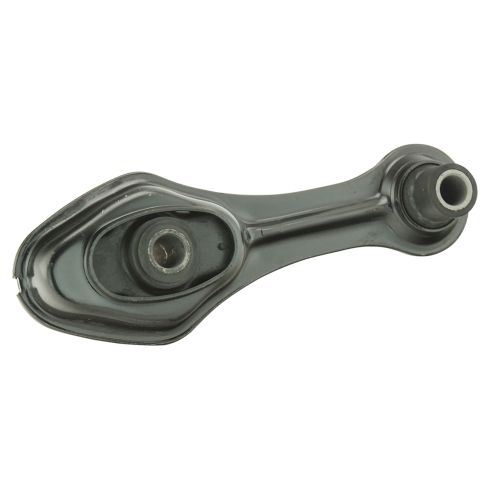
We're going to start underneath the front end here. This is your passenger front tire, and here's the mount, right here. That's called a dog-bone mount because it's kind of the shape of a dog bone. Next what you're going to do is use a little penetrating oil, trying to make our job as easy as possible.
Now looking at it from the tire, the tire being over here, there's a little pin right here that you'll want to reach up with some needle-nosed pliers or maybe a screwdriver, and you want to get that pin or get the pin out so we put it back together so you can pull the wheel well away there. Both these bolts, one here, and then this one here, both 15 mm bolts, take my 15 mm wrench. You don't need to worry about the engine falling down or anything. It's not going to happen. This is a mount, but it's a stabilizer mount. One bolt out. See, it's already pretty loose. There it is out. You can see, this has a little slot in it, so it should have some play back and forth. It's meant to be an isolator, an engine vibrator isolator. It's not meant to stop the engine, but you can see there's some cracking on that rubber and stuff, so it's time to be replaced.
Here's the original. Here's the new one from 1A Auto. You can see, this one is worn pretty good because this one is actually down a little further. The 1A Auto one's going to go right up in there. It's just going to be nice and new and probably hold the engine a little steadier and not let it make any clunking noises.
You put it back up in. The small side goes into the frame, kind of work it in there. Start the bolt in. Then lift the other side up in. Probably it's going to take a little bit of push I got push this the other way then it goes in pretty well. Then start them it actually is just a little I got to push the end in just a little bit get it started. Get one end snug. Should be probably about 50-60 foot pounds, which is this take your wrench there you go.
We hope this helps you out. Brought to you by www.1AAuto.com, your source for quality replacement parts and the best service on the internet. Please feel free to call us toll-free, 888-844-3393. We're the company that's here for you on the internet and in person.
MTA70557
In Stock
Product Reviews
Loading reviews
5.00/ 5.01
1review
5 Stars
4 Stars
3 Stars
2 Stars
1 Star
1
0
0
0
0
Good value.
Karl
June 3, 2022
It is a well made part and good value for the price. Easy to install. Thank you.
Customer Q&A
Does this fit automatic or manual transmissions or both?October 21, 2024
Richard D
10
Thank you for your inquiry! Could you please provide us with your 17-digit VIN?
October 22, 2024
Jean O
Customer service
877-844-3393
Monday - Friday 8:00am - 9:30pm ET Saturday - Sunday 8:00am - 4:30pm ET
Chevrolet is a registered trademark of General Motors Company. 1A Auto is not affiliated with or sponsored by Chevrolet or General Motors Company.See all trademarks.
Enter Vehicle Year Make Model
Specify your vehicle's year, make and model to guarantee fit.
Year
Make
Model
Options
Drivetrain
This part doesn’t fit a . Select from parts that fit.