Replaces
This part doesn’t fit a . Select from parts that fit.
Frequently bought together
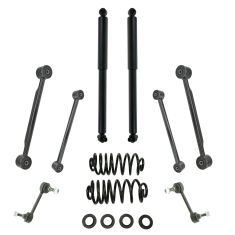
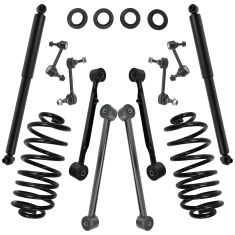
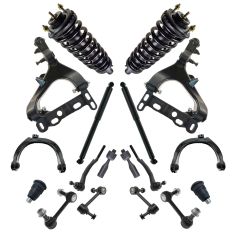
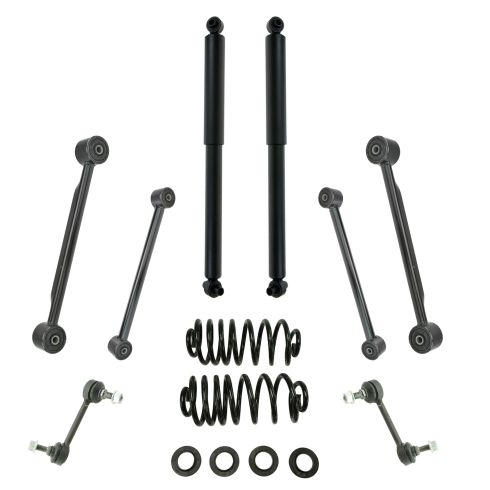
Part Details
Our direct fit gas-charged shock absorbers help restore your vehicle's handling and ride quality to just like new.
Our steering and suspension components are pre-greased and sealed for long life and do not require the extra maintenance typically required by greaseable versions.
Item Condition:
New
Attention California Customers:
 WARNING: This product can expose you to chemicals including Chromium (Hexavalent Compounds), which is known to the State of California to cause cancer, and birth defects or other reproductive harm. For more information, go to www.P65Warnings.ca.gov
Lifetime Warranty
This item is backed by our limited lifetime warranty. In the event that this item should fail due to manufacturing defects during intended use, we will replace the part free of charge. This warranty covers the cost of the part only.
FREE Shipping is standard on orders shipped to the lower 48 States (Contiguous United States). Standard shipping charges apply to Hawaii and Alaska.
Shipping is not available to a P.O. Box, APO/FPO/DPO addresses, US Territories, or Canada for this item.
Expedited is available on checkout to the United States, excluding Alaska, Hawaii.
Final shipping costs are available at checkout.


Created on:
Tools used
Okay, friends, one of the first things we need to do is safely raise and support the vehicle, so your wheel's off the ground. Once you've done that, we're gonna come right here to your center cover. Use a nice little pry bar, and go ahead and pop this off. Now that we've done that, we're gonna remove all 6 of our 19-millimeter lug nuts and take the wheel off.
Now that we have the wheel off of here, we have a nice clear view of the rear shock. We're gonna start by removing this 18-millimeter bolt right here, and then we'll just start it back in just a few threads. Okay, so that's pretty good right there. It's pretty much ready to come out. At this point, let's make our way down to the bottom.
So for the next step, if you're working on a lift and you're jacking it up by the frame of the vehicle, what you're also gonna need to do is go ahead and put something underneath the differential so you can bring this up a little bit to take the pressure off the shock bolts. Now I'm gonna use my 18-millimeter wrench to hold this side of the bolt, and I'll remove this 18-millimeter nut. There it is, friends.
Okay, friends, it's time to install our new shock. One of the first things you need to do when it comes time to installing your shock is to make sure you charge it up. Let's get right down on the ground. Okay, we have our shock on the ground here, facing straight up and down. I've got it securely between my feet so it can't slide out on me. I'm gonna carefully press this down until it bottoms out, and then I'll let it completely rise up. After it's done that, I'll repeat the process another three to four times.
Okay, so we've got it all charged up. Let's go ahead and put it up into the vehicle. We're gonna grab onto these bolts. Make sure they're in decent enough condition. If the threads need to be cleaned up, go ahead and clean them up. The shorter bolt is gonna go up at the top, so we'll go ahead and start that one in, just a few threads.
Moving along to the bottom, at this point, you might notice that the holes just don't line up. If for some reason, the hole for the differential is higher than the shock, that's really not too big of a deal because you could just compress the shock slowly and meet up with the holes. If it's in the other direction, what might you have to do? Maybe you have to jack up a little bit more on the frame or maybe a little bit more on the differential to make it so it matches up. Grab your nut. Start it on there. All right, let's bottom everything out and then torque it down. Go ahead and torque those shock nuts to 59 foot-pounds. Let's do the same to the other.
All right, let's get the wheel up on here. Start on all your lug nuts, bottom them out, and then we'll torque them to 103 foot-pounds. Let's torque these in a crisis cross manner. Now it's gonna be time to put on your center cover. If you were to look at the backside, you're gonna see something that looks a lot like a valve stem. Line that up with your valve stem. Then just give it a nice loving bonk, make sure it's completely secured, take it for a road test.
Tools used
Tools used
Okay, friends, one of the first things we need to do is safely raise and support the vehicle so your wheel's off the ground. Once you've done that, we're gonna come right here to your center cover, use a nice little pry bar, and go ahead and pop this off. Now that we've done that, we're gonna remove all six of our 19-millimeter lug nuts and take the wheel off.
Now that we have the wheel off of here, we have a nice clear view of our sway bar link. To start removing it, it's important to see the inside center piece right there. That's a little Allen head. I'm gonna show you what tool to use in a second. But, first, what we're gonna do is we're gonna remove or at least loosen this 18-millimeter nut.
A lot of times what happens is as soon as the nut breaks free, the stud in the center starts to spin. That can be a hassle. So we're gonna use a tool that looks like this, this is just a little Allen head key. You're gonna find the size that fits right in there. Okay? Take your wrench, put it right over this. Put the Allen key right in the center, and then we're gonna go ahead and turn the Allen key clockwise, which will in turn, turn the nut counter-clockwise.
You can see that some of the thread locking stuff is coming off. That's pretty common, especially, as the stud heats up. There we are. Now we're gonna do the same to the upper one. There we are friends. Okay, friends, it's time for an install. Just make sure all the angles line up with the original. We're gonna put it through from the outside in, on the top, and then from the inside, out on the bottom. Start on both of your nuts, and then we'll bottom them out and torque them to manufacturer's specifications. Now let's tighten the sway bar link nuts to 74 foot-pounds.
All right let's get the wheel up on here. Start on all your lug nuts, bottom them out, and then we'll torque them to 103 foot-pounds. Let's torque these in a criss-cross manner. Now it's gonna be time to put on your center cover. If you were to look at the back side, you're gonna see something that looks a lot like a valve stem. Line that up with your valve stem, then just give it a nice loving bonk. Make sure it's completely secured. Take it for a road test.
Tools used
Tools used
Brought to you by 1AAuto.com, your source for quality replacement parts, and the best service on the Internet. In this video, we're going to show you rear shock removal and replacement on this 2004 Trail Blazer, same as most of these mid-size SUVs. Tools you'll need are 18 mm socket with a ratchet and extension, and also an 18 mm wrench, and you probably would want jack and jack stands to raise and support the vehicle, but not totally necessary.
So to replace your rear shocks, as you can see I still have the tire on the truck, and you could actually do this on the ground, although it will cause a little clearance issue as you try and remove this lower bolt. But it's possible, you can do it on the ground. So there's that lower bolt, and there's a bolt up high right there. And if you are jacking your vehicle up, you can see my lift is under the frame. And then I have a bottle jack right here that's supporting the axle. You just want to give a little support of the axle so it doesn't drop down when you release the shock. What you probably want to do is take a couple extensions, that way you can work right outside your tire. And it'll come right apart, as you can see.
This is an 18mm again, and you might need two wrenches. One for here, and one to hold. But little trick... if all you have is wrenches, hook another wrench onto the end of that one, and that gives you some extra leverage. And like I said, on the ground this is going to be somewhat more difficult. Now I'm going to cheat 'cause I've got 18mm deep socket and an impact wrench. Comes right out. Back up top here. So that's how your shock comes out. Again, the shocks on this vehicle are fine. Just showing you how to do it. So to reinstall it, you want to put the top back up in. Put this top bolt in first. Now the bottom. Put that back in. Start that nut on. A good rule of thumb for these is get it about as tight as you can get it with a ratchet like that. And up to the top here. Again, just got my ratchet on here. That's tight as I can get it with the ratchet.
We hope this helps you out. Brought to you by www.1AAuto.com, your source for quality replacement parts and the best service on the Internet. Please feel free to call us toll free, 888-844-3393. We're the company that's here for you on the Internet and in person.