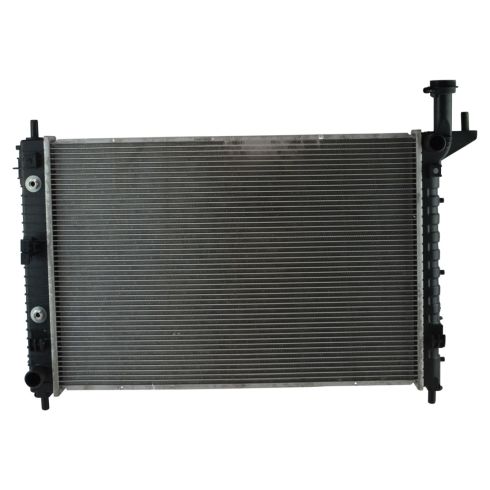
Core thickness equal to the OE part. If radiator core is slightly thinner than the OEM, this can decrease overall performance and lifespan.
Premium Aluminum Core
Engineered for top performance.
Provides efficient cooling and heat-transfer.
100% Leak Tested
Built to strict quality control standards.
Item Condition:New
Attention California Customers:
WARNING: This product can expose you to chemicals including Lead and Lead Compounds, which are known to the State of California to cause cancer, and birth defects or other reproductive harm. For more information, go to www.P65Warnings.ca.gov.
Lifetime Warranty
This item is backed by our limited lifetime warranty. In the event that this item should fail due to manufacturing defects during intended use, we will replace the part free of charge. This warranty covers the cost of the part only.
Packaging:
Radiators may incur bent cooling fins or small imperfections during shipping or manufacturing. A few bent fins or small dents and scratches do not affect the fit or the function of the part. Neither our 60 Day satisfaction guarantee, nor the manufacturer's warranty, cover these types of insignificant damages.
FREE Shipping is standard on orders shipped to the lower 48 States (Contiguous United States). Standard shipping charges apply to Hawaii and Alaska.
Shipping is not available to a P.O. Box, APO/FPO/DPO addresses, US Territories, or Canada for this item.
Expedited is available on checkout to the United States, excluding Alaska, Hawaii.
Final shipping costs are available at checkout.
How to Replace Radiator 2009-17 Chevy Traverse
How To Replace Radiator 2009-17 Chevy Traverse
Created on:
Tools used
13mm Socket
Funnel
Socket Extensions
Rust Penetrant
Channel-Lock Pliers
Jack Stands
Anti-Freeze
Trim Tool Set
Flat Blade Screwdriver
T20 Driver
Paper Towels
10mm Socket
Ratchet
Floor Jack
Complete Metric Socket Set
1. Draining the Coolant
Make sure the engine is cool
Open the hood
Have a drain pan ready
Loosen the lower radiator hose clamp with slip joint pliers
Pull the hose off the engine
Direct the fluid into the drain bucket
Allow the coolant to drain completely
2. Removing the Hood Shroud
Pry the plastic clips out of the hood shroud with a flat blade screwdriver
Peel the weatherstip ends off the hood shroud
Pull the shroud up and off
3. Removing the Front Bumper Cover
Remove the T20 Torx bolts from the top of the bumper cover
Remove the 7mm bolt from each inner fender
Remove the two T20 bolts behind each inner fender
Remove the T20 bolts from the bottom of the bumper cover
Remove the 10mm bolt from the bumper cover
With the help of an assistant, pull off the bumper cover
Disconnect the parking light wiring harnesses
4. Removing the Hood Latch
Remove the four 10mm bolts from the support
Remove the support
Unclip the push clips on the rubber air guide with a trim tool
Slide the air guide down and out
For the passenger side, push the air guide out of the way but do not remove
Remove the 13mm bolts from the hood latch
Unclip the electrical connector
Pull the hood latch out and disconnect the electrical connector
5. Removing the Radiator
Loosen the 10mm bolts from the top radiator mounts
Loosen the hose clamp from the upper radiator hose
Work the radiator hose off of the radiator
Remove the second hose from the radiator neck
Unclip the radiator from the a/c condenser
Evenly pull the radiator up without stressing the lines
Have glove fingers and zip-ties ready
Pull the rubber cap from the cooling line
Pull the clip on the cooling line out with a pick
Disconnect the cooling line and place a glove finger on the end and zip-tie it
Repeat this process for the second cooling line
Disconnect the cooling fan electrical connector
Pull the radiator and cooling fans up, separately from the condenser
6. Separating the Radiator from the Cooling Fans
Pry up the clip securing the fan to the radiator with a flat blade screwdriver
Remove the 10mm bolts from the fan shroud
Unclip the fan shroud from the radiator and remove it
7. Preparing the Radiator
Loosen the lower radiator hose clamp
Remove the lower radiator hose
Pry off the rubber plugs from the bottom of the radiator
Remove the radiator cap
Unclip the air guide from the radiator
Remove the securing clip from the radiator
Remove the protective caps from the new radiator except for the cooling line caps
8. Installing the Cooling Fans to the Radiator
Clip the cooling fan shroud to the radiator
Tighten the 10mm bolts to the fan shroud
Press in the clips to secure the fan to the radiator
Clip in the securing clip to the radiator
Clip in the air guide to the radiator
Tighten the radiator cap
Press on the rubber plugs to the bottom of the radiator
Insert the lower radiator hose to the radiator
Tighten the lower radiator hose clamp
9. Installing the Radiator
Carefully insert the radiator into place
Clip the a/c condenser to the radiator
Remove the cooling line caps
Remove the glove from the cooling lines
Connect the cooling line to the radiator
Secure the clip to the cooling line
Place the rubber onto the cooling line
Repeat this process for the second cooling line
Connect the upper hoses to the radiator
Secure the hose clamps with pliers
Tighten the 10mm bolts to the radiator mounts
Slide up the air guides into place
Clip in the air guides
10. Installing the Hood Latch
Connect the hood latch harness
Clip the harness in
Press the hood latch into place
Tighten the 13mm bolt to the hood latch
Reinstall the bumper support
Tighten the four 10mm bolts to the support
11. Installing the Front Bumper Cover and Lower Radiator Hose
Connect the parking light wiring harnesses
With the help of an assistant, lift the bumper cover into place
Push in the bumper cover clips
Insert the T20 bolts at the top of the bumper cover
Insert the T20 bolts at the bottom of the bumper cover
Insert the 10mm bolt in the bottom of the bumper cover
Insert the two T20 bolts behind each inner fender
Install the 7mm bolt into each inner fender
Connect the lower radiator hose
Tighten the lower radiator hose clamp with pliers
12. Filling the Coolant
Push the lower radiator hose onto the engine
Tighten the hose clamp with slip joint pliers
Twist the radiator cap off the radiator
Add coolant to the radiator, using a funnel
Add coolant to the overflow reservoir, using a funnel
Twist on the radiator cap
13. Bleeding the Cooling System
Start the engine
Bring the engine to between 2,000 and 2,500 RPM
Bring the engine to operating temperature
Check the coolant level
Add coolant to the overflow reservoir as necessary
14. Installing the Hood Shroud
Put the shroud into place
Clip the weatherstrip ends onto the shroud
Push the clips into the hood shroud
Hi, I’m Mike from 1A Auto. We’ve been selling auto parts for over 30 years!
We'll go inside the vehicle and open up the hood. To remove this plastic shield that's on the front of the engine compartment there are 10 clips: One, two, three, four, five, six, seven, eight, nine, ten. Take a small, flat bladed screwdriver or trim clip tool. Pop them up to loosen them. We'll need to go in like this. Pull them out. If the middle comes out, it's okay. And then this rubber seal is clipped in here. Just kind of pop it out. With a small flat bladed screwdriver, just pop it out. This trim clip tool, these may break when you're taking them out. You might want to have some new ones on hand. If the middle comes out, it just pushes right back in there. Just repeat that for all the clips. These ones are a little trickier because they're deep inside here. Trying to get this in here to pry them up. Just go along and do the same for all of them. This should just lift right off now. And then we'll put it outside.
There's six T20 Torx bolts, or Torx screws on the top of the radio support that hold the bumper on. We're going to remove those. The top of the bumper is loose. We're going to lift the vehicle up to about waist high. You can take the bumper off of the car on the ground, but this will make it easier for us and easier to show what we're doing. Use a seven millimeter socket, an extension, and a ratchet. There're two seven millimeter bolts here. We're going to remove them. They're holding the bumper to the fender. Just going to tilt the wheel in. We need to do that. You're going to repeat this for both sides of the car.
There are two T20 Torx screws that are holding the fender liner to the bumper. You got all the bolts loose, we kind of tug on the bumper. You see it's starting to come loose. Just repeat this for the other side. For both sides remove the two T20 Torx on the bottom of the fender liner where it connects to the bumper. There's 10 millimeter bolts on each side, and this little bracket's holding the front bumper on. Remove both of those. This bracket's already broken, but you would take this bolt out. Same for the other side. Bumper clips in the brackets, so I'm just going to pull on it. Pull it out of the clips. Sometimes you have to give a good tug. Just go along all the way right along the edge. I'm going to do the other side now the same way. I'm going to support the bumper like that. Pull away from the vehicle.
There are fog lights, or front marker lights. I'm going to unplug those. Do the same for both sides. I'll put our bumper aside.
I'll reinstall the bumper. Don't forget to reconnect the turn signal lamps. Both sides, just snap them into the connector. It'll click when it's in. Put the bumper back into place. Push it up into the bracket. Lift it up and in. Get both sides set. Just clip it into place.
Reinstall the bolts, screws, and clips. Your bracket isn't broken here, this one's broken, but you reinstall the 10 millimeter bolts. It holds the bottom of the bumper on. You do the same for the other side. Reinstall the two Torx screws. You do the same for the other side. Reinstall the two seven millimeter bolts or screws. One had a wider head, one had a smaller head. The smaller head one was towards the inside.
Reinstall the six Torx screws, one on the top of the bumper. Install the upper cover in the inch compartment. Just slide it under that ground point. It's going to go over these rubber mounts here, both sides. Let's go under this weather strips. Same thing for both sides. Reinstall all the push clips. It's easier to push the clips in if you pull out the center part. This is the last one. And that is complete. Close your hood.
Thanks for watching. Visit us at 1AAuto.com for quality auto parts, fast and free shipping, and the best customer service in the industry.
Tools used
RDA82725
In Stock
Product Reviews
Loading reviews
4.94/ 5.016
16 reviews
5 Stars
4 Stars
3 Stars
2 Stars
1 Star
15
1
0
0
0
2010 CHEVY TRAVERSE RADIATOR
J
November 7, 2017
Very please with radiator I purchased, it appeared to be produced with high quality standards and included everything needed to make installation easy. I was also pleased and happy that I received it before the promise date. I will certainly be a return customer.
09 Acadia radiator
C
June 11, 2018
Ordered this radiator while we were on vacation. It was there in two days and with the help of the instructional video, was able to install it in an afternoon. Very satisfied with the product and shipping time.
Perfect replacement!
Chris
November 23, 2018
This was a perfect replacement fit for my 2011 Traverse. The installation video was spot on and easy to follow. Saved me about $1,000 in labor fees! Quick delivery. I definitely reccomend this product and A1 Auto!
Great Customer Service
D
October 31, 2019
Part was exactly as described. Works great and video was extremely helpful. First radiator was damaged in shipping so called and was replaced no questions. Extremely happy with the customer service representative.
Perfect
chris
December 13, 2019
Shipping was fast, part was well made and a perfect fit with no modifications. YouTube video made by 1A was very helpful. I will use this company for my future needs.
Perfect fit
Jose
June 30, 2020
2014 gmc Acadia....was over heating do to a bad radiator. All my local parts stores wanted 200+ for this radiator. Not sure on how to replace this radiator on my Acadia I went to YouTube. Thank God I did. Not only was there a video from a1 auto on how to replace it, they had the part in stock and for almost half the price. The quality of the radiator is about the same as the original one.. delivery only took 3 days. I'm back on the road with no overheating issues. Even through out this pandemic that we're going through I have to say that a1 auto came through with flying colors. Thank you for keeping your doors open and allowing your employees to continue working. You gain the new loyal customer
Radiator 2010 GMC Acadia
Travis
January 26, 2021
Radiator was perfect match and made of the same quality as factory part. I would recommend this to anyone else.
james
July 6, 2021
Great fit. Everything was exactly as described
Kasey
July 9, 2021
Fast service, right part, excellent price!
jesus
September 8, 2021
Fit perfectly!!!
Juan
September 25, 2021
Great product. Arrived right away, exactly what I ordered and expected.
Paul
October 1, 2021
Fit great.
Susan
February 19, 2022
Right fit, came quick!! Thanks 1A Auto!!
Don't hesitate to buy from these guys, their legit!!
Dennis
February 21, 2023
Bought on numerous occasions from you guys, mainly because of your super easy to follow Youtube videos! You guys are straight up great to deal with. Parts seem to be good quality.
Great item
Ivy
December 26, 2023
Packaged great, received it within a couple of days.
Douglas
March 19, 2024
No leak. Fast shipping. Only issue was needed some minor fabrication to have radiator fan flush with radiator other than that great quality and everything else fit as an OEM replacement.
Customer Q&A
How long does this job take?June 10, 2017
Chris A
10
This job is estimated to take 2 - 3 hours to be on the safe side. In some cases you may complete in less time, but if you have not performed this replacement prior it could take longer.
June 12, 2017
Alex P
Does this radiator come with a radiator cap ?September 14, 2018
Robbin A
10
No, it does not.
September 14, 2018
John B
10
No you will have to use your old cap or buy a new cap..
September 14, 2018
J E
10
Hi Robbin,
I honestly cant remember as I purchased this years ago. I recommend calling 1A and asking the rep on the phone. They will be able to answer your question. What i can say is bang for buck, this was an amazing deal and fit my vehicle perfectly. In fact I installed it myself! Sorry I couldn't have been any more help.
Thx
Rich
September 15, 2018
Rich G
10
A new cap is not included with this item. You may be able to reuse your original cap if it is in good condition or a new cap would need to be purchased. Thank you.
September 17, 2018
Jessica D
Is this a HD radiator?September 2, 2021
Roger D
10
This radiator is made to factory spec. It is not a high-performance part.
September 2, 2021
Adam G
10
It is not "heavy duty," however it did fit perfectly and is holding up well after a year in service.
September 8, 2021
Donald R
Customer service
877-844-3393
Monday - Friday 8:00am - 9:30pm ET Saturday - Sunday 8:00am - 4:30pm ET
Saturn is a registered trademark of General Motors Company. 1A Auto is not affiliated with or sponsored by Saturn or General Motors Company.See all trademarks.
Enter Vehicle Year Make Model
Specify your vehicle's year, make and model to guarantee fit.
Year
Make
Model
Options
Drivetrain
This part doesn’t fit a . Select from parts that fit.