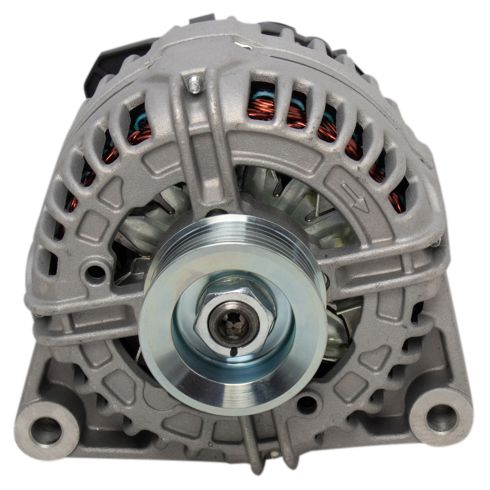
Upgraded Service Life: Pressure-Fit High-Capacity Diodes for improved heat dissipation
Improved Reliability: Double insulated rotors and stators to reduce signal degradation
Returns: Parts with electrical components cannot be returned once installed.
Attention California Customers:
WARNING: This product can expose you to chemicals including Lead and Lead Compounds, which are known to the State of California to cause cancer, and birth defects or other reproductive harm. For more information, go to www.P65Warnings.ca.gov.
Lifetime Warranty
This item is backed by our limited lifetime warranty. In the event that this item should fail due to manufacturing defects during intended use, we will replace the part free of charge. This warranty covers the cost of the part only.
Returns: Parts with electrical components cannot be returned once installed.
FREE Shipping is standard on orders shipped to the lower 48 States (Contiguous United States). Standard shipping charges apply to Hawaii and Alaska.
Shipping is not available to a P.O. Box, APO/FPO/DPO addresses, US Territories, or Canada for this item.
Expedited is available on checkout to the United States, excluding Alaska, Hawaii.
Final shipping costs are available at checkout.
How to Replace Alternator 2001-02 GMC Sierra 2500 HD
Created on:
Tools used
Flat Blade Screwdriver
15mm Socket
8mm Socket
10mm Socket
Ratchet
1. Disconnect the battery
Use an 8 mm wrench to disconnect the negative battery cable
2. Move the intake tube out of the way
Use a flat blade screwdriver to pry up and disconnect the intake tube.
Unclip the radiator hose to move it out of the way.
Use a socket and ratchet to remove the plastic covering.
3. Remove the alternator
Unplug the wiring harness
Remove the 10 mm nut securing the lead.
Take a 15 mm socket and ratchet to release tension on the serpentine belt.
Remove the serpentine belt.
Unbolt the two 15mm bolts and pry out the alternator.
4. Install the new alternator
Put the alternator in place using a rubber mallet.
Plug in the wiring harness and bolt in the lead.
Bolt the alternator in using a 15 mm socket and ratchet.
Replace the serpentine belt using a 15 mm socket and ratchet.
Bolt the plastic cover back on.
Replace the intake tube and clip on the radiator hose.
Reconnect the negative battery cable.
Brought to you by 1AAuto.com, your source for quality replacement parts and the best service on the Internet. Hi, I'm Mike Green. I'm one of the owners of 1AAuto. I want to help you save time and money repairing and maintaining your vehicle. I'm going to use my 20-plus years' experience restoring and repairing cars and trucks like this to show you the correct way to install parts from 1AAuto.com. The right parts installed correctly - that's going to save you time and money. Thank you, and enjoy the video.
In this video we're going to show you alternator replacement on this 2002 GMC Sierra. This is very similar for many GM, GMC, and Chevy trucks and SUVs from '99 to '06. The tools you'll need are 8, 10, and 15 mm sockets, a ratchet, and a screwdriver.
To figure out which alternator you have, you want to find in your glove box this tag. On this vehicle - it's kind of hard to see, but the code is KG8. That is a 130 amp alternator. The other common code is a K68, which is a 105 amp. Generally a standard vehicle has a 105 amp. If your vehicle has the towing package, you'll have the 130 amp.
Use an 8 mm wrench to disconnect the negative battery cable. Remove the intake hose by removing and loosening two clamps - one there and one there. We're going to speed up through this part here. Use your screwdriver to pry out and break the rubber loose from the plastic. Maybe twist it a little bit as well. Then pull it from the throttle body. Also, there's a little clip that holds the radiator hose in. Pry that out with your screwdriver as well. Use an 8 mm socket and ratchet to remove this top cover. You pull up and forward. Here's a connector here. Pull - I'm just using my finger to pry the tab back and pull that out. This is a 10 mm nut to remove back here.
Now you can see your tensioner is right here. So what you're going to do is take a 15 mm socket ratchet, put the socket on there, and then move the ratchet clockwise, and that takes the tension off. You can pull the belt either off of your tensioner, or I'm actually over here pulling it off of the idler pulley in the middle, and then slowly release this back. It's going to have to go back further than the original point. Now get your wrench back off. There's two 15 mm bolts to remove right here.
Just use your screwdriver to pry up and get the alternator free. Pry up on the other side. And the alternator comes up and out. So we have my original and my new alternator from 1A Auto and you can see everything is exactly the same. This post is the same. It has this same connection here, everything is going to bolt in exactly the same.
My original alternator is working fine in this truck, so I'm just going to reinstall the original, just kind of a video test. For installation I'm going to use a little bit of penetrating oil on the mounting points, just so the alternator slides in there easily. For reinstallation make sure that is out of the way and then slide it back down in. I'm going to tighten it as much as I can as possible. You never want to use a hammer to pound it in. You can use a rubber mallet if you need a little persuasion. Put that bolt in. Both bolts are in.
Then start them going. We'll tighten them up. When you tighten these bolts up you want to be firm, probably between 30 and 40 foot-lbs. They don't have to be overly tight, though. Plug in that lead. And the 10 mm bolt for the battery lead. Tighten that up. You want to be snug with this. You don't have to be extremely tight. Put your engine cover back on. Slide it back and press down on the bolt. Walk it around a little bit until you find the spot. And just tighten this up a little bit till it's firm. So first I went down around the crank pulley, up around the water pump to the back side of the belt, then around to the power steering pump. So now I have this part that I can hold, to put onto the alternator. I'm going to set it there for a second.
I'll take my socket, put it on my 15 mm bolt on my tensioner, and while I pull this way on the tensioner, take the belt and pull it up and onto the alternator. The tensioner takes over and I'm going to push it on a little more onto my idler pulley here. Make sure that's pretty well centered. After you have the belt on, just do a quick check. Make sure it's on all the pulleys. Look way down at the crank pulley and make sure that its' on correctly down there, and also obviously over here - the alternator - and the power steering pulley. Everything looks good.
We're going to fast forward through this section, which is putting that tube back in and pushing the rubber onto the plastic, tightening up the clamps, and reinstalling that little clip that held the radiator hose to it. Now we'll reconnect the negative battery cable. Just make sure you get that nice and tight.
We hope this helps you out. Brought to you by www.1AAuto.com, your source for quality replacement parts and the best service on the Internet. Please feel free to call us toll free: 888-844-3393. We're the company that's there for you on the Internet and in person.
ALA94410
In Stock
Product Reviews
Loading reviews
4.25/ 5.04
4 reviews
5 Stars
4 Stars
3 Stars
2 Stars
1 Star
3
0
0
1
0
mario
January 5, 2023
Awesome service, parts and quality all around. Only place I buy my stuff for my vehicles!
Alternator set 3/4 inch taller than original, correct no. belt could not fit.
Tina
May 19, 2023
This alternator was 3/4 inch taller than the original that it was supposed to replace. Could not get the belt to reach no matter what we did. Ran to town to buy new belt, sure that was the problem. That belt didn't work either. Finally thought, I wonder if the alternator is too tall. Remounted the old alternator and the belt went on like a dream. My 1999 Chevrolet silverado with its 5.3 liter engine and vin letter T was supposed to fit according to your tech and tables. Thank god for my Brother's help getting it all back together.
Good quality
Christopher
December 18, 2023
Worked perfectly
full charge happy truck
marc
December 24, 2024
made a big difference in the way it starts up and runs. My old one was making noise so I decided to change it since it was the original one. I'm very happy with the purchase.
Customer Q&A
Hello team, this is upgrade 130 amp from old 105 amp. Will needs special cord extra coil wire? Due high power???
Im apology not good grammar. Thank you.July 21, 2022
Alexy R
10
This alternator is not an upgrade. This is for models that came originally equipped with a 130 amp alternator.
July 21, 2022
Jessica D
Customer service
877-844-3393
Monday - Friday 8:00am - 9:30pm ET Saturday - Sunday 8:00am - 4:30pm ET
GMC is a registered trademark of General Motors Company. 1A Auto is not affiliated with or sponsored by GMC or General Motors Company.See all trademarks.
Enter Vehicle Year Make Model
Specify your vehicle's year, make and model to guarantee fit.
Year
Make
Model
Options
Drivetrain
This part doesn’t fit a . Select from parts that fit.