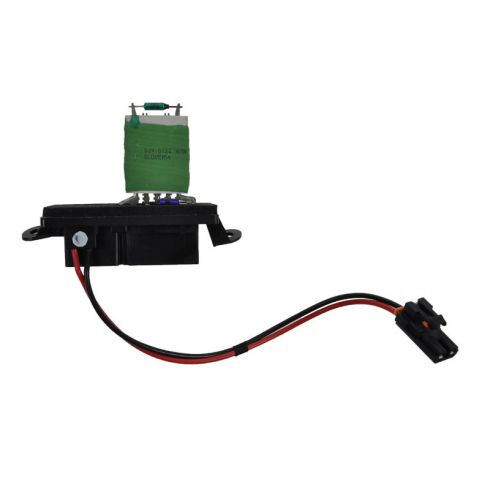
All of our auto parts are intended for Left Hand Drive USDM vehicles. If your vehicle is Right Hand Drive, please ensure the part is correct for your specific vehicle.
Item Condition:New
1 Year Warranty
This item is backed by our 1-year warranty. In the event this item should fail during intended use, we will replace the part free of charge. This warranty covers the cost of the part only.
Returns: Parts with electrical components cannot be returned once installed.
FREE Shipping is standard on Orders shipped to the lower 48 States (Contiguous United States). Standard shipping charges apply to Hawaii, Alaska and US Territories. Shipping is not available to Canada.
Expedited is available on checkout to the United States, excluding Alaska, Hawaii and US Territories as well as P.O. Boxes and APO/FPO/DPO addresses. Final shipping costs are available at checkout.
How to Replace Blower Motor Resistor 2003-06 GMC Sierra 2500 HD
Created on:
Tools used
Socket Extensions
7mm Socket
Ratchet
7/32 Inch Socket
1. access the resistor
Remove the four bolts under the glove compartment.
Use your 7mm socket and driver
2. remove the resistor
Unplug the resistor from the harness.
Remove the four bolts securing the cover next to the resistor and unplug the remaining harness.
Unbolt the now unplugged resistor and remove it.
3. Install new resistor
Use your wrench to bolt it back in.
Plug everything back in, unbolting the cover obstructing the second harness again if necessary.
Test and replace the panel.
Brought to you by 1AAuto.com-- your source for quality replacement parts and the best service on the internet.
Hi, I'm Mike Green. I'm one of the owners of 1A Auto. I want to help you save time and money repairing and maintaining your vehicle. I'm going to use my 20+ years experience restoring and repairing cars and trucks like this to show you the correct way to install parts from 1AAuto.com. The right parts installed correctly- that's going to save you time and money. Thank you and enjoy the video.
In this video we're going to replace the blower motor resister on this 2002 GMC Sierra. This procedure is the same for pretty much any GMC or Chevy truck and SUV with this body style with the manual air conditioning controls. You'll need two sockets, a 7 mm and a 7/32 standard size socket and a ratchet and an extension.
A common problem with these trucks is, you can see with my system is on, I only get fan on the four and five positions. On the passenger side, there are four, 7mm bolts to remove, one there, one in there, there's one up in that hole right there, can't really video it and then over here closer to the gas pedal. There's one right there and once you remove those bolts, just reach in and kind of pull it down and out of the way. Just put your thumb in there and disconnect your harness. All the harness is, is a little tab right here that you need to pull back. This tab right here. That's up in there, pull that back and then down.
Now you're going to remove four bolts. You're going to remove two here that hold the resistor in, then you're going to remove two that hold this fan cover here. There's one here and then there's one opposite of that; that I really can't film. Once you have this cover loose, what you're going to fight to do is get a finger in there to press on the tab. This is what locks in there. Basically you have to reach in there and press right on this to unlock it and then pull it out, so that's what I'm trying to do there.
Maybe if you have smaller fingers you won't need to loosen this up, but I did, so I'm actually going to bolt this back up. We can take this out now. Here is my old resistor out. Here's the new resistor from 1A Auto. You can see it's pretty much the same. It's all going in there the same, the resistor itself, is a little different from the circuit board, but it will go right up in there. I have this snug. I'm going to put this up in there and pretty much by feel, reconnect it. It's not too difficult. Now I'll reconnect my harness. Just a quick note here, I did have to turn that connector around. Just the resistor from 1A Auto was just turned 180 degrees, so you just flip it around and it just plugged right in. Turn the key on and you can hear it already working on three, you can hear it working on two and one. Now I have all five speeds. Now we'll just put this bolt up in here. Just put in the most difficult part of the operation. Tighten that up.
The final part is put your cover back in place. You want to push it up in there, you push it up next to the firewall first and I'm sorry for shaking around a little bit here. I'm just trying to film with one hand and trying to push it up with another. Push it up and in first and then make sure you have everything lined up. As you can see here those are the passenger side outlet holes. Make sure those are all wound up, then start your end bolt here and then I recommend starting the one next to the driver side. Once you have those lined up, the other two middle ones go in pretty easily.
We hope this helps you out. Brought to you by www.1AAuto.com-- your source for quality replacement parts and the best service on the internet. Please feel free to call us toll free, 888-844-3393, where the company is here for you, on the internet and in person.
15-81087
In Stock
Product Reviews
Loading reviews
5.00/ 5.01
1review
5 Stars
4 Stars
3 Stars
2 Stars
1 Star
1
0
0
0
0
easy order & fast delivery
D
October 12, 2017
I will definitely us A1 Auto again. Their web-site is easy to use. I received my order quickly, the part worked as soon as installed, installation went just like it showed. Very Happy, Dave
Customer Q&A
No questions have been asked about this item.
Customer service
877-844-3393
Monday - Friday 8:00am - 9:30pm ET Saturday - Sunday 8:00am - 4:30pm ET
Enter Vehicle Year Make Model
Specify your vehicle's year, make and model to guarantee fit.
Year
Make
Model
Options
Drivetrain
This part doesn’t fit a . Select from parts that fit.