Hi, I’m Mike from 1A Auto. We’ve been selling auto parts for over 30 years! We’re dedicated to delivering quality auto parts, expert customer service, and fast and free shipping, all backed by a 100% satisfaction guarantee. So visit us at 1AAuto.com, your trusted source for quality auto parts.
All right, before draining it, open up the radiator cap on the expansion tank. It'll just let air in so it'll drain faster.
To get to this little radiator hose, we've taken the wheel off so you can see it better, but you could do this on the ground, and just turn the wheel. We're going to have to move this splash shield and just peel it back. So, I'm going to take my 7mm ratchet. We're going to take out these 7mm screws. Now we're going to take a flat headed screwdriver or a trim clip tool, and just kind of work it under to get these barbed clips out. That one's loose. Put that aside.
It's got three different style push clips up here. You got to kind of work either the screwdriver under the side of them, or you can use the trim tool. Then you kind of get it under there, and you pull out the middle, and it will unlock them. Sometimes the middle comes out. That's okay. Just pop out the rest of them like that. Then we're going to take the splash shield. Just fold it up and out of the way.
So we're going to drain the radiator of this vehicle by removing this lower hose. There's no drain on it, so we're just going to undo the clamp here. Work it off the gooseneck, and then it's just going to just pour out, so you want to make sure you have a drain pain ready to catch all this because it's going to be a significant amount of coolant with this truck.
All right, so I'm going to use these pliers here to undo this clamp. You're going to squeeze it together. It takes a pretty good amount of force. There's actually a little lock on them, and I'm going to work the hose off with the clamp right now. So this little lip here is like a little drain guide, I guess. We're going to just pop this hose back on here now that the majority of the fluid is out because we're going to go up and remove the expansion tank.
Take your pliers. Squeeze this clamp back together. Work the hose back on. Make sure it's fully seated. Release the clamp. That's on there nice and tight. So after you put the hose back on, just take some paper towels and dry it up as best you can, and then when you're all finished with the project, you can take a hose and some soapy water and just kind of spray it down to get rid of all the residue from the coolant. All right, so we're just going to put this back here for now so it's out of the way, but we're going to go up top and work on the coolant expansion tank or reservoir.
Okay, so we have to take this intake tube off, and to get to this hose clamp, we have to pop off this cover that's on top of the engine that just pops up. There's two points where it pops on to, so you just kind of get them, and then you work it out straight from the back. Just like that. And see here, there is where it pops on here and here, and then these two tabs slide into the back. We're going to set this aside so it doesn't get broken.
All right, so before we take this intake tube off, we're going to pop this little PCV valve off. It just comes out like that, and place it aside. Okay, and the next thing we're going to disconnect from the air intake tube is this little hose clamp that's supporting the upper radiator hose. Just push down on it to unhook it. Then you're going to remove this hose clamp here at the throttle body. You can either use a flat-headed screwdriver or an 8 mm socket on a ratchet. All right, we're going to move to the other side here near the mass airflow sensor. Again, you can either use a flat head screwdriver or an 8mm socket. Then we're going to work this off the air box elbow. Just like that. Now you pull it off the throttle body. It's also got a little support here with these air resonators. Pull it up just like that, and then work it off the throttle body. Just kind of maneuver it out of the engine compartment, and we'll place this aside.
To get this coolant reservoir out, there's a bolt that's under here. To have better access to it, we're going to lift the air box out. So it just sits on rubber mounts, so we're going to unclip the mass airflow meter. Carefully work that out. Just place that aside so you don't damage the connector. Then we'll just kind of work this out off the rubber mounts, and it's just going to lift out of the engine compartment. We're going to put this aside too.
Okay, so before we remove this bolt, we're going to undo the hoses while this thing's pretty solidly mounted so you don't have to struggle with it while it's loose. Take our pliers. Squeeze these together. If you can get it, there's actually a little lock that will hold those open. Sometimes it'll be a little tricky, but sometimes you can get it, and that will leave them loose. Do the top one. Just like that. Now we're going to take a little pick and just kind of work it around the hose to free it. Some coolant is going to drip out of there. Same thing here. We're going to take our little pick. Just kind of work it around the hose to sort of free it up, and then just kind of work it back and forth like that, and now the hose is off.
Now we're going to remove this bolt that's holding in the coolant or reservoir or expansion tank. So there's another bolt on the other side here. It's actually a nut on a stud. We're going to loosen that. Now with that loosened, we can lift this up off these little clip here. Now be careful, there might still be some coolant in here.
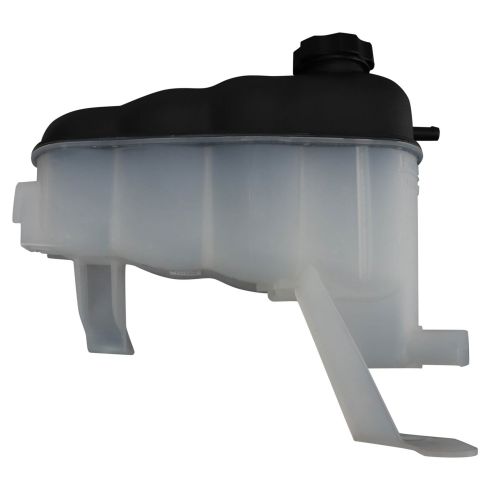
So, here we have the old reservoir as you can see, it's pretty dirty from old coolant, and we have the new reservoir from 1AAuto.com. This is virtually identical and will work perfectly as a replacement. Okay, so as you can see, there's a stud in the backside that goes to this hole here.
So we're going to place this back. Same position as the old one. I'm going to get this rear stud and get it started, and I'll start the other one, this bolt. Take my ratchet and just tighten it down. Just snug them. Same for the rear. All right, so now we're going to put the bottom hose back on. Slide it on until it stops. Take the pliers. Get it in about the same position. You can kind of see where it was on the hose. You can see where the indentation was. Get it to unlock. Once those unlock, they kind of snap tight. You can squeeze them again a little bit to reposition it. That one's on there nice and tight. Now we're going to do the top hose. Same thing. We're going to put it over the nipple. Squeeze the clamp together. These have quite a bit of spring to them. Be careful. Get it in the same position it was before, and release it. It's on there nice and tight.
So now that we have the coolant reservoir back in, we're going to put the air box back into the vehicle. This just kind of pops onto the rubber mounts, and you just kind of have to feel it in there. So then once you sort of find the holes that it pushes in to, it just kind of sits in there. So once the air box is back in place, don't forget to reconnect your mass airflow meter. Make sure it goes on with a nice click just like that.
All right, so we're going to put the air intake pipe back on. You've got to kind of fish this air resonator down into the engine bay. It's a little tricky because you got to get that long air resonator tube down the back of the intake of the engine. Just kind of float it into place. You can slide it on to the throttle body. It goes on to the throttle body, and then you just push it down right there onto the little mount.
Come over here to the air intake of the air box. Work that over. Make sure that that's seated. It's seated over here. Push the radiator hose back up into it, the clip that was holding it. Just like that, and don't forget to tighten these hose clamps. So again, you can either use a flat-headed screw driver, or I'm going to use an 8mm socket and just tighten these down. You'll feel them start to get tight. Snug them down, and they're good. And again, the same thing over here at the air box. And one last thing you need to reconnect on this is that PCV valve we popped out earlier. Just like that.
Okay, so we're going to use a 50/50 mix of DexCool because this truck is a GM product, and the total capacity of this truck is about 4-1/2 gallons, but we didn't train anything out of the engine, just the radiator, so it might take less, but we're going to start by filling it up here, and then as soon as it's full up to the bottle. We’re going to let the truck run, and after it cools off, we'll check the coolant level again.
All right, so we're going to put the cap on, and we're going to start the truck and let it run until it's hot. Okay, so as soon as I started the truck, it pretty much sucked in the gallon of coolant that I poured in here. Since I didn't measure what we took out, I'm just going to add another gallon until it's full again before I restart the truck. Refill the coolant reservoir and run the engine until it reaches normal operating temperature. Once that happens, you can let the engine idle for about three minutes. Then you can shut the engine off. Let it cool, and then go back and check to make sure that the coolant is at the correct level, and you can top it off as necessary.
We're going to put this plastic splash shield back in. You can use one of these little barbed clips that kind of stayed there, so we can put that back in to hold it. You can get the other barbed one that went here. Now we're going to put those other two push clips, those bigger ones, were up here. Kind of work them into the hole, and then you push the center in, and that locks them. These can be a bit tricky. Sometimes, if you squeeze them tight like that, and then you just push them in, it's locked. Now there's two screws. Those have little 7mm heads on them, so just kind of get them started.
Thanks for watching. Visit us at 1AAuto.com for quality auto parts, fast and free shipping, and the best customer service in the industry.