Replaces

This part doesn’t fit a . Select from parts that fit.
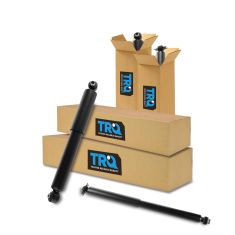
Frequently bought together
Part Details
Our direct fit gas-charged strut assemblies help to restore your vehicle’s handling and ride quality to just like new.
Our direct fit gas-charged shock absorbers help restore your vehicle's handling and ride quality to just like new.
Item Condition:
New
Attention California Customers:
 WARNING: This product can expose you to chemicals including Chromium (Hexavalent Compounds), which is known to the State of California to cause cancer, and birth defects or other reproductive harm. For more information, go to www.P65Warnings.ca.gov
Lifetime Warranty
This item is backed by our limited lifetime warranty. In the event that this item should fail due to manufacturing defects during intended use, we will replace the part free of charge. This warranty covers the cost of the part only.
FREE Shipping is standard on orders shipped to the lower 48 States (Contiguous United States). Standard shipping charges apply to Hawaii and Alaska.
Shipping is not available to a P.O. Box, APO/FPO/DPO addresses, US Territories, or Canada for this item.
Expedited is available on checkout to the United States, excluding Alaska, Hawaii.
Final shipping costs are available at checkout.


Created on:
Tools used
Brought to you by 1AAuto.com, your source for quality replacement parts and the best service on the Internet.
Hi, I'm Don from 1A Auto. I hope this how-to video helps you out, and next time you need parts for your vehicle, think of 1AAuto.com. Thanks.
In this video, we're going to show you how to replace the rear shocks on this 1996 Chevy Tahoe. If you replace one of them, we do recommend that you replace both of them. We show you on the passenger side, but the driver's side shock is the same procedure. It's the same part and process for the Tahoes from '95 to 2000. The items you need for this are new rear shocks from 1AAuto.com, 14mm and 21mm socket and ratchet with extension, 21mm wrench, a torque wrench, and jack and jack stands.
You want to start off by removing this 21mm bolt and then you're going to remove these two 14mm bolts. Using a 21mm socket and ratchet and a 21mm wrench, you just want to remove that nut. Once the nut's removed, use the socket and ratchet on the other side and just start twisting out the bolt. Now, use a 14mm socket and ratchet with an extension to remove those two upper bolts and we'll just fast forward as Don does this. Once those are removed, the shock will pull down.
Up front is the old shock, in the back is the new shock from 1A Auto. You can see they're identical and they will fit the same. You will have to just apply some pressure to shrink the new shock. Feed your new shock up into place with a bolt and a 14mm socket and then just tighten it into place. Really, you only need to tighten it preliminarily and then you should start the other bolt. Once you have both bolts started, just got back and forth tightening them up until it's nice and firm. Now, push the shock in and then forward and then line it up and push the bolt through. Then, just replace the nut and washer on the other end and tighten that up with your socket and ratchet and the 21mm wrench. Torque this lower bolt to 75-80 foot pounds and you're all set.
We hope this helps you out. Brought to you by www.1AAuto.com, your source for quality replacement parts and the best service on the Internet. Please feel free to call us toll-free, 888-844-3393. We're the company that's here for you on the Internet and in person.
Tools used
Safely raise and support your vehicle on the frame so your suspension can hang. Now that we've safely raised the vehicle, let's remove this by using a small pry bar right in this little slot. Now you can see your 22-millimeter lug nuts, remove those. And now we'll just do the same thing to the other side. Now that we have the wheel off, we have a clear view of what we need to do. To get to the upper part of the shock, we're gonna remove this portion right here using a little forkey tool that looks like this. Grab these little push clips, let's pop right out, do the same to them all. There we are.
Now it's time to remove both bolts. You can start wherever you want. I'm gonna start at the top using an 18-millimeter on one side and an 18 on the other. Okay, looks good. I'm just gonna leave that on there a couple of threads. We'll do the same on the bottom. Start that nut on there a couple of threads, hit with some more penetrant. Now let's start driving the bolts out. It's important to make sure you have the nut started on, and if you want to put it flush, that would be better. The reason for that is because you don't want to damage the threads on your bolt when you go ahead and bonk on it with your hammer.
The next thing to do is to apply a little bit of upward pressure on the lower control arm. You can use a floor jack or a post jack, whatever you've got, but just kind of lift it up so you can get a little bit more movement with that bolt. There we are. Grab that washer. Let's grab the shock, see if we can move it around. Up and out. Let's coat this shanked area with some copper never-seize or grease, a little bit like that. Now you have the threaded area, I'm gonna say it's your prerogative to use some thread locker, but I would recommend it. Awesome.
We're gonna take the long bolt, that'll be the one that goes through the top of the new shock. Let's go ahead and compress our shock three to five times. It's time to get the new shock in here. Go right up in between the control arm and go right up in the past and try to get the lower portion in to where it belongs first. You might need to compress the shock a little bit. All right. So now it's sitting down where it needs to go, I'll get that upper portion started in. Don't forget your washer and then, of course, the nut. Do the same thing to the lower.
So to line up the holes, it can be a little bit difficult. You might need to go up a little bit or down a little bit with your control arm to line it up. Let's snug these up. Now let's torque them to manufacturer specifications. Torque both these bolts to 66-foot pounds. Let's get this out of here. Let's get this back on here. Let's start at the center. There we are. Let's get the wheel on and torque it to manufacturer specifications. Start on one of those lug nuts. Now we're just gonna start on all the lug nuts, we'll bottom them out and then we'll torque them to 120-foot pounds. Torque these to 120-foot pounds. It's torqued. We'll get our cover on here. Awesome. And now we'll just do the same thing to the other side.
Tools used
Now, I'm going to take a 22 millimeter socket. Take these lug nuts off. I'm going to take this wheel off. Now, I need to support the rear axle, and I'm just going to use a screw jack. Just take some of the load off of the shock. That should be good right there. Now, I'm going to use a 21-millimeter wrench, and hold the bolt on the lower shock. And then use a 21-millimeter socket, loosen the nut up, and take that nut off. And take that nut off. Then I'll take a punch and a hammer, and just punch the bolt out.
If you have to adjust the tension on the screw jack, pull that out. Make sure that's loose. Now, I want to get this top bolt out and the nut, and I'm going to use a 21-millimeter socket, an extension, and from the backside, I'm going to hold the bolt. And on this side, use a 21-millimeter socket. Take th\ nut off. Slide the bolt out, and grab it from the inside. And you should be able to slide the shock out. If you have to, you can use a pry bar. Just pry this out, and there we go. Slide the shock in position, and get the bolts in from the backside. And just slide the nut on.
Before I tighten the upper bolt, install the lower bolt. You have to adjust the screw jack and get that nut started. Now, I'm going to torque this to 70-foot pounds. And torque this one to 70 as well. Now, I can lower the screw jack and set it aside. We'll take the wheel. Put the wheel back on. Put the lug nuts back on. I'm going to tighten these lug nuts to 140-foot pounds in a cross pattern or star pattern so that it tightens the wheel down evenly. All right, and I'll just go around again. Double-check. Good.
Tools used
Tools used
Okay, so we have removed the wheel just so we have a little bit more room to work. You don't necessarily have to.
One of the first things we're going to do is remove these 13-milimeter headed nuts. If you were to feel on the backside, you're also going to feel a 13-millimeter headed bolt end on the other side. So, we'll first get our socket on there. You might need to bonk it on there a couple times. Obviously, I have a lot of rust on mine. I've got my 13-millimeter wrench, put it up there. Let's see about removing this. Now we'll just do the same to the other one. Get that bolt out of there.
Now we're going to remove the lower bolt right here, using an 18 on this side and a 21-millimeter on the nut side. There we are. Take this right out of here.
Now it's going to be time to compress the rear shock. You want to compress it at least three to five times to activate the gases inside. We'll get this strap right off of here, let it completely decompress, and then recompress it, like I said, three to five times.
Time to get the shock in here. I'm just going to go ahead and line it up, kind of where it's going to go, and put my bolt through. The bolt is going come through from the center. Slide it right through like that. Then, you have your emergency brake cable. Make sure you get that on there the way it's supposed to go. Next is going to be the washer, and then the nut. Perfect.
So, the next thing we need to do is jack up the rear differential so we can bring the shock up to where it's going to mount into the mounting frame. All right, that's pretty close. I'm going to leave that just like that and grab my new bolts. Okay, let's snug them up.
Let's snug up this lower bolt. Make sure your emergency brake bracket is where it's supposed to be. This looks good.
Get our wrench up there. Let's torque this to 13 foot-pounds. That feels good. And do the same to the other one. Let's torque this bottom bolt to 74 foot-pounds. Torqued.
Let's get this out of here. If you did happen to remove the wheel, just go ahead and replace it, and then torque it to 120 foot-pounds.
Tools used
All right. So, we're underneath the rear of the truck, and now we have a nice, clear view of our rear shock. There's gonna be a bolt that comes through from the inside towards the outside with a nut. We're gonna go ahead and remove this, and then, right up top, there's gonna be two mounting bolts. We'll remove those last. Following the rear shock up, you're gonna find one mounting bolt here and then one on the opposing side. This is gonna be the last thing holding the shock in, so make sure you hold onto that. There it is, friends.
Okay, friends. Now, it's time to activate our rear shock. To do that, I'm just gonna go ahead and get this right out of here, and I'm gonna let this come all the way up. Once it comes all the way up, we're gonna continue on by pressing it down as far as we can and then let it come all the way up again. Continue this process three to five times, and that's what's gonna activate your shock. It's a good idea to inspect your bolt threads and make sure it's all in good condition. If anything looks as though it's damaged or not usable, go ahead and replace it.
Now, let's just quickly look at the top of the shock. What you're gonna notice is this mounting area along the top. It's a little bit at an angle in one direction or the other. You wanna make sure that you pay attention to that when you start putting this up and into the truck, because of I put it up like this and then, of course, I have it lined up, you wanna make sure that this is gonna be going in the same direction as the angle of the actual truck up there. So if I put it in backwards, you can tell that it's really not gonna be lining up very well and it might cause damage.
Let's start those upper bolts in there. Now, let's just go ahead and push up on that shock and let it come down so our holes line up. There we are. Let's go ahead and get our washer and our nut on here. All right. At this point, we're gonna continue on by snugging up all of our bolts. Once we have them bottomed out, we're gonna torque the lower bolt to 74 foot-pounds and the 2 top bolts to 13 foot-pounds.
All right. Now, the process will be the same for the other side of the truck.