Replaces
This part doesn’t fit a . Select from parts that fit.
Item Condition:
New
Lifetime Warranty
This item is backed by our limited lifetime warranty. In the event this item should fail due to manufacturing defects during intended use, we will replace the part free of charge. This warranty covers the cost of the part only.
FREE Shipping is standard on Orders shipped to the lower 48 States (Contiguous United States). Standard shipping charges apply to Hawaii, Alaska and US Territories. Shipping is not available to Canada.
Expedited is available on checkout to the United States, excluding Alaska, Hawaii and US Territories as well as P.O. Boxes and APO/FPO/DPO addresses. Final shipping costs are available at checkout.


Created on:
Tools used
Brought to you by 1AAuto.com, your source for quality replacement parts and the best service on the Internet.
Hi, I'm Don from 1A Auto. I hope this how-to video helps you out, and the next time you need a part for your vehicle, think of 1AAuto.com. Thanks.
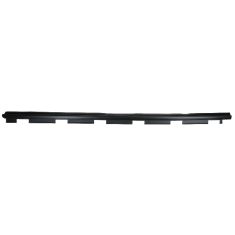
In this video, we're going to show you how to replace the window sweep on this 1996 Chevy Tahoe. We show you on the driver side but the passenger side has the same procedure. The items you'll need for this include a new window sweep set from 1AAuto.com, a 7mm and 10mm socket and ratchet, wire cutters, a flat blade screwdriver, a punch or drill, pliers, and some heavy duty staples.
Start off by removing this triangular panel. You just pull it. Next, you want to remove these two 7mm bolts. We'll just fast forward as Don does this. Next, pry up your switch panel and then just slide it back. Now, using your flat blade screwdriver, push the tabs on these harnesses and pull them free. For the speaker harness, you just push on the tab right here and pull it free. Now, using the flat blade screwdriver, pry out this bezel and it just pulls off. Now, you want to start prying out along the edges of the door panel. Try to feel for where the clips are and pull them free.
Now, you can lift it up and out of the window sill, and you just want to twist out your courtesy light socket. Remove this foam insert and then pull up this wire and using a flat blade screwdriver. Pull back the tab and disconnect this harness. Then, you want to remove these three 10mm nuts. We'll just fast forward as Don does this. Now, pull your mirror off. If you have one of these rain guards, you will have to peel it from the mirror first. Now, to remove this window sweep, you want to push back and pull up, and that will release it.
Now, for the window sweep attached to the door panel, you're going to have to remove a series of staples. Using some wire cutters, just try to get them underneath and pry the staples up and out. You want to repeat that process on all of them and then it pulls free. Take your new window sweep and line up the holes. You just want to punch a hole through the new window sweep down into the old holes. If the stapler you're using is a much different size than the one you used previously, you may have to make a new hole for the other side, push the staple through the window sweep, and then use pliers to help you push it through the door panel. Make sure you just bend those tabs underneath. Then, just repeat the process all the way down the window sweep.
Take your new window sweep that goes onto the door and just push it down into place. Making sure that it's re-clipping. Then once it's re-clipped, feed your harness back through the door and put your mirror back into place and replace those three 10mm nuts. Reconnect your mirror harness and push that foam back into the door.
Tools used
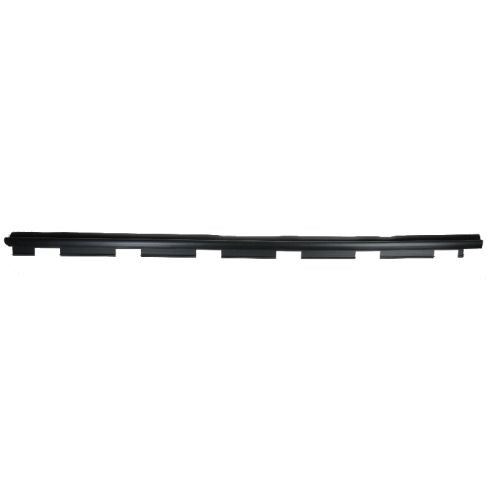
Okay, friends. To get started on our outside window sweep, we wanna have the window down so we can access it. Something that you're gonna notice is that it runs underneath your outside mirror, so what we're gonna need to do is get on the inside here and start loosening up some nuts. Before we can get to that, we need to remove this trim piece right here. Should just pop right off. Now, let's just grab onto this, pull it out of here. So, now with that removed, you can see that there's gonna be three mounting nuts. Well, what we wanna do right now is just loosen up the mirror. So let's go ahead and loosen up all three of those. The mirror nice and loose, you can see that we're gonna be able to get our window sweep under there. We need to continue on with a tool that looks like this, and that's gonna pull the window sweep up and off of here. I'm gonna start off on the far end. Just grab onto it, lift it up, and out of here. There it is. We'll recycle that.
Now, it's gonna be time to get our brand new window sweep in here. Let's go ahead and pull that away from the door. Slide this right in there. Push it as far as I can. At this point, you wanna make sure that you're gonna line up with the edge of the door. If you don't, you need to just continue pushing. This is looking pretty good. So now, I'm just gonna push this down. As you can tell, it's coming right past where it needs to be. At this point, you might notice that it's a little hard to push down. If you just use a rubber mallet, you can help it along. Straight all the way across. Now, let's put up the window.
The glass a little bit. As you can tell, it's touching all the way across. This looks perfect. Up those nuts. All right. Now, it's gonna be time to get this foam piece back in there. Go ahead and squish it down, pack it in there.
Now, it's gonna be time to install our last trim piece here. You're gonna notice you have these little flippies that are gonna on the inside of the door panel, and then you have the outer edge that goes along the outer portion. Let's go ahead and slide it down on there. Now, I'm gonna grab onto this door panel, I'm gonna gently pull it away, and then, from the backside here, I'm just gonna help the little piton down into its hole. Then put it in.