WARNING: This product can expose you to chemicals including Lead and Lead Compounds, which are known to the State of California to cause cancer, and birth defects or other reproductive harm. For more information, go to www.P65Warnings.ca.gov.
Lifetime Warranty
This item is backed by our limited lifetime warranty. In the event that this item should fail due to manufacturing defects during intended use, we will replace the part free of charge. This warranty covers the cost of the part only.
How to Replace Coolant Overflow Tank 1999-2006 Chevy Silverado
How To Replace Coolant Overflow Bottle 2001-06 GMC Sierra 2500
Created on:
Tools used
Drain Pan
Needle nose pliers
Flat Blade Screwdriver
10mm Socket
Vise Grip Pliers
Ratchet
1. Removing the Air Intake Box
Loosen the air intake hose clamp with a flat blade screwdriver
Separate the intake hose from the air box
Lift the air box up and out
2. Removing the Coolant Bottle
Have a drain pan ready
Clamp the coolant hose with vise grip pliers
Loosen the hose clamp with needle nose pliers
Pull the hose free
Remove the two 10mm nuts from the coolant bottle bracket
Loosen the lower hose clamp with needle nose pliers
Clamp the lower coolant hose with vise grip pliers
Pull the coolant bottle aside
Tip the coolant bottle to pool coolant away from the hose
Pull off the lower coolant hose
Disconnect the wiring harness from the coolant bottle
3. Installing the New Coolant Bottle
Connect the wiring harness to the new coolant bottle
Push the lower hose onto the coolant bottle
Push the coolant bottle into place using the locating tab
Remove the vise grip pliers from the lower hose
Push on the lower hose clamp with pliers
Fasten the two 10mm nuts onto the coolant bottle bracket
Push the upper hose onto the coolant bottle
Remove the vise grip pliers from the lower hose
4. Reinstalling the Air Box
Put the air box into place, using the locating tabs, starting at the back
Push the intake hose into air box
Tighten the intake hose clamp
5. Refilling the Coolant
Twist off the coolant bottle cap
Add coolant to the cool fill line
Twist on the coolant bottle cap
Brought to you by 1AAuto.com, your source for quality replacement parts and the best service on the Internet.
Hi, I'm Mike from 1A Auto. I hope this how-to video helps you out, and next time you need parts for your vehicle, think of 1AAuto.com. Thanks.
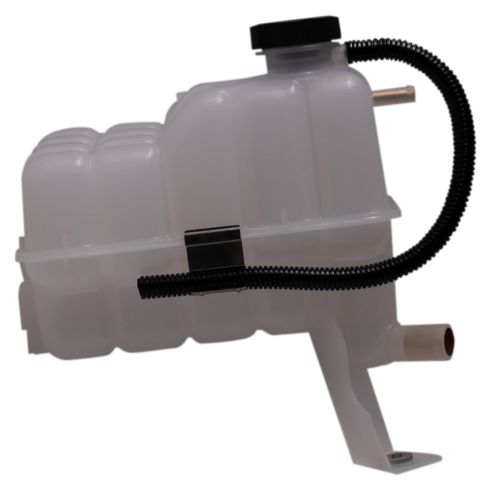
In this video, we're going to show you how to replace the radiator overflow bottle on this 2002 Chevy Suburban. It's the same part and similar process on these Suburbans from 2000 to 2004. The items you'll need are a new radiator overflow bottle from 1AAuto.com, flat blade screwdriver, 10mm socket and ratchet, pliers, two pairs of locking pliers, and a drip pan.
Start off by loosening up this hose clamp. Then, just pull this hose free from the air box. Lift up the air box and just push it towards the engine to free it from the side. Then, lift up that hose and lift your air box up and out.
Clamp on to this hose with locking pliers and make sure you have a drip pan below it. Then just push these teeth together on the hose clamp and pull the hose free. Then remove these two 10mm nuts. We'll just fast forward as Don does that. Now, push the teeth together on this hose clamp. Slide it down the hose. Then clamp onto this hose with locking pliers and pull the hose free. It's a good idea to tip the tank back so it makes less of a mess. Then just pry that hose off with a flat blade screw driver until you can get a good enough grip on it, and pull it off. Just lift up on the tab on this harness and pull it free. And your radiator overflow bottle is disconnected.
On the left, is the old radiator overflow bottle. On the right, is the new one from 1A Auto. You can see they're identical, and they'll fit exactly the same. Take your new overflow bottle and reconnect the harness. Then, push that lower hose into place. Now push this tab into this slot. Push the bottle down. Then remove those locking pliers and slide that hose clamp back into place. We'll just fast forward as Don replaces those two 10mm nuts and tightens them up. Now push the teeth together on this hose clamp again and push the hose back into place. Then just remove the locking pliers.
You want to push these three tabs down into these three holes. Pull back the air hose and push the back end of the air box down in first. Then just push the box straight down into place and make sure you push those tabs in, push the hose back onto the front, and then tighten up that hose clamp.
Obviously you'll want to refill your radiator fluid. There are cold and warm fill lines. Obviously our engine's cold right now, so fill up to the cold line. You should after you refill it, the first few times you drive your vehicle just check it and make sure that it's at the proper level.
We hope this video helps you out. Brought to you by www.1AAuto.com, your source for quality replacement parts and the best service on the Internet. Please feel free to call us toll-free, 888-844-3393. We're the company that's here for you on the Internet and in person.
Tools used
Funnel
Flat Blade Screwdriver
Drain Pan
10mm Socket
Ratchet
Needle nose pliers
1. Removing the Air Intake Box
Loosen the clamp on the air intake hose.
Remove the air intake hose from the intake box.
Pull back on the air intake box and pull it up and out.
2. Removing the Coolant Bottle
Remove the coolant bottle cap.
Use pliers to pinch the tabs on the clip together and slide the clip back and remove the hose.
Remove the 10mm bolt from the front of the bottle and the 10mm nut from the back.
Pull the coolant bottle up and out.
Disconnect the connector.
Clamp the coolant hose with a pair of vice grips.
Slide the clip back with pliers and pry off the coolant hose.
Remove the bottle and dump the coolant into a clean bottle or container.
3. Replacing the Coolant Bottle
Reconnect the coolant hose and remove the vice grip.
Slide the coolant hose clip back into place.
Reconnect the harness.
Put the bottle into place.
Replace the 10mm nut and bolt on the bottle.
Reconnect the other hose on the coolant bottle and slide the clip forward.
Use a funnel and pour the coolant into the new overflow bottle.
Replace the cap.
4. Replacing the Air Intake Box
Push the intake hose back and push the back end of the intake box down into place.
Reconnect the air intake hose.
Tighten the clamp on the hose.
Brought to you by 1AAuto.com, your source for quality replacement parts and the best service on the internet.
Hi I'm Mike from 1A Auto. I hope this how to video helps you out and next time you need parts for your vehicle think of 1AAuto.com. Thanks.
In this video we're going to show you how to replace the radiator overflow bottle in this 2002 GMC Sierra 2500 HD. It's pretty much the same procedure in most GM trucks, SUVs and pickups between the years of 1999 and 2006. The items that you'll need are a new radiator overflow bottle from 1A Auto; a flat blade screwdriver, pliers, vice grips, a funnel, a bottle or pan for the coolant and a 10 mm socket and ratchet.
To start off we're going to remove the air intake box. You just want to use a flat blade screwdriver to loosen up that bolt and that will loosen the clip and you can pull the air intake hose off. Then you just want to pull back on the air intake box and pull it up and out. You want to use pliers to pinch that clip together and then you want to pull that hose off. It helps if you loosen the cap. It releases some of the pressure and then the hose should pull right off. Next what you want to do is remove the 10mm bolt from the front of the overflow bottle and the 10mm nut from the back of the overflow bottle. We'll just fast forward while he does that.
Now you want to lift the bottle up and out and disconnect the connector there by pulling back on the tab. Now you want to tilt the overflow bottle back and clamp the hose with a pair of vice grips. Now you want to use a pair of pliers and push that clip together and slide the clip back off of the radiator bottle. Then you want to pry off that hose using a flat blade screwdriver. Once the hose is off you can remove your radiator overflow bottle from the engine. You want to dump the coolant into a bottle. Use a funnel or you could also use a pan and then you could pour it right into the catch pan. You need something to store the coolant in. You want it to be relatively clean because we are going to pour this back into the radiator overflow bottle.
You can see the old radiator overflow bottle on the right and the new one from 1A Auto on the left. They're exactly the same; same mounting brackets. You want to tuck your new radiator overflow bottle down into the engine. Reconnect that hose and you can disconnect your vice grip. Then you want to use a pair of pliers to slide that clip back onto the overflow bottle. Now you want to connect your clip and line up the overflow bottle. We'll fast forward here as he replaces the 10mm bolt and the 10mm nut that secure the overflow bottle.
Now you want to reconnect that top hose. Using pliers push the clip back together and it should release it. Now you want to pour the radiator coolant back into the overflow bottle. Replace the cap. Now you want to put your air intake box back in so just pull back that air intake hose. Put the back end of the air intake box in first and push it down into place. What you want to do is you want to line up the two clips on the bottom of the air intake box with the two holes in the body of the truck. Then you want to reconnect that air intake hose. Push the box down into those holes. Then using a flat blade screwdriver tighten up the screw on that clip and then you're all set.
We hope this helps you out. Brought to you by www.1AAuto.com, your source for quality replacement parts and the best service on the internet. Please feel free to call us toll free 888-844-3393. We're the company that's here for you on the internet and in person.
ECA92002
In Stock
Product Reviews
Loading reviews
5.00/ 5.04
4 reviews
5 Stars
4 Stars
3 Stars
2 Stars
1 Star
4
0
0
0
0
John
January 15, 2023
LOOKS LIKE FACTORY EXCEPT FOR OVERFLOW HOSE BUT WORKS THE SAME. EXCELLENT
Easy Peesy fix!
Ralph
April 7, 2023
The correct part for my 2004 Chevy Tahoe. It fit and works properly!
My old coolant reservoir was old and dingy inside which made it hard to read the coolant level inside it. This new coolant reservoir is so much nicer and easier to see the coolant level.
I have had 99 % success with all products ordered.
Tony
October 22, 2023
This is my 2nd time in replacement since I ordered a a few years ago.. I hope the sensor lasts much longer this time.
Customer Q&A
Does this also come with cap?November 24, 2024
Hector R
10
Yes.
November 24, 2024
Leo P
10
Yes it does
November 25, 2024
Larry W
10
Yes it does
November 25, 2024
Pablo M
Customer service
877-844-3393
Monday - Friday 8:00am - 9:30pm ET Saturday - Sunday 8:00am - 4:30pm ET
Chevrolet is a registered trademark of General Motors Company. 1A Auto is not affiliated with or sponsored by Chevrolet or General Motors Company.See all trademarks.
Enter Vehicle Year Make Model
Specify your vehicle's year, make and model to guarantee fit.
Year
Make
Model
Options
Drivetrain
This part doesn’t fit a . Select from parts that fit.