Brought to you by 1AAuto.com, your source for quality replacement parts and the best service on the Internet.
Hi, I'm Mike from 1A Auto. I hope this how-to video helps you out, and next time you need parts for your vehicle, think of 1AAuto.com. Thanks.
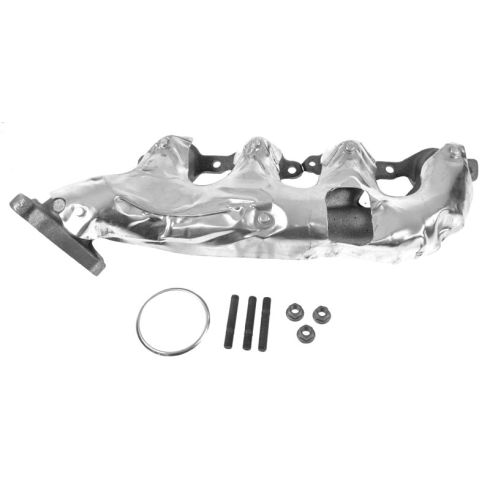
In this video, we're going to show you how to replace the exhaust manifold on this 2002 Chevy Suburban, and it's the same part and similar process on these Suburbans from 2002 to 2006. We show you on the passenger side, but the driver side is the same procedure. The items we'll need for this include a new exhaust manifold from 1AAuto.com, 10mm and 15mm socket and ratchet with extension, a piece of pipe for extra leverage, pliers, a wire brush, a torque wrench, jack and jack stands, and we recommend air-powered tools but they're not required for this procedure.
Start off by loosening these two hose clamps using your flat blade screwdriver, and we'll just fast forward as Don does this. Now, just pry this clip out and then pull the hose back. You may need a flat blade screwdriver to help you pry it free, and then pull forward and lift it up and out. Next, you want to remove this 15mm bolt holding on your dipstick tube. Now, we'll just fast forward as Mike removes that. Now, pull the tube up and out, and then you want to just pull out on your spark plug wires and you can either just set them aside or pull the top part free too.
Then you want to remove each of these 10mm bolts along your exhaust manifold. We'll just fast forward as Mike removes the rest of those. You want to leave one on either end and one in the middle just half way in. To loosen some of these, you may have to use a piece of pipe for some extra leverage. Jack your vehicle up and then remove these three 15mm nuts, and it helps to spray them with penetrating oil to loosen them up. Then, just using your socket and ratchet and a piece of pipe for extra leverage, just remove those nuts.
You'll see, I kind of go to air-powered to cheat a little bit. It just goes faster. You also want to remove the three nuts from the other side to let the exhaust drop down. Now, remove these 10mm bolts that you've got half way in holding this in place. Once you've removed them, just pull your exhaust manifold up and out and pull off your gasket.
On the left is the old exhaust manifold; on the right is the new one from 1AAuto. You can see they're identical and they'll fit exactly the same. Take this ring off your old manifold and push it into place in your new one if your new one doesn't come with one of these. Twist in the studs and just tighten them up with a pair of pliers. Now at this point, on a lot of these GM V8s, you can have broken bolts, and what you want to do with the manifold out, you can really use a hammer, give the bolts some good taps and then lock on to them really tight with some vice grips and you can usually get them out. If that doesn't work, a little bit of heat with a torch on the head will usually free them up.
Once you have everything out, use a wire brush to clean up the surface of the head where the manifold will mount and then slide the manifold in. Just be careful not to break anything. Slide the manifold down into place, and once you have it resting in place, put your gasket in. Obviously, the gasket goes between the manifold and the head. Lift the head up or lift the manifold up into place, and start your bolts in. I basically just start one or two at first, get all of them started, and then preliminary tighten them up.
Put the manifold in place. Just lift your exhaust up and put the flange in place and get those three nuts on. Now, just replace those nuts and tighten them preliminarily. Tighten up the 10mm bolts along the top, and then just torque each of those to 40 foot-pounds. You want to start with the center ones and work your way out. Now, tighten up these three nuts the rest of the way. You want to repeat the procedure for the other side.
Take your dipstick tube and feed it back down into place. You can look through the spot right here and you can see it going in. Just line it up and push it into that hole. Once you've pushed that all the way in, you can replace that 15mm bolt that holds it into place. We'll fast forward as Mike replaces that and tightens it up. Now, just replace your spark plug wires. Now, take this air intake hose and push it back down into place on the air intake box, and then on to the engine and just tighten up those two hose clamps. Just re-clip that hose to the air intake hose and you're all set.
We hope this video helps you out. Brought to you by www.1AAuto.com, your source for quality replacement parts and the best service on the Internet. Please feel free to call us toll-free, 888-844-3393. We're the company that's here for you on the Internet and in person.