This item is backed by our 1-year warranty. In the event this item should fail during intended use, we will replace the part free of charge. This warranty covers the cost of the part only.
FREE Shipping is standard on Orders shipped to the lower 48 States (Contiguous United States). Standard shipping charges apply to Hawaii, Alaska and US Territories. Shipping is not available to Canada.
Expedited is available on checkout to the United States, excluding Alaska, Hawaii and US Territories as well as P.O. Boxes and APO/FPO/DPO addresses. Final shipping costs are available at checkout.
How to Replace Liftgate Release Switch 2007-14 Chevrolet Suburban
Created on:
Tools used
Socket Extensions
T20 Driver
T30 Bit
10mm Socket
Ratchet
Trim Tool Set
1. Removing the Lift Gate Panel
Open the lift gate
Turn off the automatic lift gate switch inside the cabin
Remove the T30 bolt from the lift gate handle
Pry out the lift gate panels with a trim tool
Open the rear glass
Remove the two pushpins from the back side of the lift gate panel
Pull the panel off the lift gate
Disconnect the electrical connector from the lift gate close switch
2. Removing the Lift Gate Handle
Remove the four 10mm nuts from the lift gate handle
Disconnect the electrical connector from the lift gate handle
Push the grommets out of the lift gate handle
Release the lift gate handle clips
3. Removing the Lift Gate Open Switch from the Handle
Remove the four T20 bolts from the back of the handle
Pull the bracket off the back of the handle
Pull the lift gate open switch out of the handle
Thread the wire out of the handle
4. Installing the Switch
Thread the wire into the handle
Line up the open switch on the handle
Line up the bracket on the switch
Fasten the four T20 bolts into the handle
5. Installing the Handle
Feed the wire into the lift gate
Fasten the four 10mm nuts onto the back of the handle
Connect the electrical connector for the switch
6. Installing the Lift Gate Trim
Slide the lift gate panel into place
Connect the electrical connector to the lift gate close switch
Push the plastic rivets into the back side of the lift gate trim
Close the lift gate glass
Push in the lift gate panel clips
Fasten the T30 bolt into the lift gate handle
Turn on the automatic lift gate switch inside the cabin
Test closing and opening the lift gate with the two switches
Hi. I'm Mike from 1AAuto. We've been selling auto parts for over 30 years!
In this video we will be removing and replacing the lift gate release switch in the 2009 Chevy Suburban. If you need this part, or other parts for your car or truck, click the link in the description and head over to 1AAuto.com.
We're going to open the lift gate. We're going to switch our automatic lift gate off.
We're going to take this handle off. We're going to use a T30 and an extension. Take that off. Next we're going to use one of our trim panel tools. We sell these at 1AAuto.com. Slide it in and peel it back. We're going to pull that down. I'm going to pull this one down. We just need to pull the edges out to gain access to this. Before I pull it out, I'm going to pop this. I'm going to pop this rear glass. I'm going to use this button on the key fob. Hold it down, your glass will pop up. We're going to take these two pushpins out. Push down on them and release. Pull them out. Pull those out. We don't want this to close all the way. I'm going to pull this up a little bit. Pry down on this. We can push this up and out of the way. There's, for this switch, a little clip. Pull that up. Pop that switch off.
Next we use our 10 millimeter socket, and extension, and a small ratchet. Pull these nuts off. Then there's two more over here. I'm going to pop this connector off right here. It slides out like that. Here we're going to use our flat blade screwdriver. We'll push this grommet through just like that. We're going to use the screwdriver and push on this retainer tab right there while pulling from up top. There's another one on the other side. Then, pull out.
Next we're going to use the T20, and extension, and a ratchet. We're going to take these two, four fasteners out. Pull that up. Fish our wiring through here, and there's our switch.
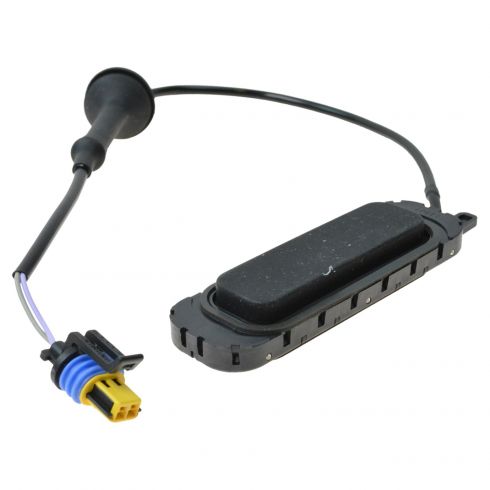
As you can see, this is our old rear lift gate switch, the outer switch. This is our new one. It's identical from 1AAuto.com. Look at the connectors. The connectors are identical. Rubber grommets go through the gate to the switch itself. A lot of times these switches get corroded. They fill up with water, and then they won't work any more. Get yours from 1AAuto.com and you'll be ready to rock and roll.
Next we're going to fish this connector through here. Pull the grommet through. This is our switch right there. We're going to take this cover. This is going to go on this way. You can see the wires go through here on the cover. It's going to go right like that. We're going to take our Torx T20 and the screws. Then we're going to tighten them all down just snug.
We want to fish our wiring through the hole. Push this grommet in. If you need help, use the flat blade screwdriver. Line up the holes and push it down. Next we're going to use our 10 millimeter socket and extension and install the 10 millimeter nuts. Then over here. Once you get those in, then I will snug in.
Next we're going to plug in the connector until it clicks. We want to slide this over up top first, sliding these parts underneath up here just like that. Before we push those push tabs in, we're going to align some of these push rivets and get those in. You need to remember there's an electrical connector right here. Hook that up for your switch.
With these plastic type rivets that we've pulled out before, you want to get it set up like this. You're going to push on this to get it so it's popped through like that, so that when we get these in the hole, you're going to push down and make it flush. That's good. We can close this. We're going to line these up. Push that up. Over here, line these up. It's all lined up.
Now we're going to install this bolt. It's a T30 Torx. Tighten it up. Just snug it up. We're going to turn on our automatic lift gate.
Now we're going to test our lift gate with the close button, and it latches good. Now we're going to open it. Push the button. Good.
Thanks for watching. Visit us at 1AAuto.com for quality auto parts, fast and free shipping, and the best customer service in the industry.
D1499F
In Stock
Product Reviews
Loading reviews
4.94/ 5.016
16 reviews
5 Stars
4 Stars
3 Stars
2 Stars
1 Star
15
1
0
0
0
switch
Dan
December 26, 2018
This part fit perfectly and was easily installed with video help. The shipping was quick and Iwill definitely will 1A auto again.
OEM replacement
F
January 11, 2020
Excellent product brought by 1a auto, excellent service and after watching the installation video on you tube by 1a auto very easy to install yourself. Buy with confidence and install with confidence with 1a auto. Will definitely use 1a auto more in the future.
Lift gate release switch
K
July 3, 2020
Followed the video for a Tahoe. I have an Escalade. The switch works perfect! Definitely worth the effort... will follow this site now.
Oem fit and quality at great price!
T
September 23, 2020
Definitely recommend this for a replacement for the lift gate switch. It is identical to the oem switch in fit and quality as well as affordable. Once again. 1a does it right!
See above
Richard
June 29, 2021
Easily installed and works perfectly. Your video on replacing this switch was concise, accurate and easy to follow.
????????????
Laurie
January 15, 2022
Hello dear. So sorry Im just getting to reply back to you. Thanks so very much my part work really well. Question. Do you ship to Nassau Bahamas??
John
July 11, 2022
Spot on
Meets all expectations
Jim
July 15, 2022
Exact functional replacement for my nonfunctional switch.
fast and quick
Diana
September 2, 2022
Quick and fast receiving the part. The video was worth watching made it easy to fix and repair. Will buy from them in the future.
Mark
December 13, 2022
Good price and arrived in a couple days
CHARLES
February 17, 2023
easy to install
Marcus
April 17, 2023
Great product!
The right stuff!
Dwight
October 30, 2023
The right part shipped on time and the install video was right on. Thanks 1A Auto??
Crappy Design from factory
Dustin
January 15, 2024
GM crapped the bed when they went to this style of switch. Thankfully they give you a hole to drill on the panel so you know where to put the screwdriver. These things hate the winter, I'm on my 3rd one.
Buy this one, don't buy cheap you'll end up replacing it in a years time!
Zachary
February 18, 2024
Easy to install and works great.
Wyatt
May 20, 2024
Install was easy. The replacement fixed my issue. Fit was just what I was expecting.
Customer Q&A
I have a 2007 Tahoe with a manual tailgate. I just installed a new actuator because it quit working but it still wont open. Any thoughts?November 13, 2020
Titia G
10
There could be multiple reasons why you're having this particular problem. We suggest taking your vehicle to a nearby reputable shop to identify the cause. Once you know the cause, we'll be happy to see if we carry the parts and how-to videos needed for your repair.
November 14, 2020
Emma F
10
I had to turn my switch off on the console inside the vehicle then turn it back on. My actuator has been working fine. Check the harness make sure it is plugged in correctly (no bent pins).Then check for fuse.
November 21, 2020
Dan R
Customer service
877-844-3393
Monday - Friday 8:00am - 9:30pm ET Saturday - Sunday 8:00am - 4:30pm ET
Chevrolet is a registered trademark of General Motors Company. 1A Auto is not affiliated with or sponsored by Chevrolet or General Motors Company.See all trademarks.
Enter Vehicle Year Make Model
Specify your vehicle's year, make and model to guarantee fit.
Year
Make
Model
Options
Drivetrain
This part doesn’t fit a . Select from parts that fit.