WARNING: Cancer and Reproductive Harm - www.P65Warnings.ca.gov.
Lifetime Warranty
This item is backed by our limited lifetime warranty. In the event that this item should fail due to manufacturing defects during intended use, we will replace the part free of charge. This warranty covers the cost of the part only.
Returns: Parts with electrical components cannot be returned once installed.
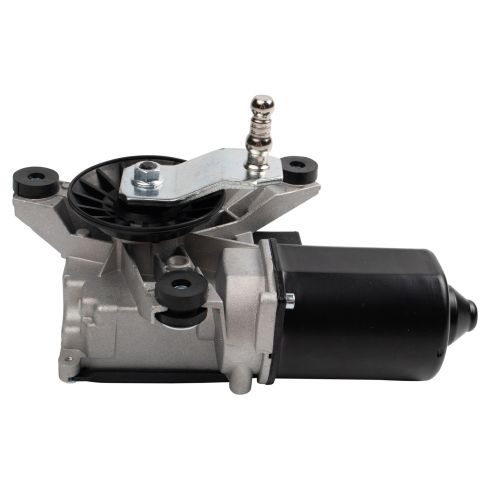
How to Replace Wiper Motor 1988-98 GMC Sierra K1500
Created on:
Tools used
Socket Extensions
Flat Blade Screwdriver
Phillips Head Screwdriver
Painter's Tape
10mm Socket
Ratchet
1. Removing the Wiper Arms
Mark your wiper blade position with painter's tape
Pry out the wiper arm tab with a flat blade screwdriver
Lift the wiper arm off the pivot
Repeat these steps for the other arm
2. Removing the Wiper Cowl
Peel the weatherstrip off the top of the firewall
Remove the three Phillips screws from each side of the cowl
Remove the two corner panels
Remove the fourth Phillips screw from each side of the cowl
Remove the four Phillips screws from the front of the cowl
Lift up the cowl
Disconnect the windshield washer hose
Remove the cowl from the vehicle
3. Removing the Wiper Motor
Loosen the 10mm nuts on the wiper linkage
Pull the wiper linkage arms off the wiper motor stud
Disconnect the wiper motor electrical connector
Remove the three 10mm bolts from the window motor
Pull the window motor off the firewall
4. Installing the Window Motor
Put the window motor into place
Install the three 10mm bolts for the wiper motor
Connect the wiper motor electrical connector
Slide the wiper linkage arms onto the wiper motor stud
Tighten the 10mm nuts on the wiper linkage
5. Installing the Cowl
Connect the washer hose
Put the cowl into place
Install the four Phillips screws in the front of the cowl
Insert the first two screws on each side of the cowl
Put the corner panels into place
Install the remaining two screws on each side of the cowl
Push the weatherstrip into place
6. Installing the Wiper Arms
Slide the wiper arms onto the pivots
Lay the wiper blades down gently
Remove the painter's tape
Hi, I'm Mike from 1A Auto. We've been selling auto parts for over 30 years. We're dedicated to delivering quality auto parts, expert customer service, fast and free shipping, all backed by our 100% satisfaction guarantee. Visit us at 1AAuto.com, your trusted source for quality auto parts.
In this video, we're going to be working with our 1996 GMC Sierra K1500. We're going to show you how to remove and replace your vehicles windshield wiper motor right here. If you like this video please click subscribe. We have a ton more information on this truck as well as many other makes and models. If you need this part for your vehicle, you can follow the link down on the description over to 1AAuto.com. Here are the items you'll need for this repair.
Use some small pieces of painters tape to make a straight line with your wiper blade. This will help us position the arms back on without needing to do trial and error. Using the flat blade screwdriver, pry out on the tab on the top edge of the wiper arm at the pivot. Remove the wiper arm from the pivot. Do the same thing on the opposite side.
Remove the weather strip from the top of the firewall. Remove the three Phillips-head screws securing the cowl to the truck on both sides. There's one down on this opening. There are three, both in the same positions on either side of the vehicle. Once you get the first three screws removed, lift up and remove this corner panel that goes around the hinge. There's a fourth Phillips-head screw under there you'll also need to remove. Remove the three screws from each corner of your cowl.
Once that's done, you can remove all four of the Phillips-head screws along the front of the cowl. Pull back and lift up to remove the cowl. You'll need to disconnect the washer hose over here on the driver's side. Remove the cowl from the vehicle.
Loosen the 10 millimeter nuts on the wiper linkage. There's no need to remove these entirely. If you're doing the driver’s side arm, you can stop here and move on to removing the other portion on the other end of the arm. However, for the passenger side, you'll need to loosen this.
Remove the blue safety tab in the connector by pulling it straight back. Lift up on the tab with a small flat blade screwdriver and remove the electrical connector. Then remove the three 10 millimeter bolts around the body of the motor with a 10 millimeter socket ratchet and extension. Once the screws are out, wiggle the motor to release it and then you want to pull back at the driver side, slide it out until the center of the pivot ball is in the center of the opening, and then pull out to release it.
Reinstall the wiper motor by sliding the arm back through in the opposite fashion you used to remove it. Start one of your 10 millimeter bolts to keep it in place. Get the other two going, reinstall them with your 10 millimeter socket ratchet and extension. Reinstall the electrical connector and snap the blue safety tab back into its loop. Snap the arms back on to the wiper, tighten them back down with your 10 millimeter socket and ratchet. Make sure they're in the same place they were removed from.
Reconnect your windshield washer hose, and lay the cowl back into place. Reinstall the four screws in the center section of the cowl. Reinstall the two short screws on the end. Once the rear one's in, you can reinstall the plastic cover. It simply slides in and drops down. Reinstall the longer screw on the outer edge here. Repeat these steps on the opposite side. Reinstall the weather strip onto the top edge of the cowl.
Now, I know we had mentioned using the painters tape to align these earlier, but it turns out these wipers are keyed, which means they'll only go on one way. Simply pull out the tab and slide them back on. Lock the tab back into place. Lay the wiper down. Remove the tape.
Thanks for watching. Visit us at 1AAuto.com for quality auto parts, fast and free shipping, and the best customer service in the industry.
WWA10628
In Stock
Product Reviews
Loading reviews
5.00/ 5.05
5 reviews
5 Stars
4 Stars
3 Stars
2 Stars
1 Star
5
0
0
0
0
Randy
December 17, 2022
Worked and fit perfectly thanks a bunch
Adam
September 5, 2023
installed easily and works as it should. fixed the Phantom windshield wiper problem
Raymond
December 12, 2023
Fit perfect works great I appreciate the videos for easy install
Garry
February 28, 2024
Wipers were intermittent. Mostly didn't work when it was raining lol. Work perfect now.
Steve
April 23, 2024
Well built motor...looks like it is going to be fine...
Customer Q&A
Does this wiper motor also control the washer pump?November 11, 2021
John D
10
This motor will only control the wiper arms, not the windshield washer pump.
November 11, 2021
Jessica D
need one for 1988 2500?February 19, 2022
John D
10
We would be happy to check fitment. Can you please confirm the make of your vehicle and if it has 2WD or 4WD? Does it have Delay wipers?
February 21, 2022
Andra M
Does the motor have a new board in it? Or is that sold seperatly?December 23, 2022
Jessee D
10
This wiper motor includes the internal board
December 27, 2022
Jason R
Is it only one motor for both wiper blades or two separate motors for each wiper blade?October 30, 2024
Carlos S
10
One motor works both wiper blades. There is an adjustment for the position of the rotor arm built into the truck mechanism. I have had good results with this motor.
October 30, 2024
RALPH O
10
It's one motor for both wipers. The two wipers are connected via a linkage.
October 30, 2024
Adam W
10
Yes only one motor. There is a linkage that operates the wipers in tandem.
October 30, 2024
Cecil W
Does this motor work with intermediate wipers?December 10, 2024
Howard P
10
Yes, on my 95 Chevrolet truck, it works exactly like the original one.
December 10, 2024
RALPH O
10
Yes it does. 99 GMC Suburban - works just like the original motor.
December 11, 2024
Lynn R
10
Yes, on my 95 Chevrolet truck, it works exactly like the original one.
December 11, 2024
RALPH O
Customer service
877-844-3393
Monday - Friday 8:00am - 9:30pm ET Saturday - Sunday 8:00am - 4:30pm ET
GMC is a registered trademark of General Motors Company. 1A Auto is not affiliated with or sponsored by GMC or General Motors Company.See all trademarks.
Enter Vehicle Year Make Model
Specify your vehicle's year, make and model to guarantee fit.
Year
Make
Model
Options
Drivetrain
This part doesn’t fit a . Select from parts that fit.