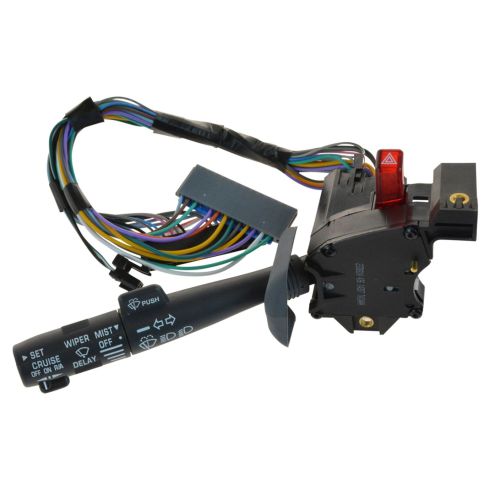
DMZCC00001-Chevrolet GMC Cadillac Windshield Wiper, High Beam, Hazard Light Switch Dorman Help 2330814

Replaces
1999 GMC Savana 2500 Van with Tilt Steering Windshield Wiper, High Beam, Hazard Light Switch Dorman Help 2330814

Frequently bought together
Product Reviews
Loading reviews
4.88/ 5.0
33
33 reviews
perfect fit
January 22, 2017
works perfect my old switch the cruise was sticking, this works and looks perfect.
Good part. Video helps
February 5, 2017
I am not sure this switch was a Dorman because Dorman always has a label on the box or switch with their name. This looked like a Taiwan knockoff which is a source of good products. Mainline China on the box would have generated a return. Install went fine following the video. Only problem with video was that it is not clear on airbag removal from steering wheel. 4 metal tabs you must pry toward column and pull on corner as you go. Shipping using UPS and then transfer to USPS is always a real bad experience. Just ship using USPS. It always arrives on time or a day earlier. Problem of chattering directional relay has been solved
Dimmer seitch
April 11, 2017
Ordered this for my 2000 gmc k2500 crewcab the videos really helped me remove and install my new parts. The multifunctional switch works great
Good fix good part
June 23, 2017
Looks like same or better quality as original. Installed with good instruction video. Works just like new.
I'm a happy Coustomer.
Turn signal switch
July 8, 2017
The part arrived ahead of schedule and the box was in good condition. I watched the video online, which was helpful. The part installed as expected and fit just as the factory unit. It works like new now. The only difference between this unit and a factory GM unit is the crispness of the detents when clicking the signal on and off. This unit feels softer and is quieter when it returns to center. This is not a complaint, simply an observation. I have used the unit for about a month now.
Just what the chevy Ordered
October 14, 2017
Went together seamlessly , works great, would highly recomend
I Have Lights!
February 1, 2018
Good product, fast shipment, and decent pricing. Turn signal switch was well packaged.
One of many orders from 1Aauto
April 10, 2018
The part was an exact fit. And with the how to video an easy task to replace. I subsequently ordered an ignition lock cylinder, window regulator with motor and door lock actuator. For the same vehicle. The parts always arrive on time.
CAN YOU BELIEVE. THEY SENT THE RIGHT PART =:)
August 27, 2018
LOOKS GOOD WORKS GOOD I HAVE HAZARD LIGHTS NOW. PART IS AS IT IS SUPPOSE TO BE. GREAT WORK FROM THE STAFF AT 1A AUTO PARTS=:)
Turn signal replacement
September 27, 2018
Great how to videoed. They are a great asset to those will to repair vehicles themselves . The product I orders was correct for my truck . With your videos I am willing to buy more products and attempt these projects myself. Thanks for your products and support..
Better than the original!
October 18, 2018
Nailed it! I think it works better than the original. Turn signals work smooth., cured my intermittently non working wipers too! The videos that go with this really saved me serious time. Couldn't be happier! No complaints with the price either....
Top Notch Customer Service
November 8, 2018
I ordered some replacement parts for misc repairs on my vehicle, well I accidentally ordered too many of one particular product and when I received the items I contacted 1aAuto customer service department. Let me just say the service I received was absolutely top knotch and I will not ever hesitate to order more parts from them in the future. I highly recommend doing business with them!
-Patrick 11/08/2018
Great parts
November 10, 2018
Fast shipping arrived day early. Just what I needed.
November 26, 2018
Perfect fit. Great install video. Great people to deal with. Great prouduct.
Works Great
November 30, 2018
I just followed the video that 1A Auto has for this part everything went perfect, thanks 1A
Perfect Item
April 4, 2019
Item was exactly as advertised. I love that the give multiple views of items before purchase to ensure item is correct. Thank you so much. Your great!!
Just what I needed
July 13, 2019
I was a little hesitant to order this part because it looked fairly involved. After watching A-1 Auto's video for the repair I was willing to give it a shot. Part came on the exact day I was told it would and was identical to my old part. I watched the step by step video on my laptop while doing the repair and everything went great. It took me about 3 hours to complete the job. The biggest thing for me was getting the air bag out but found another video that showed the release better. I'm sure the repair shop would have charge about $100 per hour for 3 hours and marked up the part (I paid $89.95) so I'm sure I saved about $450+ taxes. Great deal A-1 Auto. Thanks I will be back...
GM combination switch
July 22, 2019
The Dorman product arrived on time and fit exactly the same as a OEM part would have. Very satisfied to the point I will order again if more parts are needed
Turn signal switch
July 29, 2019
Ordered the part,Free shipping .Recieved it in about five days.Watched the video,Learned alot from it,all went well it took about two hours. Everything working again.
Exact replacement
February 28, 2020
Dealer who installed commented that it looked like OEM including
excellent packaging. Saved me hundreds. USPS delivered 2 days faster than quoted.
worked great
May 12, 2020
I would buy again
Multi fuction turn signal switch
July 28, 2020
Well made replacement part for my twenty year old original.Original part was worn and very loose. New part works and feels sturdy when operating. Very happy!
Turn Signal switch- Multi-function
August 14, 2020
Watched the video and replaced switch, directions were right on.
Switch works great and all functions work.
I will use your products again if new problems arise in the future.
Thank you.
2000 Tahoe Limited
September 9, 2020
Exact fit for 2000 Tahoe limited and yes it is easier if you take off steering wheel I tried to leave it on but soon realized just take it off
1997 chevy suburben
December 14, 2020
Two times buying from 1A Auto they are the best and they have all the parts i need all the time
Multifunction switch
March 14, 2021
Switch works great. Factory feel and solid doesn't feel cheap at all
New parts for an old truck
April 14, 2021
I accidentally broke the hazard button on my multi switch. Thought it might be an easy fix until i realized the whole unit had to be changed out. Also, all the writing had faded so i needed a new one anyways. I found the whole unit on 1AAuto, and matched it with the features my current one had. Cost was the same if not cheaper with 1AAuto but they also had videos showing how to make the swap at home. I placed the order and it came within a few days. No backlog from what i noticed. When i pulled the old one out and compared them, they were identical and the new one fit perfectly into place. I completed the wiring install and all the functions worked without a problem. Im definitely thankful for their how-to videos. They made the job much easier.
Perfect part
April 21, 2021
A garage wanted to charge TWICE what I paid for the multifunction switch and $350 to install! Using the videos produced by 1aAuto, my 12 y.o. daughter and I did it ourselves over a relaxing weekend. She learned more skills, I paid her $50 and saved, saved, saved. I get most of the parts I need from 1aAuto. Thanks for the savings, and the switch works perfectly.
Worked perfectly!
May 11, 2021
I ordered this for my 97 Chevy Truck and it worked flawlessly! Even better is 1AAuto had a help video to help me replace it.
In like other places I got a Lifetime Warranty with it.
February 27, 2022
Its in and working like it should
January 29, 2024
Works great
Multifunction switch
January 30, 2024
Perfect fit for my 1996 K1500.
Blinker switch
February 26, 2024
Product fit fine and worked, still does
Customer Q&A
Will this switch make my break light stay on put break light switch on and they still on?
April 13, 2020
10
Thanks for your inquiry. There could be multiple reasons why you're having this particular problem. We suggest taking your vehicle to a nearby reputable shop to identify the cause. Once you know the cause, we'll be happy to see if we carry the parts and how-to videos needed for your repair.
April 13, 2020
Adam G
Does that switch control the horn also?
December 17, 2020
10
No it does not
December 17, 2020
M I
10
No, this will be for the turn signals, wipers, and hazard switch. The horn control is a different part all together.
December 17, 2020
Curtis L
Does this fit a 2013 gmc k1500 W/T ?
November 26, 2021
10
No, this part is not listed to fit.
November 26, 2021
Andra M
GMC is a registered trademark of General Motors Company. 1A Auto is not affiliated with or sponsored by GMC or General Motors Company.
See all trademarks.


