Replaces
This part doesn’t fit a . Select from parts that fit.
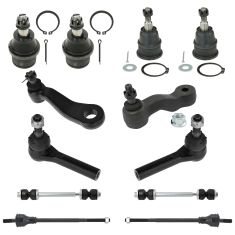
Frequently bought together
Part Details
TRQ suspension kits are manufactured using premium raw materials and coatings for extended service life. Each TRQ suspension component is designed to be a direct, maintenance-free replacement to the stock unit. To extend the life of your steering and suspension components, TRQ recommends replacing components in pairs, sets, or kits. All products are fit and road-tested in our Massachusetts R&D facility to ensure we deliver on our promise of Trusted Reliable Quality.
Product Features
Our steering and suspension kits are offered in a variety of options to best fit your repair needs and your budget.
Install Tip: When replacing steering components, have a professional alignment performed afterwards. This ensures proper tracking and even tire wear.
Our steering and suspension components are pre-greased and sealed for long life and do not require the extra maintenance typically required by greaseable versions.
Item Condition:
New
Attention California Customers:
 WARNING: This product can expose you to chemicals including Lead and Lead Compounds, which are known to the State of California to cause cancer, and birth defects or other reproductive harm. For more information, go to www.P65Warnings.ca.gov.
Lifetime Warranty
This item is backed by our limited lifetime warranty. In the event that this item should fail due to manufacturing defects during intended use, we will replace the part free of charge. This warranty covers the cost of the part only.
FREE Shipping is standard on orders shipped to the lower 48 States (Contiguous United States). Standard shipping charges apply to Hawaii and Alaska.
Shipping is not available to a P.O. Box, APO/FPO/DPO addresses, US Territories, or Canada for this item.
Expedited is available on checkout to the United States, excluding Alaska, Hawaii.
Final shipping costs are available at checkout.


Created on:
Tools used
Tools used
Tools used
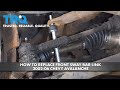
Normally, there is a shield right here, you wanna take that shield off. There'll be four or five 15-millimeter bolts. Take that off, get it out of your way. Now, we're gonna take this nut off. On this vehicle, there's a cotter pin. So, I'll just use some side cutters, take this cotter pin off. Just bend it back a little bit and just pry it out. And sometimes they break. There we go. Now, I'm gonna take a 22-millimeter socket, take this nut off. Now, I wanna remove that stud from the steering linkage that goes through the idler arm. I'm gonna use a tool like this, it's gonna press it out. You can use a couple other methods. You could use a pickle fork, try to get it out this way...that way. Just gonna put the nut on to stabilize the tool so it doesn't fall off. All right. While that's on there tight, I'm just gonna give it a tap with the air hammer, see if the vibrations loosen it up. So, that didn't work out. So, I'm gonna try a pickle fork. Sometimes these are tricky to get to separate. There we go.
Now, I'm gonna take these two bolts out. I'm gonna use a 21-millimeter wrench. On the backside, there's a nut and then a 21-millimeter socket on the front. Get that nut off. Take the bolt out. And just grab the idler arm and the housing and just slide it up. If you were gonna replace one of these pieces or the other, you can separate that nut. Just gonna put the housing in the vise, make it easier to install. Take the nut off. All right. Take the idler arm, put the nut on, take a 24-millimeter socket and snug it up. Now, I'm gonna take this castle nut off. And get this in position. As you slide the housing in the bracket, you wanna make sure the idler arm goes through the steering linkage. Get the bolts lined up. And put the nuts on the backside. Now, I'll tighten these down. Then torque both of those bolts to 73 foot-pounds. Now, install the castle nut and tighten that up. And then torque this to 46 foot-pounds. And find the hole through the stud and you can use the cotter pin, slide it through. If it doesn't fit or if you can't get it to line up, you can tighten the nut up a little more so it does line up. There we go. And use some side cutters and just bend this like this. And then you can trim the excess. Now, if you have that shield right here, reinstall that shield.
Tools used
Tools used
One of the first things we need to do is safely raise and support the vehicle, so the wheel is off the ground. Let's remove our 22-millimeter lug nuts. Remove your wheel.
Now that the wheel's off of here, we have a clear view of the sway bar link. What you're going to notice is, up along the top, it has a strange-looking nut. It's very thin. It's going to be hard to grab onto. I'm going to use a pair of locking pliers to try to grab onto it. Using my 15-millimeter socket, I'm going to come down from the bottom here. Now I'm going to use my 14-millimeter socket down along the bottom here, see if we can get this to come apart. Looks like it's starting to turn.
Okay. So, for us, the outer sheath on this broke free from the bolt itself that's supposed to be running through the center, so I'm just going to go ahead and spray this down with some penetrant, let that soak down and through there. Sometimes, what happens is, is this outer portion will actually freeze or get stuck onto the bolt. If that's the case, what you would either want to do is grab onto the outer portion with some locking pliers, and then try to spin out that bolt. If that doesn't work, you might have to just cut the bolt itself. There's the bolt. Let's get all this out of here. Awesome.
So, now, assuming you're doing the sway bar links as a pair, now is the best time to go ahead and start doing the other side as well. Okay. Once you have both sides out, you should be able to move the bar around a little bit at this point. We're going to grab our new sway bar links. We take off the nut, take off the washer and the bushing, the washer and the bushing, and then, of course, the sheath, washer and bushing again, and we're going to leave it just like this.
Now, as we come up, okay, coming up from under the control arm, we still have the bolt with the washer and the bushing. Now we're going to take our bushing with our washer, put that facing down and towards the control arm. Grab your spacer, put that on there. We're going to push this up a little bit further. Now you're going to go washer, facing up, bushing. Get it underneath that sway bar. Bring it up. Bushing again.
If you were to look at these bushings, you can tell that they have like a rounded area, and then they have this area right here with a little like a piton. The piton is going to be going either towards the control arm or towards the sway bar. Set that on there, this one right here, and then, of course, our locking nut. I like to use a little thread locker on these.
I'm just going to use my 14-millimeter wrench, and of course, my ratchet underneath, and I'm going to start snugging it up. As I snug it, I want to be watching these bushings. What I want to see is the bushing touching up against the bar, on both sides of course. And, of course, down by the control arm there, we want those bushings to be touching up against it as well. We don't necessarily want to continue tightening, though, until the point where they seem like they're getting squished down and even pancaking out. So, let's just snug them up so they're all touching at least, and then we'll continue on.
Okay. So, this looks great. As you can tell, all of my bushings are touching exactly where they need to be touching. And you're also going to notice that I didn't continue tightening until they flattened out, like I had said before. This looks pretty great, so I'm just going to take a quick measurement of it. It looks like it's approximately the width of my thumb, personally, so I'm going to make sure that I go approximately the same on the other side of the vehicle.
Okay. Now it's going to be time to get the wheel up on here. Slide it on. Now we'll get the lug nuts on here, we'll bottom them out, and then we'll torque them to manufacturer specifications. Let's torque these lug nuts to 140 foot-pounds. Torqued.
Tools used
Tools used
Tools used
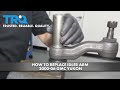
All right, friends, so one of the first things we need to do is safely raise and support the vehicle. Once you've done that, you want to come right up front to this skid plate right here. Go ahead and remove all 15-millimeter bolts that hold it in. Now that that's out of the way, let's come right over here to where the idler arm comes down through this arm right here. Remove the 21-millimeter nut.
Now, the next thing we would need to do to get this arm out of here is, of course, try to drop this sway bar out of the way. If your bolts look like ours do, and you think that they're going to be an issue, I would just skip right past that, and we'll come right up here, and we'll remove the whole idler unit right here. To get this out of here, we're going to use a 21-millimeter right there, and then we'll use a 21-millimeter wrench on the nut side.
Right there. Let's put a nice piece of wood in between the frame and this bar right here just to make it so this bar can't go up too far while we hammer on this right there. Now that that's out of there, we can grab right onto this, and we'll get it out of the vehicle. Now, when you're replacing the idler arm here, you're going to need to separate it from the idler arm bracket assembly. When you go to do that, you're going to remove this nut right here, and then you're going to have to try to get something in between to try to separate.
You could try to use a puller, and that would probably be helpful if you have that tool. If you don't have the tool, and you try using a pickle fork, you're probably going to damage this right here, in which case, you would replace the pair, which is what we're going to do today. But I'll still show you how to get it apart anyways just in case you're doing only one piece.
Now, to remove this, I like to have it nice and level on the ground, and I'll put my foot on it. I'm going to have it so it's facing down towards the left, so when I remove this and it tries to spin, it can't go anywhere. Now, that we have the nut off of there, we need to separate the idler arm from the bracket assembly itself. We want to do that without damaging the bracket assembly because we're going to be reusing it, right?
So if you were to look right up here, you're going to see that there's a hole right inside the center of this. What I would like to do is take a punch. I'm going to put this on something sturdy. You can use something like a piece of wood like I have now, a desk, a vise, anything you want. Just be super careful. Come right in here with your punch and a hammer. Let's see if we can get this to come out.
Okay. So that came out, and we caused no damage to this. Perfect. The next thing I like to do is put the unit right inside of a vise if you have access to one. You want to grab on to this boot. Take a look underneath there. Make sure there's plenty of grease. Go ahead and push it down. That feels great. Now, we're going to take that idler arm. Set it right down on there. Take our brand-new nut. You always want to use a brand-new nut.
Okay. So now if I use my 24-millimeter wrench, and I try to tighten this, what you're probably going to notice is the stud on the inside is going to start spinning once it gets to a certain point. Okay. So as you can see, it's spinning the stud. Is the nut all the way down? No, it's not. So now we're going to use a hex bit, and you want to use an 8-millimeter. Come right inside there. That's going to hold it, and now we'll continue tightening this.
Make sure it's nice and tight. That feels great. Maybe time to get our unit back up inside the vehicle here. Just bring it right up and in behind those lines hopefully. Okay, get that in the center link. Let's get this into its bracket. Okay, that looks decent. Let's grab our two bolts. Make sure that they have washers. Put that right through. The other one. There we are. Let's grab the washers and the nuts for the other side. Now, let's snug these up. Now, let's go ahead and torque these down to 73 foot-pounds.
Torqued. Let's get this nut on there. Snug it up. Torque this to 46 foot-pounds. Torqued. And use our locking cotter pin. Slide it right on through there, and then make sure you pin it over so there's no way this nut can come loose. This out of here. Awesome. Let's get this shield back up on here. I'm going to line up those holes. Start in all the bolts before I tighten any of them down. Perfect. The next thing that I would want to do is make sure that I get it down to a reputable alignment shop.
Tools used
Tools used
I'm going to use a 22-millimeter socket to take off the lug nuts so we can remove the wheel, then I remove the wheel. So I'm going to use some pliers at the top of the sway bar link right there, and then underneath, I'm gonna use a 14-millimeter socket and just take the link out. A long bolt goes straight through just like that. And take the top off just like that. Now just take a pry bar underneath here. Just raise up on the sway bar, take the link out, all right. So we'll just take the new link apart, and just leave the washer and the bushing on this long bolt. And take the other bushing and the washer, line that up first.
And then this tube goes next. Slide that bolt through, and then another washer and the bushing. Align this up and slide the bushing and the washer. Pry down on the bar. And then it would help if you had someone to help you out to pry this while you're holding this and getting the nuts started. All right, that's good. And then use a 14-millimeter wrench for the nut and a 14-millimeter socket and tighten this down. And then you want to torque this to 89 inch-pounds. Make sure you're on inch-pounds, not foot-pounds. Now, put the tire back and lug nuts. Now we're gonna torque the lug nuts to 140 foot-pounds in a star pattern or a cross pattern so that it tightens the wheel down evenly. And just go around again. Double Check.
Tools used
Tools used
You want to keep in mind when you're doing this job, after you're done, you're gonna want to go to a local garage and have the vehicle aligned so you don't have premature tire wear.
Just take this cover off. Use a 15-millimeter socket. There's two bolts in the bottom, two on top. Sometimes there'll be a third. Slide it off. Take this cotter pin out. Just use some side cutters and pull that up. Just gonna use a little rust penetrant. It's a little rusty. Take a 21-millimeter socket. Take this nut off.
Now, I want to separate the idler arm from the steering bar. I'm just gonna use a front-end tool. There's many different tools you could use to get this off. Just tighten this up. Put the nut on just so my tool doesn't slip off the stud. It's just gonna use it as a guide.
Another way you can try to do this is use a pickle fork. There we go. Slide that up. I'm going to take these two bolts out. I'm going to use a wrench, a 21-millimeter wrench backside to hold the nut. Use a 21-millimeter socket on the bolt. Take both of those out. Pull the bolts out. Let me just grab the whole idler arm assembly and you just slide it off.
If you're gonna replace just the arm or just the assembly, you're gonna have to separate it. So use a 24-millimeter socket. It helps to put it in a vise and then you can use a puller and separate these two just like that. And take the arm, put the new nut on. Just snug that up tight. All right, just line this up.
I'm gonna have to tap this in place. That's good. Before you put the bolts through up top, just make sure it's going through this bar right here. Put the bolts in, take the two nuts. Get them on the back side. Now, snug these up. Torque to 74 foot-pounds. And take the castle nut, install that there, tighten it up and torque this to 46 foot-pounds.
If the hole didn't line up, you can just tighten it up a little bit more so you can put the cotter pin in. Slide the cotter pin in, and just bend one of the tabs over and trim the excess. Take this shield, install it bolts, put the back in, and tighten these up.
Tools used