Replaces


Frequently bought together
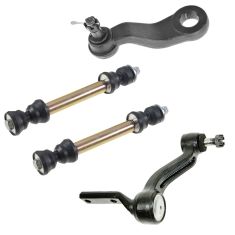
Part Details
Specifications
Product Features
TRQ suspension kits are manufactured using premium raw materials and coatings for extended service life. Each TRQ suspension component is designed to be a direct, maintenance-free replacement to the stock unit. To extend the life of your steering and suspension components, TRQ recommends replacing components in pairs, sets, or kits. All products are fit and road-tested in our Massachusetts R&D facility to ensure we deliver on our promise of Trusted Reliable Quality.
Install Tip: When replacing steering components, have a professional alignment performed afterwards. This ensures proper tracking and even tire wear.
Our steering and suspension components are pre-greased and sealed for long life and do not require the extra maintenance typically required by greaseable versions.
Attention California Customers:
 WARNING: This product can expose you to chemicals including Lead and Lead Compounds, which are known to the State of California to cause cancer, and birth defects or other reproductive harm. For more information, go to www.P65Warnings.ca.gov.
Lifetime Warranty
This item is backed by our limited lifetime warranty. In the event that this item should fail due to manufacturing defects during intended use, we will replace the part free of charge. This warranty covers the cost of the part only.
FREE Shipping is standard on orders shipped to the lower 48 States (Contiguous United States). Standard shipping charges apply to Hawaii and Alaska.
Shipping is not available to a P.O. Box, APO/FPO/DPO addresses, US Territories, or Canada for this item.
Expedited is available on checkout to the United States, excluding Alaska, Hawaii.
Final shipping costs are available at checkout.
Created on:
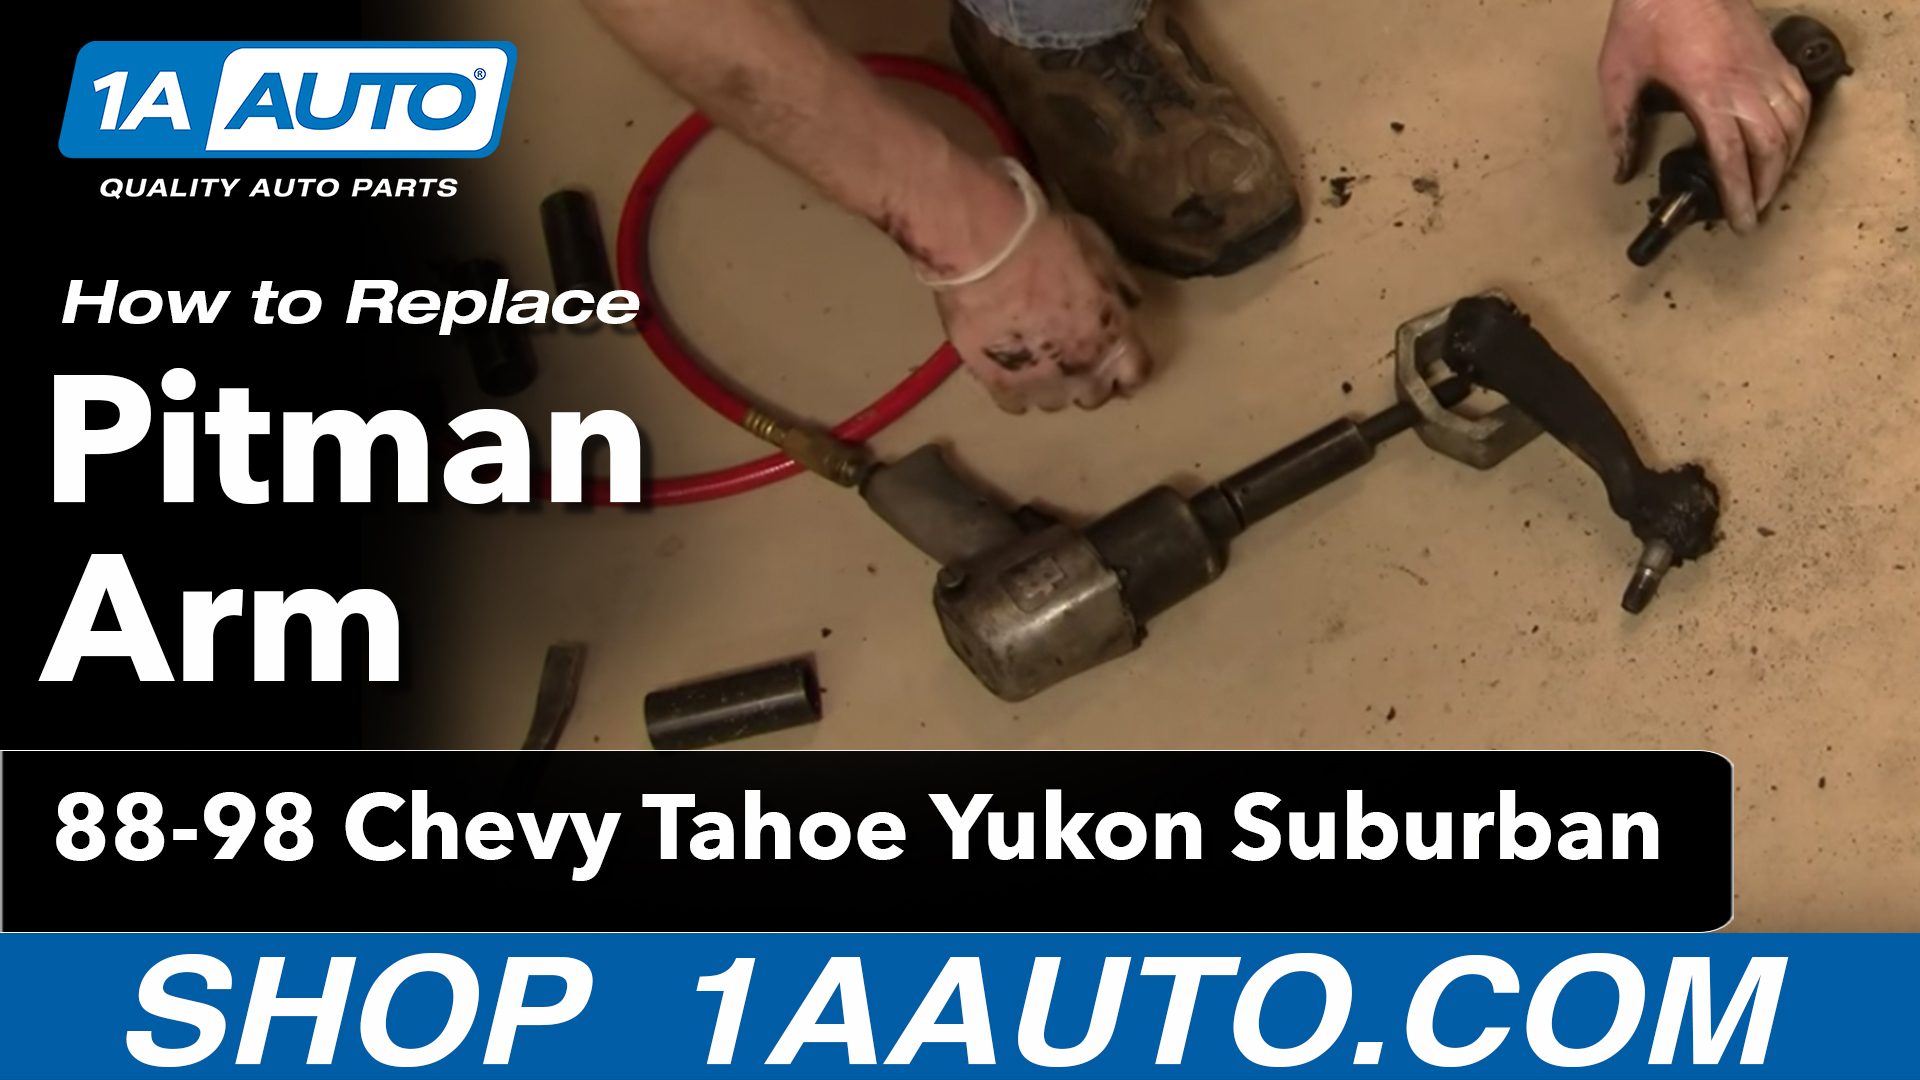
Tools used
Brought to you by 1AAuto.com, your source for quality replacement parts and the best service on the internet.
Hi, I'm Mike Green. I'm one of the owners of 1A Auto. I want to help you save time and money repairing or maintaining your vehicle. I'm going to use my 20-plus years' experience restoring and repairing cars and trucks like this to show you the correct way to install parts from 1AAuto.com. The right parts installed correctly. That's going to save you time and money. Thank you and enjoy the video.
In this video we're going to install a new Pitman arm on this 1996 Tahoe. It is the same as any 1988 to 1998 Chevy truck. This is a four-wheel drive vehicle. So four wheel drive trucks and also 1992 to 1999 SUVs, four-wheel drives.
You will need the following tools: penetrating oil, a whole host of mm sockets, 18-mm fitting wrench, joint fork and hammer Pitman arm puller and actually not listed here was a 19-mm socket and ratchet or your tire iron to remove your tire. You'll also need a jack and jack stand or lift.
To check and see if you have a bad Pitman arm you can see where this front driver's side tire we're going up and under. Here's your transfer to here and then up right there is the joint of your Pitman arm. This here is your Pitman arm and then this is your steering linkage. Again, here is your Pitman arm. Here's your steering linkage. Now when you move your tires, I'm just grabbing hold of the tires and kind of turning them back and forth when the car is above the ground and you can see there is a lot of play and movement going on around that Pitman arm. That joint is bad.
First, you'll want to remove this skid plate which is four 15-mm bolts. You can see two easy here, and there's one up here and one you cannot really see, but over here. Now we're going to remove the steering box to get to the Pitman arm. Okay. So, this is the driver's side of the engine compartment. There's the power break booster and this right down here is your steering box. It's a little difficult to see. It's where you can see these tubes going in. There is a plastic shield here. It kind of clips around. Now you can see this was clipped up and around here. You just kind of peel that off and pull this plastic shield back and now you're going to want to use some penetrating oil and douse both your fittings, one here and then one a little further up. It's kind of difficult to see.
There are two fittings to douse with penetrating oil and then there's also a bolt. You might be able to barely see there and then you also want to loosen this bolt here and that loosens the coupler from the steering box shaft. The best tool for removing those power steering fittings is a fitting wrench like this, 18 mm. See it down on there? I got it on there and then once you loosen it with a fitting wrench you can usually get an open-end wrench on there to help you navigate it the rest of the way.
Then, make sure you have a catch pan underneath to catch the fluid as it starts leaking out. Now we're going to use an 11-mm socket and ratchet and extension to loosen that bolt. Down in there put the socket and ratchet on there. At this point it might be good to have someone help you just hold the steering wheel so it keeps that from turning at all. Once you remove the bolt then you want to take a large screwdriver or a pry bar and put it down in there and just make sure that you can move the steering shaft away from the steering box and if you watch you can see that the shaft is moving from the steering box pretty easily. When I actually unbolt the steering box I'll be able to pull it right out.
No from underneath here's the front of our transfer case on this four-wheel drive truck and this is our Pitman arm joint right here. So, it's a 21-mm bolt. I'll use an impact wrench. As you can see we removed the tire over here and this is a joint fork. So, we're going to bring it in from the side here and then use a good hammer. Basically we just removed the tire so we can get a good wrap on this fork. Okay. You see that fork just separates that joint. Now we get to the three bolts that hold your steering box on and I just used a little screwdriver kind of bend this fender up a little bit because it was in the way and you can just tap it back down with a hammer when you're done. Then you can easily get a socket and extension on there, and just to show you it can be done with hand tools, again, 21-mm. I'll just do the rest of it with an impact wrench just to be quicker.
Hold on to the box with one hand. If not it's just going to fall out. Move it up and out of the steering gear and pull it forward from the shaft. Here's the bottom of it. Put the steering box here, upside down, once again just so any more fluids just drain out into the pan. Here's where having an impact wrench is going to be really valuable. Then this socket is a 34 mm. If you don't have an impact you can just turn it on all the way and then use a large bar. You may want someone to help hold it. You could bolt your steering box onto a longer piece of wood which would help you to keep it steady, but having an impact wrench is the best way. Now, you're going to want to use your Pitman arm puller. This is really the only way to do this.
Believe it or not I actually forgot to film, or I messed up and I didn't film pulling the Pitman arm off so I'm just going to show you how to use the Pitman arm puller and the tool on to the idler arm. It's the same idea. You would just be doing it on the steering box. Put the tool on like that and then put your wrench on there and then pull and it breaks it right free. Okay, and this ends part one of this video. If you want to see, obviously, reinstalling the Pitman arm go please to
part two.
We hope this helps you out. Brought to you by www.1AAuto.com, your source for quality replacement parts and the best service on the internet. Feel free to call us toll free, 888-844 3393. We're the company that's here for you on the internet and in person. Thank you.
Tools used
Brought to you by 1AAuto.com, your source for quality replacement parts, and the best service on the internet. Hi. I'm Mike Green. I'm one of the owners at 1AAuto. I want to help you save time and money repairing and maintaining your vehicle. I'm going to use my 20 plus years' experience restoring and repairing cars and trucks like this, to show you the correct way to consult parts from 1AAuto.com. The right parts installed correctly. That's going to save you time and money. Thank you and enjoy the video.
In this video we are going to remove and reinstall the radiator fans in this 2001 Ford Taurus. The fans didn't need repaired in this car. I'm just doing the video to show you how to take them out and put them in. The only tools you'll need are an 8mm socket and ratchet and a flat blade screwdriver. We're going to disconnect the battery here using an 8mm socket. You'll want to use a regular screwdriver. There is two tabs, you'll want to pull out on the tab, and pull up on this fuse box. This will just go up and out of the way a little bit. You'll see there is an 8mm bolt right here. You can see right down there is a plug for your radiator fan. All you're going to do is pry out lightly here and pull that plug off. You want to pull these pins. You can see here's one of the pins out. Pull these pins out of the fan shroud. Okay. We'll kind of speed through that process of unplugging the fan and removing the harnesses from the clips, and then finish out removing the 8mm bolt. Get this up out of the way. Pull this fan up. That just comes out of the bottom. Lift it out.
With this fan I've done the same thing. I already loosened this bolt. I've already unplugged it. I'm just going to take that bolt off. I'm going to pull it out. Then I'm going to slide over to where this other fan came from. It's going to be a fight with all the wiring. Slide it up and out. Slide this on over. It has two feet that have basically a cross pattern on it. If you look down in you can see right there, that cross right there, that's where one of the feets goes. Then that cross right down there is where the other one goes. You put the fans down in, and you kind of just work them back and forth a little bit. You find where they go down in, and then that 8mm bolt lines up. Then tighten up that bolt. Tighten up this 8mm bolt. Reconnect the wiring harnesses for the fan. Make sure everything's routed correctly. Put the fuse block back into place, reconnect the battery, and you should be all set. The second fan, slide it down in, just pull the wiring out the way kind of. The same thing on the feet. This goes down in here into place. Tighten up your 8mm bolt. This back into place now, and then the pins connect them. Put the harnesses back into their places. Connect the battery one more time. You should be all set.
We hope this helps you out. Brought to you by www.1AAuto.com, your source for quality replacement parts, and the best service on the internet. Please feel free to call us toll free at 888-844-3393. We're the company that's here for you on the internet and in person

PSA63516