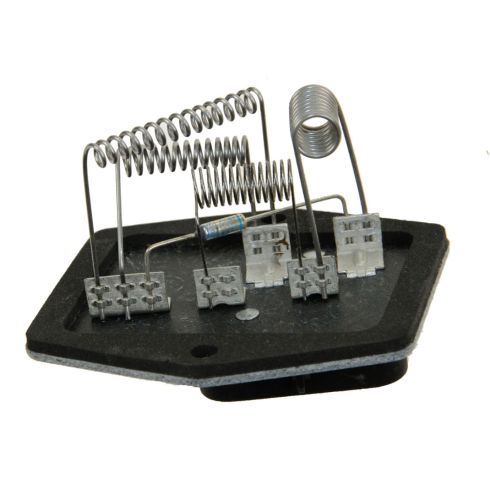
All of our auto parts are intended for Left Hand Drive USDM vehicles. If your vehicle is Right Hand Drive, please ensure the part is correct for your specific vehicle.
Item Condition:New
1 Year Warranty
This item is backed by our 1-year warranty. In the event this item should fail during intended use, we will replace the part free of charge. This warranty covers the cost of the part only.
Returns: Parts with electrical components cannot be returned once installed.
FREE Shipping is standard on Orders shipped to the lower 48 States (Contiguous United States). Standard shipping charges apply to Hawaii, Alaska and US Territories. Shipping is not available to Canada.
Expedited is available on checkout to the United States, excluding Alaska, Hawaii and US Territories as well as P.O. Boxes and APO/FPO/DPO addresses. Final shipping costs are available at checkout.
How to Replace Blower Motor Resistor 1995-2000 Chevy Tahoe
How to Replace Blower Motor Resistor 1995-99 GMC Sierra K1500
Created on:
Tools used
Flat Blade Screwdriver
7mm Socket
Ratchet
Needle nose pliers
1. Accessing the Blower Motor Resistor
Open the glove box
Push the sides of the glove box in as you pull it out
Unhook the glove box
Remove the glove box
2. Removing the Blower Motor Resistor
Remove the two 7mm bolts from the blower motor resistor bracket
Use a pair of needle nose pliers to undo the clips that connect the wiring harnesses to the bracket
Press the wiring harness tabs with a flat blade screwdriver
Disconnect the wiring harnesses
Pull the bracket down
Use a flat blade screwdriver to press the tab on the resistor relay
Pull out the blower motor resistor bracket
Disconnect the resistor wiring harness from the resistor
Remove two 7mm bolts from the resistor
Rotate the resistor upside down
Pull the resistor forward, down and out
3. Installing the New Blower Motor Resistor
Push the new blower motor resistor into place, being sure not to damage the coils
Insert the two 7mm bolts into the resistor
Connect the resistor wiring harness
Reconnect the relay to the bracket
Put the bracket into place
Clip the two wiring harnesses to the bracket
Insert the 7mm bolts into the bracket
Connect the two wiring harnesses
4. Reinstalling the Glove Box
Hook on the glove box
Push in the sides of the glove box as you push the glove box into place
Brought to you by 1AAuto.com, your source for quality replacement parts and the best service on the Internet.
Hi, I'm Don from 1A Auto. I hope this how-to video helps you out, and next time you need parts for your vehicle, think of 1AAuto.com. Thanks.
In this video, we're going to show you how to replace the blower motor resistor on this 1996 Chevy Tahoe. The items you'll need for this are a new Blower Motor Resistor from 1AAuto.com, flat blade screwdriver, 7mm socket and ratchet, and a pair of pliers.
Start off by opening your glove box and pushing in the sides and pulling it down, then unhook and pull. Next, you want to remove this two 7mm bolts. I'll just fast forward as Don does this. Now, using a pair of pliers, just push the tabs on the clips at the bottom of these harnesses and push them up and out of that bracket. Now, press the tabs on the top of the harnesses and disconnect them. Now, pull down the bracket and on the top of this relay, just push the tab and pull it free.
Your harness for your blower motor resistor is right here. Just pry back on the tab and pop the harness up and off. Just set that aside, and your resistor is held in with two 7mm bolts. I will just fast forward as Don removes both of those. Once those are removed, you can pull your resistor up and to get it out, you're going to actually have to rotate it upside down. Just keep working it around until it's completely upside down and then pull it forward and then down and out.
Take a new blower motor resistor from 1A Auto and just push it back into place. You want to make sure you don't damage any of the coils and just very carefully lower it back into place. Just again, make sure those coils are okay and that none of them are touching each other. Replace those two 7mm bolts. Now, reconnect your resistor harness. Replace your bracket and reconnect that relay and then take your two harnesses and push both of them back down into the bracket, and replace those two 7mm bolts that hold the bracket into place. Now, reconnect those two harnesses, and then take your glove box, put those hooks back onto those bars. Push the sides in and push the glove box back into place. You're all set.
We hope this helps you out. Brought to you by www.1AAuto.com, your source for quality replacement parts and the best service on the Internet. Please feel free to call us toll-free, 888-844-3393. We're the company that's here for you on the Internet and in person.
Tools used
Socket Extensions
7mm Socket
Ratchet
Needle nose pliers
1. Removing the Glove Box
Open the glove box
Remove any items inside the glove box
Press the back corner of the box together from the side
Lay the box down
Pop the box out of its hinges
2. Removing the Blower Motor Resistor
Remove the two 7mm screws from the blower motor relay bracket
Pinch the clips on the bottom of the bracket connected to the harness
Pull the connector out of the bracket
Disconnect the connector from the blower motor relay
Pry out on the tab and push the resistor up to disconnect the connector
Remove the two 7mm screws from the resistor
Remove the resistor
3. Installing the Blower Motor Resistor
Install the blower motor resistor into place, with the safety lock facing the passenger side
Tighten the two 7mm screws
Connect the harness to the resistor
Connect the relay harness
Press the relay into place
Tighten 7mm screws to the bracket
Press in the harnesses to the bracket
4. Installing the Glove Box
Hook the bottom hinges into place
Click the tabs into place
Close the glove box
Hi, I'm Mike from 1AAuto. We've been selling auto parts for over 30 years! We're dedicated to delivering quality auto parts, expert customer service, and fast and free shipping, all backed by our 100% satisfaction guarantee. So visit us at 1AAuto.com, your trusted source for quality auto parts.
In this video we're going to be working with our 1996 GMC Sierra K1500. We're going to show you how to remove and replace your vehicle's blower motor resistor.
If you like this video, please click subscribe. We have a ton more information on this truck, as well as many other makes and models. If you ever need parts for your car, you can follow the link down in the description over to 1AAuto.com.
Here are the items you'll need for this repair: 7mm socket, ratchet, socket extension, needle nose pliers
Open your glove box, be sure that anything that's going to fall out or roll around on the floor has been removed. Press the back corners of the glove box together until they slide out. Lay the glove box down and pop it out of the hinges.
Remove the two 7 millimeter screws on the blower motor relay bracket. We'll do this using the 7-millimeter socket and ratchet. You'll need a pair of needle nose pliers to pinch these clips on the bottom of the bracket securing the electrical connectors. Pinch those together to compress them, and then push up. It may take a little bit of wiggling. Once you've got them compressed, you should just be able to slide them right up through the opening and grab it. There's one on each connector, they're exactly the same. Now there's a little connector on the back of the relay here, you'll need to push down and you should just be able to pull the whole relay and bracket forward to remove it. Just make sure it's disengaged before you pull too hard. We'll remove that bracket. Slide these harnesses out of the way.
Then take a screwdriver, pry out on the tab for the blower motor resistor. Push up at the same time. Push that connector and the harness out of the way as well. Then there are two 7-millimeter screws on the top there, one on each side of the connector at the three and nine o'clock positions. Reach in there with our 7 millimeter socket and ratchet, and remove those. Once the screws are out, lift up and remove the blower motor resistor from the heater box.
Be careful not to damage anything if you're reinstalling it. Carefully install your new blower motor resistor into the vehicle, be careful not to bend any of these springs and let them touch, otherwise the fan speeds aren't going to work the way you want. Remember that the safety lock side of the connector is going to face to the passenger side of the vehicle. Be sure that none of the wire harnesses or connectors are stuck underneath, and set your blower motor resistor back into the box so you can start your two 7-millimeter screws. Tighten down the two screws with your 7-millimeter socket and ratchet, and remember these are only going into plastic, so we just need to get them snug.
Reconnect the electrical connector for your blower motor resistor. Reconnect the relay, and slide the bracket back into place so you can reinstall and tighten your two 7-millimeter screws with your 7-millimeter socket and ratchet. Slide your connectors back over toward the bracket. White one goes closer to the relay, black one goes to the left of that.
Hook the bottom hinges of your glove box back into place, push the tabs in to close your glove box.
Thanks for watching. Visit us at 1AAuto.com for quality auto parts, fast and free shipping, and the best customer service in the industry.
15-8788
In Stock
Product Reviews
Loading reviews
5.00/ 5.02
2 reviews
5 Stars
4 Stars
3 Stars
2 Stars
1 Star
2
0
0
0
0
99 Yukon front blower motor resistor
Keith
July 13, 2019
I purchased a blower motor resistor, the instructions on the how to video where fantastic, 1A Auto kept it simple and easy, it was easier than I thought.
John
June 27, 2024
Easy install, exact match.
Customer Q&A
what does this part do?November 21, 2021
Ricky G
10
Lets the fan motor have different speeds. If its out you only have high speed on the fan.
November 21, 2021
Richard J
10
There are four speeds for the blower motor controlled by the rotary switch on the control panel. These windings (resisters) change the voltage from the switch to the blower motor thus changing the speed of the blower motor.
November 22, 2021
Roger P
10
This resistor pack provides the different resistance to the blower motor for each of the blower switch positions which gives you the different speeds. At the high setting, this is bypassed and the switch is connected to a relay. This is why when this unit goes bad, you only have the HIGH speed fan.
November 22, 2021
Daniel T
10
This part allows your blower motor to be varied in speeds.
November 22, 2021
J C
10
This part allows your blower motor to be varied in speeds.
November 23, 2021
J C
10
There are four speeds for the blower motor controlled by the rotary switch on the control panel. These windings (resisters) change the voltage from the switch to the blower motor thus changing the speed of the blower motor.
November 24, 2021
Roger P
Customer service
877-844-3393
Monday - Friday 8:00am - 9:30pm ET Saturday - Sunday 8:00am - 4:30pm ET
Enter Vehicle Year Make Model
Specify your vehicle's year, make and model to guarantee fit.
Year
Make
Model
Options
Drivetrain
This part doesn’t fit a . Select from parts that fit.