Replaces
This part doesn’t fit a . Select from parts that fit.
Frequently bought together
Part Details
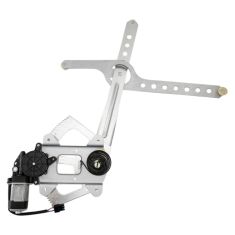
This window regulator is a high quality aftermarket part that meets or exceeds the performance of the original. Subjected to extensive testing and quality control standards, allows us to offer this regulator with our superior warranty!
Complete Repair in One Purchase - Stop searching for parts individually and complete your repair with a customized kit or set from DIY Solutions.
High-Quality Parts from Trusted Brands - DIY Solutions' kits and sets are selected from the best automotive brands and include hard-to-find and even obsolete parts you may need for your vehicle.
Guaranteed Fit - DIY Solutions ensures its selected parts are quality-tested to guarantee fit and function.
Direct FitDirect fit, pre-assembled parts made ready to fit your vehicle and provide easy and trouble-free installation.
Rigorously TestedBuild to strict quality standards
Highest Quality MaterialsMade from the highest quality materials for extreme durability and premium performance.
Item Condition:
New
Attention California Customers:
 WARNING: Cancer and Reproductive Harm - www.P65Warnings.ca.gov.
Lifetime Warranty
This item is backed by our limited lifetime warranty. In the event that this item should fail due to manufacturing defects during intended use, we will replace the part free of charge. This warranty covers the cost of the part only.
FREE Shipping is standard on orders shipped to the lower 48 States (Contiguous United States). Standard shipping charges apply to Hawaii and Alaska.
Shipping is not available to a P.O. Box, APO/FPO/DPO addresses, US Territories, or Canada for this item.
Expedited is available on checkout to the United States, excluding Alaska, Hawaii.
Final shipping costs are available at checkout.


Created on:
Tools used
Now, before we start this job, it's important to make sure that you have your window in the up position, it's going to make it much easier overall. So, to start getting the door panel off of here, we're going to need to remove some stuff. You're going to have a couple of little plugs here. Those are covering some Phillips head screws. So, I like to just pop those out with my flat-head screwdriver. Now, we're going to use our trim tool and we're going to remove this outer plastic piece here. To do that, there's going to be a little clip hidden inside there, there, and over here. So, I'm just going to start right along here. Continuing with our plastic trim tool, we're going to lift up on this plastic piece here starting from the rear. There we are. Let's disconnect all this wiring. The switch right here, just pull that right out of there.
The next thing you're going to want to do is remove this area right here. Yours is probably going to have a nice lens cover over it. Ours is broken. You just kind of come right down along the corner here and you should be able to pop it off. Then we're going to disconnect the wire. Lift up on that. Separate the two. Now, we're just going to use a little forkey tool, remove this push clip right here. Now, we'll move along up to here. Now, we're going to remove this piece right here. It should pretty much just lift straight up and out. There we are. Now, let's continue with our trim tool. We're going to come right down along the bottom of the door panel, and try to break it free. Remove the wiring down in here. Okay. Lift straight up on it and remove the panel.
So, the next thing you'd want to do is slide this. There's a little area right here that looks as though it should have a screw. Ours does not, but if there is one, just remove that. And then once you do, you should be able to slide this and then draw it away. Right behind here, you're going to see the rods that run right along here and connect over there. We're going to disconnect them from the backside of this. Let's pull this out to where we can see. I can see this rod. I'm just going to come down with my nice small screwdriver and just try to separate these two parts. There we are. Do the same to the other one, of course. Next, it's going to be time to remove the speaker. There should be a screw here and there. Ours are missing. But remove those two screws. And then right here, there's a little tab, push on this, and then you should be able to pull the speaker away from the panel itself. Now, we're going to disconnect the wiring that goes to it right there.
Let's tape up this window. The next thing we're going to do is start carefully pulling this plastic bag. And this is so that we can get to all the wiring because we want to make sure that we can disconnect it and have it nice and safe after we take off this panel. There we go. That looks pretty decent. So, now, we're going to remove this plate right here. You're going to notice that there's a whole bunch of these mounting bolts right there. They come all the way around. All of them are the same in exception of the one right here. We're going to carefully try to move this around just to see if it breaks free. You want to keep in mind that the window regulator is mounted to this plate and the window regulator also is attached to the glass up here. It has a couple of little rollers that are going to go into a track. So, if we were to pull this down, we could, of course, pull a tug on the window, which might pull it down. The window's glass, so, obviously, you want to wear eye protection. Safety is the number one concern.
The next thing we need to do is remove the rivets that are holding the window regulator to this panel. You can do that with something like this, with a drill and a nice drill bit. Or you can do it with something like this with a nice cutoff wheel. Obviously, if you use a cutoff wheel, you might, you know, nick this area around here a couple of times, in which case, you would just paint over it and it's not that big of a deal. That looks pretty good. I'll punch the rest of that out.
Hammer and punch right for the center. Okay. Those popped out. One more here. There we are. The window regulator can move around. If you look right through here on the panel, you're going to see where the rods kind of are secured to the panel itself. You should be able to push those away. There's one right over here as well. Awesome. Let's remove that bolt. So, now, you have the rod that comes through this right here. We're just going to pull that right down. Okay. This is looking good. Now, we're just going to let this dangle. Obviously, you want to make sure you don't put any weight on any of the wires. We don't want to give this any tugs. We're going to grab onto the window regulator. Just slide it towards the front. And then we should be able to kind of pull it down. Assuming I can get it out of there. So, now, we just need to disconnect the wiring for it. Squeeze right there and draw it off. There's the window regulator, friends.
The next thing we're going to do is connect in our new window regulator, and we're going to put on our window switch here so we can function it. You want to have the key in the on position. And at this point, you want to be super careful. Of course, we have our eye protection and our hand protection. When we go to power up this window regulator here, there's a possibility that this is going to spin. Well, it's a probability that this is going to spend, but there's a possibility you could have your hands in a very dangerous spot. So, what you need to do is just pay special attention to make sure you're not in any pinch points.
With the window regulator connected in, you can see that you have your two rollers that are facing in the same direction and then you have one that is not. The two that are facing in the same direction are going to be the two that go up inside the upper channel up here. So, what we're going to do now is we're going to put the first one through and then we'll put the second one through and we'll let the window regulator hang just like this. The next thing you would want to do is take your panel, put it up on there to the approximate area where it's supposed to go. If you want to put in a couple of screws for good measure, it couldn't hurt just to hold it up there so you don't get hurt. And then what we need to do is carefully put our hands behind here and we're going to see if we can get the bolt holes to line up. I can see one there, I can see one over here.
These all look like they're pretty close. So, I'm going to go with them just like that. But like I said, if they're not lined up, what you're going to need to do is be super careful for any pinch points. And you're going to need to adjust the window regulator either up or down to get it so everything lines up perfectly. So, now that we have that lined up, let's get this disconnected again and out of the way. We have the key power off. There's no way that this motor can function. We're going to get our hands back in there now. I'm just going to lift this up a little bit. I'm going to slide it back out of its track that we set it into. And I'm just going to let it hang for a second.
The next thing we need to do is get these rods. These are going to go in between the window regulator and the panel itself. Something else that I want to show you before I put the panel up is this wheel right here is going to go inside the track that's on the inside of this door panel right there, okay? This little piton right here is going to go inside of this piece right there through the bottom. This is all going to be inside the door panel, so it's going to be hard to see. So, I'm trying to let you know ahead of time what's going on. This goes in the track, this goes in the piton there, okay? We'll lift this up. Get this thing so it's kind of sitting where it's going to need to go. I'm just kind of resting the rods up here. We're hopefully they'll stay for a minute.
Now, I'm going to get everything else lined up. Get this back inside of its groove. Just make sure that the two wheels up on top are sitting inside the groove where they need to roll. That feels perfect. Rollers are up here, rolls back up. I'm going to put the one with the piton in now, slide that right up and in there. The other rod is going to ride right underneath that one. So, we'll just put them both, so they're kind of up here for now. So, now that we have the window regulator and the rods lined up perfectly, we're just going to take this, I'm going to put one bolt in, lift up on the panel, make sure that these ears go over the panel that's on the door there. Should sit right in there. I'm going to slide my window regulator around till I can find my rivet holes. We've got one there, there, there, and there. Perfect.
The next thing we're gonna need some of these right here. Nice, beautiful rivets. These are 1/4-inch. We're going to need four of them. Slide that in and through there. I like to start them all in before I tighten any of them up. That way there, I know that it lines up overall. Now, before you rivet this in, it's important to double, triple, quadruple check to make sure you have everything on the inside of this door panel set up right. You need to have the rollers in the channel up along the top. You need to have the roller in the channel that runs along here. You need to have the rods sitting inside the little piton area on that unit that I showed you, and coming up in this direction here so you can get to them. Once you've done that, you also want to make sure that the wiring for the window regulator is plugged in, and then we can continue on by using this right here and putting in these rivets to hold the window regulator to the panel.
Just make sure the rivets don't fall out. All right. That's a good sound. It means we're at the end of that rivet. At that point, you can, of course, trim off the excess. We'll do the same to all.
The next thing we're going to do is cut off these little ends here. I like to use my cutoff tool. I'm just going to come along the top here and put in a few of these bolts to try to hold this panel still for a minute, and then we're going to test the window regulator ahead of time before we continue on any further. That way there, if there's any problems, we can fix it now. Click this in. Get the key in the on position. I'm going to try not to tear this tape because I might have to reuse it. I'm hoping that I won't, but we'll see. Beautiful. The window is going up and down the track perfectly straight. It's going down when I tell it to go down, it stops when I tell it to stop, and it goes up when I tell it to go up. This is perfect. Let's get the tape off of here and continue.
So, now, let's check to make sure that these rods are working perfectly for the latch and, of course, for the handle. I'm going to start with this inner one. I'm going to pull the rod that has the little piton that goes to the locking mechanism inside here, the electronic locking mechanism. I'm going to pull that towards the front of the door. That's the unlock position. Now, I'm going to grab that other rod and I'm gonna push this up. This is simulating that the door is in the shut position. I'm going to pull on that rod and this should come down. That means that I can open the door now. Let's go ahead and shut that door. I'm going to do it again, give the rod pull. Awesome. Okay. Flip it back up. Now, I'm going to take that first rod with the piton for the locking mechanism. I'm going to push it towards the latches. Let's pull on that same rod that's going to work this mechanism here.
Okay. That is not working. So, now what I'm going to do is I'm going to pull on this other rod, the locking rod, and now, I'll pull on the latch rod again. That works great. Let's do the same over here. I'm gonna grab this outer handle. Right now, I'm in the unlocked position. So, I'm going to put pressure on this, pull on that, and it releases. Door's shut. I'm going to lock it. Push on this, pull on the outer handle. Okay. It's locked. I unlocked it. Awesome. This works perfectly. Let's continue. So, now that we know that everything functions as it should, we can continue on by bolting in the play here or the door panel. We're going to use all of our little bolts and just go right along in the outer area. I'm just going to start them in and then I'll snug them all up once I get all the way around. Awesome.
Just reaching here, we're going to grab the wire for the speaker. Connect it in. Make sure we don't have anything on the magnet here. If you were to look at the speaker, you're going to see a little tab there and then there should be one here. We're going to come at an angle and slide them right into these little grooves here. Should slide in. Pretend that they're both in, press it, it should click right in. So, now, you would just, of course, want to get this back on here. For us, it's not gonna stick. You can get yourself some butyl tape and get it to all stick back on there. It's probably a great idea.
Now, it's going to be time to install the inside door handle. If you were to look at the backside, you're going to see an area right here for the door handle rod and then an area right here for the lock rod. You can grab those rods, I'm going to line them up. You can start with whichever one works best for you. I'll go with the one that's farthest away because I'll have the most amount of flexing action. Make sure it clicks in and it does not fall out. If it falls out, you have an issue. Next, I'm going to do the lock or the handle one. Obviously, it's very hard to get the right angle. Okay. I got it lined up. I'm just gonna squeeze it right in there. Give it a nice tug. Make sure it does not fall out. Now, we're just going to take this unit, we're going to press it up so it's up against the panel and it's sitting in the grooves, and then we'll slide it towards the latch.
So, now, for good measure, I'm just gonna throw a rivet right in here, you could try to put a nut and a bolt and reach your hand back through there if you have to. Okay. That's nice and tight. I'll just cut this off now. So, we're just going to get this in here. Should have a nice little cover over it. So, now, it's gonna be time to get the door panel back on. If you were to feel right down along here, you're going to feel there's a ridge. That's going to sit right over along the top of this. And then, of course, you have all these little push tabs that are going to go inside of all these holes after we've done that. Let's grab our wiring, get that all ready. I'm going to click this in because now is the time to do it before I get this together. I've got my wires in my hand, I'm just going to kind of pull those through. Let's get this up onto here. Okay. Look to make sure your pieces all line up. There we are. Trying to get the cover on here. Let's make sure our door's unlocked. This should slide right over.
A couple of loving bonks, that feels good. Let's get this area back on. Now, it's going to be time to get this reinstalled back into the door panel. We'll connect in our speaker wire, super important. We've got our mirror wire, click it in, give it a tug. Get my wires situated here. I'm going to turn this. Slide it right in. This one, slides right in. Everything is nice and secured. You want to make sure the speaker wire is going through this slot and not over here. Otherwise, it could get a pinch coming across there. To install this, you're going to notice you have a hooky-do right here towards the front area, and then you have your clips right here that are going to latch right there. That being said, come in high and put in the front area first of the hooky-do. And then right here, give it a nice push. A couple of loving bonks. Perfect. We don't want to forget about this. You've got your little clip here, and as you can tell, it slides down. You also have your hooky-dos there that are going to ride along this ridge right there. Come up nice and high, push in, slide down. Give it a nice tug. Make sure it does not rattle around and it's not falling off. We need a little clip right here. Now, it's time to get these two screws into the handle area here. Make sure it's nice and tight. Don't forget about your little covers in whichever hole you want, nothing special.
Now, it's going to be time to test our work. So, you want to make sure you have the key in the on position, the vehicle does not have to be running. Let's go ahead and try to put this window down and then back up. The battery's a little low in this vehicle. Perfect. Passenger side, oh yeah. Let's go ahead and test the mirror. Right side. Yeah. Awesome.
Tools used
Brought to you by 1AAuto.com, your source for quality replacement parts and the best service on the Internet.
Hi, I'm Don from 1A Auto. I hope this how-to video helps you out, and the next time you need a part for your vehicle, think of 1AAuto.com. Thanks.
In this video, we're going to show you how to replace the window sweep on this 1996 Chevy Tahoe. We show you on the driver side but the passenger side has the same procedure. The items you'll need for this include a new window sweep set from 1AAuto.com, a 7mm and 10mm socket and ratchet, wire cutters, a flat blade screwdriver, a punch or drill, pliers, and some heavy duty staples.
Start off by removing this triangular panel. You just pull it. Next, you want to remove these two 7mm bolts. We'll just fast forward as Don does this. Next, pry up your switch panel and then just slide it back. Now, using your flat blade screwdriver, push the tabs on these harnesses and pull them free. For the speaker harness, you just push on the tab right here and pull it free. Now, using the flat blade screwdriver, pry out this bezel and it just pulls off. Now, you want to start prying out along the edges of the door panel. Try to feel for where the clips are and pull them free.
Now, you can lift it up and out of the window sill, and you just want to twist out your courtesy light socket. Remove this foam insert and then pull up this wire and using a flat blade screwdriver. Pull back the tab and disconnect this harness. Then, you want to remove these three 10mm nuts. We'll just fast forward as Don does this. Now, pull your mirror off. If you have one of these rain guards, you will have to peel it from the mirror first. Now, to remove this window sweep, you want to push back and pull up, and that will release it.
Now, for the window sweep attached to the door panel, you're going to have to remove a series of staples. Using some wire cutters, just try to get them underneath and pry the staples up and out. You want to repeat that process on all of them and then it pulls free. Take your new window sweep and line up the holes. You just want to punch a hole through the new window sweep down into the old holes. If the stapler you're using is a much different size than the one you used previously, you may have to make a new hole for the other side, push the staple through the window sweep, and then use pliers to help you push it through the door panel. Make sure you just bend those tabs underneath. Then, just repeat the process all the way down the window sweep.
Take your new window sweep that goes onto the door and just push it down into place. Making sure that it's re-clipping. Then once it's re-clipped, feed your harness back through the door and put your mirror back into place and replace those three 10mm nuts. Reconnect your mirror harness and push that foam back into the door.
Tools used
Hi, I'm Mike from 1AAuto. We've been selling auto parts for over 30 years! We're dedicated to delivering quality auto parts, expert customer service, and fast and free shipping, all backed by our 100% satisfaction guarantee. So visit us at 1AAuto.com, your trusted source for quality auto parts.
In this video we're going to be working with our 1996 GMC Sierra. We're going to show you how to remove and replace your vehicle's power window regulator. If you like this video, please click Subscribe. We have a ton more information on this and many other vehicles. And if you need this part for your truck, you can follow the link down in the description over to 1aauto.com.
Here are the items you'll need for this repair.
Remove the two Phillips head screws inside of the armrest on the door. Do this with a Phillips head screwdriver. To remove the bezel around the interior door handle, you need to kind of get in there with a trim tool or a flat blade screwdriver, and push down on the tab to release it. There are three: one at the top, one at the bottom, and one on the side.
Remove the extension at the top of the door panel by prying out with a trim tool. Using your trim tool, pry up at the back of the power window switch. Lift it up and pull back to release the hook at the front. Disconnect the connector for your tweeter. Pop up the tab on this two pin connector at the front of the window switch, and pop the connector out, and then push down on the tab for the main connector and remove that from the switch. I'm using a pick here. You could also use a small flat blade screwdriver or a trim tool if you had to, really whatever works best for you.
Using the trim tool, pop out on the door reflector and remote the connector. This is another one of the ones we'll have to lift up on the tab with a pick. Using a trim tool, pry out the bottom of the door. You may need to work it a little bit to figure out where the tabs are. You'll also need to pop out this pin at the top on the front of the door. Once all the tabs are out, lift the panel up and remove it from the door.
Peel off the inner water shield on the door. There's also a small piece over in the corner. Make sure your window is rolled all the way down. There are ten 7 millimeter screws around the perimeter of the inner panel. One under the speaker here that's a little tricky to see, and a 10 millimeter at the front. We'll need to remove all of those with a socket and ratchet. Pull the panel forward. Pull out the handle rod. It may help to have a tool to help you get some leverage on it. You'll also want to pop that out of its guide clip. Same thing with the lock rod down here. We'll also need to pop this out of its guide rod and pull it out of the lock actuator as well. Pop out the tab for the courtesy light in the door. Lift up on the cover for the door lock actuator, and remove that connector. You need to fish it out and around. Pop that retainer through, and then pop out all the rest of the retaining clips to remove the harness from the door.
You'll also need to unplug the window motor and the door speaker. Pull the harness through the door. Slide the door panel forward until the window roller is out of its channel, then slide the guide out of the back, and remove the assembly from your vehicle.
Drill out the heads of the four rivets securing the window motor to the door panel. There are two on the front and two on the back. If the centers are drilled out, you may still need to chisel off what's left of the heads. Once you free the window motor and bracket from the inner panel, slide the other leg out of its retainer and remove the assembly from your inner door panel.
Here we have our old window motor and regulator that we removed from our truck and our new part from 1A Auto. As you can see these parts are almost identical. There are some very minor differences in the motor being its size. This actually comes with a harness to connect. It's the same as the plug that's on our old motor. It just makes it a little easier to get on and off, which is a nice feature to have. Other than that the same four hole mounting location for our rivets, we have the same leg for the other end of the guide over here, same two tabs on the back that will actually sit into our window to move it up and down, and the same toothed gear here to actually move it up and down in the door.
If your motor or regulator has gone bad and your window isn't going up and down at all, or straight and even, it's getting stuck, or it's just getting noisy, this new part from 1A Auto is going to go in direct fit, just like your original equipment and fix you up right.
We're going to put some white grease in the rails where our window regulator sits, just to make sure it runs smoothly and lasts a long time. We'll slide this end in. Now we don't have a rivet gun large enough to use the original style rivets, so we're just going to use some nuts and bolts to reinstall our window regulator. You can now install your rivets with a rivet gun, or if you've gone with nuts and bolts like we have, you can tighten them down with the appropriate size socket and ratchet. We'll put some white grease in the window track to help make sure our new window regulator rolls smoothly.
Reconnect your door speaker and your window motor, and send the rest of your wiring harness back through the door. Slide the back half of your window regulator back into the window track. Once the back is in, slide forward and install the front part of the regulator into the glass as well. Reconnect the door lock as well as the door handle. Don't forget to engage the lock actuator, and snap both rods back into their guides.
Realign your door panel. Reinstall your wiring harness. Make sure that all the tabs and retainers go back in their appropriate places. Make sure you run the harness through, and reconnect the door actuator as well. Lock the clasp in for your reflector, courtesy light, and reinstall the ten 7 millimeter screws around the perimeter, as well as the one 10 millimeter. Reinstall the water shield. Sometimes this adhesive doesn't really want to stick a second time, if that's the case, it's all right to put some tape on there to secure the edges.
Pull your wire harness back through the door and lay the top edge into the door frame. Line up the plastic containers and push them all back into place. Reinstall the inner door handle bezel by lining it up and snapping it in. Reinstall your reflector. Place the upper door extension into place. Reinstall the two Phillips head screws in the armrest.
Reconnect your door speaker as well as the two electrical connections on the power window switch. Slide the front hook into the door panel. Snap the back into place, and you're good to go.
Thanks for watching. Visit us at 1AAuto.com for quality auto parts, fast and free shipping, and the best customer service in the industry.
Tools used
Brought to you by 1AAuto.com, your source for quality replacement parts and the best service on the Internet.
Hi, I'm Mike Green. I'm one of the owners of 1AAuto. I want to help you save time and money repairing and maintaining your vehicle. I'm going to use my 20 plus years experience, restoring and repairing cars and trucks like this to show you to correctly install parts from 1AAuto.com. The right parts installed correctly, that's going to save you time and money. Thank you and enjoy the video.
In this video, we're going to show you window regulator and door lock actuator replacement. It's pretty easy, actually. The toughest part is actually just getting to them, getting the panels off to access the regulator and lock actuator. Tools you'll need are seven-millimeter socket and ratchet or a Philips screwdriver, flat blade screwdriver, a putty knife or door panel clip tool, a ten-millimeter socket and ratchet or wrench, and a drill with a three-eighth inch drill bit.
This process is a multi-step process. First process is getting the interior door panels off. I'm fast-forwarding through it. We do have a video on this In regular motion, but you can either search for it or I've actually related it to this video. Once you get the door panel off, which is pretty simple, some screws, and couple of plates. Then I'm doing the pins, then you're on to your interior door panel. In the interest of the YouTube ten minutes, I'm just kind of fast-forwarding through this part.
We get in there, we're actually going to remove this whole plate. You're going to start by removing a series of seven-millimeter screws. One, two, three, four, five, six, seven, eight, nine I believe there's nine or ten seven-millimeter screws and there's one ten-millimeter screw up there. So, I'm going to pull those out. Now, what you want is you want your window all the way down, kind of pull out. Once you've pulled out, then you can see back in here. Just pull down this here and disconnect that from your door lock rod. Just pull that up and out. Then here's your lock rod, just pull that out. Then pull those rods from their guide clips here. You want to disconnect your lock actuator here. See, there are a bunch of little clips here with their wire harnesses using a regular pair of pliers, reaching back, and squeeze and connect the pins on the back side. I'm forcing them out. Take these harnesses, pull them back through here, and then disconnect the power window motor back here and your speaker. Then you're going to push all these wire harnesses back through the panel here.
So, now with the harnesses back in there, as you can see, I just kind of taped up those rods because they tend to get in the way. You can see down in there it's going to be hard to you can see that the rollers are in the track down at the bottom there, and that's what you do. You're sliding it forward. Get that roller out of the track, and once the front one comes out, then you take the whole thing, make sure you're not caught up on anything and wires like to get in the way a little bit take the whole plate, rotate it up like that, and then the whole thing comes out. It'll going to be a now you have access to your door lock actuator and your window regulator.
Most of the tough work is done. Now, the window regulator and door lock actuator are just riveted to this panel. What you're going to do is roll up those rivets, and since these weren't bad, they didn't remove them and replace them but you can see here, you just use a drill, press it in the center of the rivet, drill into it, basically until the rivet head pops off, and then you use a screwdriver or a putty knife or something to separate the parts. Then you bolt in the new ones. All of the parts of 1aauto will be the exact duplicates of the original parts, so they will install no problem. Then so, you bolt them in and then you ride and put them back together.
Before I put this together, I'm just going to take some white grease chance to remove that tracks on take my panel. Now this wheel, I would say, needs to into that track then followed by that wheel. I'm going to tip it, rotate it up, get it in there so that the wheel goes in. Now, before I even put that next wheel in, I reach back here and then let's take these long harnesses I'm going to put them through the hole, reach in here, and then I'm going to hook up my speaker and then I'm going to hook up my power window motor. I'm also going to take those harnesses, keep pulling these through. I'm going to put my big ones through as well, and then put this pin in here. Now, I'm going to get back to that wheel, get it right down in place, and push it in. That's in.
You want to place your and then reconnect my lock rod here, all there, push that in .Then I'm going to take this tape off, pull this up then connect my door rod there, put this snap that into place and just push that right through, and then lock that one in place. Now, I'm going to reconnect and reroute this whole harness. Pull this big pin right here. Actually, before I pin them together, what I'm going to do is reroute everything. This went down in here, came out there, this went here, landed there, went around, and then hook up to my door lock actuator.
So, now everything's hooked up. What I'm going to do is I'm actually going to run a test here. The door lock's working, and my window's working. Get these harnesses all pinned on the right spot in the interest of making the YouTube ten minutes, I'm just fast-forwarding, pinning the harness on there. Then you need to make sure you put in all the bolts, and there are ten seven-millimeter bolts, and a ten-millimeter bolt. Then you're putting on the door panel. Again, to install the door panel, we do have this video in regular time and it's related to this video. So, we hope this helps you out. We can get your door lock actuator fixed or your window regulator or both, and maybe those windows and locks won't give you quite so much frustration.
We hope this helps you out, brought to you by www.1AAuto.com, your source for quality replacement parts and the best service on the Internet. Please feel free to contact us toll free 888-844-3393. We're the company that's here for you on the Internet and in person.
Tools used
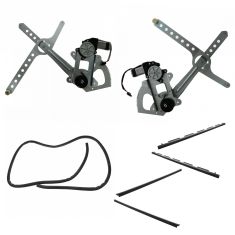
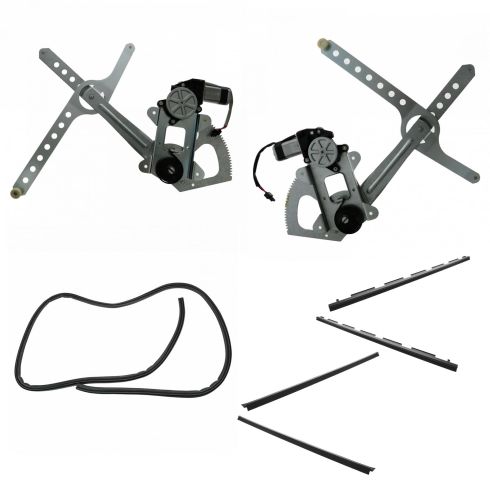
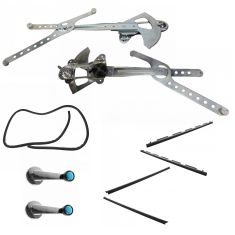
Replaces Chevrolet GMC Front Power 6 Piece Window Regulator Kit DIY Solutions WIN01374
$194.95
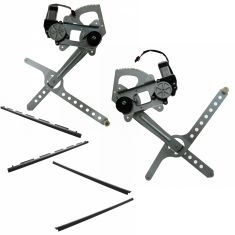
Replaces Chevrolet GMC Front Manual 10 Piece Window Regulator Kit DIY Solutions WIN01378
$169.95
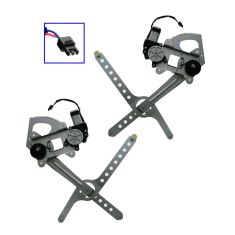
Replaces Chevrolet GMC Cadillac Front Driver & Passenger Side Power 2 Piece Power Window Motor & Regulator Assembly Set TRQ WRA50143
$114.95
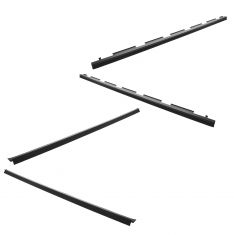
Replaces Chevrolet GMC Front Window Sweep 4 Piece Set Fairchild Automotive KG2040
$72.95
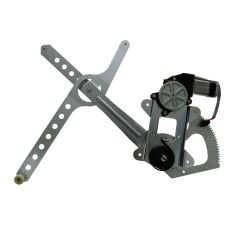
Replaces Chevrolet GMC Cadillac Front Passenger Side Power Power Window Motor & Regulator Assembly TRQ WRA51070
$64.95
Replaces Chevrolet GMC Cadillac Front Driver Side Power Power Window Motor & Regulator Assembly TRQ WRA51071
$64.95
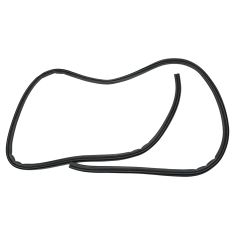
Replaces Chevrolet GMC Cadillac Body Mounted Door Weatherstrip Seal Fairchild Automotive G3009
$47.95