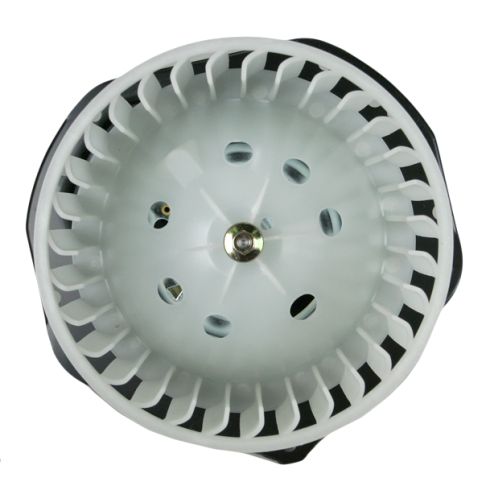
1AHCX00089-Chevrolet GMC Pontiac HVAC Blower Motor Assembly TRQ HMA84804

Replaces
1988 GMC Safari without Rear Air Conditioning HVAC Blower Motor Assembly TRQ HMA84804

Frequently bought together
Product Reviews
Loading reviews
4.05/ 5.0
20
20 reviews
February 9, 2017
Motor was as hard to install as the video showed. But it works great and is very quiet.
1996 Chevy Tahoe Front Heater Blower Motor
February 13, 2017
I really like dealing with 1 A Auto. I purchase most of my auto and truck parts using their easy ordering platform. They stand behind all their product line and make it very easy to either return or exchange warranty parts. I tell many of my friends about the video library available on 1 A Auto web site as well.
Awesome Service and Very Helpful Videos
July 5, 2017
For a long time I've been watching their how to videos online and when I finally decided to start restoring my camaro, I could only think of one place to get parts and that's 1a Auto, I'm very pleased with their service and helpful videos, they have saved me easily hundreds of dollars in mechanic fees by buying their parts and installing them myself.
Awesome
January 14, 2018
Old blower was noisey got this one easy install works like new again perfect fit very happy with the part.
Heater fan and motor
April 24, 2018
The part was the right one exactly the same, fit right in.
Noisy blower AC motor Solved
November 9, 2018
The new blower motor was a simple Remove-Replace unit that fit perfectly mechanically and electrically. Great solution. Thanks for speedy delivery. Third item from A-1 and they have been Great.
Fast delivery
June 26, 2019
Parts were great quality and came on time.
1995 chevy hvac
September 21, 2019
Bought this blower and for my hvac and it was a perfect match. Still going strong.
Works like new
November 4, 2019
Drop in replacement for failed blower motor on my 95 Chevy K1500. 1A Auto's video showed perfectly how to replace it. The great videos are why I purchase replacement parts from 1A Auto.
Makes a high pitched noise. Really bad on low settings
November 26, 2019
Purchased this to replace my speaking blower motor. Mine squealed randomly while driving. This motor has a annoying high pitched hum ALL of the time. Really bad on the lower settings. I also had to trim the motor mount with a tin snips to get it to fit. Not cool. Installed this in a 1996 Chevy 4x4.
Holes did not fit screw for ground wire
December 2, 2019
Holes did not fit screw for ground wire
1996 Chevy blower motor
June 23, 2020
This website was very to work through and also bringing me the right part. It was nice that there were videos. I knew how to do it i thought but then you can watch the video just ti make sure. I will definitely come back if i need parts!
It makes a howling noise
October 2, 2020
I replaced the original one after 24 years as it had developed a noisy bearing.
The new one makes a howling noise. Unacceptable. I will return it
Humming/Rattling noise/squeaking
October 26, 2020
Purchased the new blower with fan about two years ago. When first installed the motor hums. It worked so I figured I'd live with it. Now the motor sounds like my old one did at 22 years old. Put up this review after seeing the others with the same issue. Bearings are failing.
Great product
December 21, 2020
Easy to install fits perfectly and works like it should
Easy ReplacementShort Break in Period
June 8, 2021
The old blower motor on my 1996 GMC Yukon was making an unbearable constant squeaking noise whenever on. I switched out with this one from 1A auto. Easy job and fixed the issue. There was a short break in period however where the fan was pretty loud. It basically sounded like a small vacuum for about 200 miles. I noticed the other day though that those initial noises have completely subsided. No squeaking has returned.
Would recommend to anyone
June 18, 2021
Work and fits perfect! Not more noisy fan while heating or cooling
Defective part, customer service could have been a bit more efficient as I was without my vehicle over Thanksgiving.
December 3, 2022
Ordered a blower motor for my 1995 Chevy K1500 quick delivery but the motor was defective. I was fortunate to buy one locally for half the price.
Easy replacement
May 23, 2023
Installation video was great. Easy replacement & great product.
January 19, 2024
Perfect replacement
Customer Q&A
No questions have been asked about this item.
GMC is a registered trademark of General Motors Company. 1A Auto is not affiliated with or sponsored by GMC or General Motors Company.
See all trademarks.


