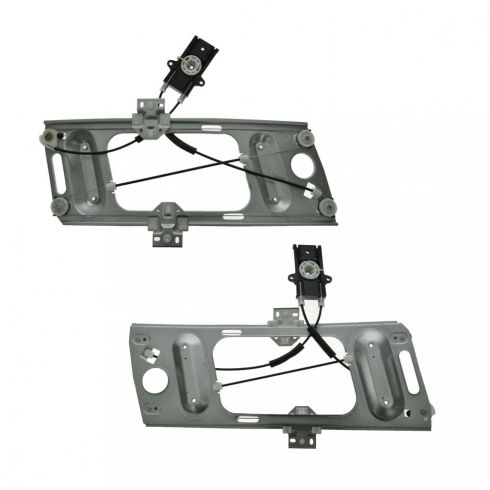
Kit Includes: (1) Driver Side Window Regulator (1) Passenger Side Window Regulator
Regulator Option: without Motor
Quantity: 2 Piece
Operation: Power
Specification
Side Location
Driver & Passenger Side
Product Features
Heavy Duty: Engineered to perform under harsh conditions
Improved Design: Upgraded components and materials to prevent premature failure
Installer-Friendly: Application Specific Design
Note: This window regulator is designed to work with factory style motors only. Due to variations in aftermarket designs, replacement motors may not have the correct gear style.
This window regulator is a high quality aftermarket part that meets or exceeds the performance of the original. Subjected to extensive testing and quality control standards, allows us to offer this regulator with our superior warranty!
Item Condition:New
Attention California Customers:
WARNING: This product can expose you to chemicals including Lead and Lead Compounds, which are known to the State of California to cause cancer, and birth defects or other reproductive harm. For more information, go to www.P65Warnings.ca.gov.
Lifetime Warranty
This item is backed by our limited lifetime warranty. In the event that this item should fail due to manufacturing defects during intended use, we will replace the part free of charge. This warranty covers the cost of the part only.
FREE Shipping is standard on orders shipped to the lower 48 States (Contiguous United States). Standard shipping charges apply to Hawaii and Alaska.
Shipping is not available to a P.O. Box, APO/FPO/DPO addresses, US Territories, or Canada for this item.
Expedited is available on checkout to the United States, excluding Alaska, Hawaii.
Final shipping costs are available at checkout.
How to Replace Window Regulators 2000-07 Chevy Monte Carlo
Created on:
Tools used
Flat Blade Screwdriver
T27 Torx Driver
Phillips Head Screwdriver
Putty Knife
10mm Socket
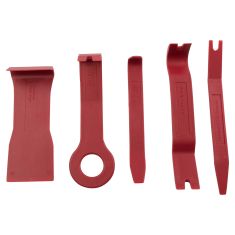
Door Panel Removal Tool
Ratchet
1. Remove the door panel
Check out our other videos for detailed instructions on how to do this.
Carefully peel back your water shield.
Disconnect the side mirror connection.
2. Remove the window regulator
Carefully pull the foam block out of the door.
Tape your window up and remove the two 10 mm bolts to release the regulator from the window glass.
Unbolt the window regulator and the motor.
Disconnect the window motor connection.
Carefully pull the window regulator assembly out of the door.
3. install the new window actuator
Feed the window actuator into the door.
Bolt the actuator and motor into the door.
Connect the power window motor harness.
Untape the window and lower it into the power window regulator track.
Secure the window with the 10mm bolts.
Connect the power window switch to test.
Replace the sound deadening foam block.
Put the water shield back onto the door.
4. install the door panel
Connect the side mirror wiring connection.
Check out our other videos for more detailed door panel installation instructions.
Brought to you by 1AAuto.com your source for quality replacement parts the best service on the internet. Hi, I'm Mike Green. I'm one of the owners of 1A Auto. I want to help you save time and money repairing and maintaining your vehicle. I'm going to use my 20 plus years' experience restoring and repairing cars and trucks like this to show you the correct way to install parts from 1AAuto.com. The right parts installed correctly, that's going to save you time and money. Thank you and enjoy the video.
In this video, we are going to show you window regulator replacement on this 2003 Monte Carlo, same as any 2000 and 2007 Monte Carlo. Tools you'll need are Phillips screwdriver, T27 Torx driver, and flat blade screwdriver, putty knife and regulator, and 10 mm socket and ratchet. Now we obviously start this by removing the door panel and I'm doing this in fast motion. You can probably pick up enough to see how to do it but if you need to see this on regular motion just checkout our other videos for the door panel removal on replacement and once I'm done doing Speedy Gonzalez to this then we'll get to the regulator. Okay, that's just the inside of the door. You are going to want to disconnect your mirror connection here, which pressing on this thumb tub. Okay and you'll actually want to pull that out. Carefully use a screwdriver. You've got to press on it from the other side, pull it through.
Then you carefully want to remove your water shield. You want to do this slowly. You don't want to rip or stretch this too much. The regulator is riding behind here. This piece of form is actually glued to the door. You just want to kind of pull it lightly and up and out. And, now you'll need a 10 mm socket and ratchet, and your regulator is held in here and here by four bolts and then your window motor is held in here by three bolts. What you'll want to do. There are two bolts here. What you are going to want to do is tape up your window and then remove those two 10 mm bolts. You can see I've got some paper tape up here and what I'm going to do now is remove these two bolts. Now if you have a broken regulator and your window is halfway up halfway down, it might be a little tougher to get to these bolts. This one will be easy because it'll probably be this big area here but there's enough room back in here that you should be able to get to it. The other thing is to if your window regulator is broken, what you can do is reach in, and probably force it up by hand, and then tape it up here.
Okay, for the purpose of this demonstration, I'm going to hook up the car window switch again here. You could see there's my mechanism just came down. I took those bolts out. I'm going to unbolt, I'm going to loosen these two bolts up here. Then I'm going to remove these two bolts. Loosen up these bolts. You can take this up now. It might give you a little better access to this connection. It's kind of, like it switches here. Just put a screwdriver on there and disconnect it. Now you lift the regulator up and out. Here's our original regulator. Here's the 1A regulator. I actually have ... I have it backwards here I guess. You can see everything's the same on the 1A regulator. It's going to bolt in just fine. There's the connector from the original motor. Our regulator has a pintail on it but it is the same connector. Actually, makes it a little bit easier to get together. All you are going to do is you are going to transfer these two bolts to the new regulator so you can hang it up in there. This one is fine from the car. This is broken so I'm going to put the original one back in. This one we'll show for reference purposes.
Make sure also that you've threaded the bolts into your window motor. You can fit in there. Fit in there, reach in here to help it out and hang the window motor. I just hang the window motor right there and then this regulator. There's no just fitting this up. Make sure your top is right against your door. So it has to be inside the window. You can feed it up, put those bolts in and then down. Now you can put your two bolts, put them on. Regulator is on tight. Let's get my window motor moved up. There's my connector right down there. Just all the way, click it in. Tighten the window motor up in place. Un-tape the window. All right and then slowly, slide it down. You can see there's the connector on the window and its teeth to make sure that those teeth go on this side while the connector's obviously on that side. The same thing on the front one here. What I can do is get this one in. All right.
I'm going to reconnect my switch. I'm going to run the window up. Obviously, you are also making sure your window regulator works at that point. My other bolt in. You want to push hard. It is kind of a flat spot you have to go in and push on it to get it going. Make sure it's tight. Make sure your rear one's tight here. Just have fun with it. Now that everything's bolted up, I'm going to reconnect my switch and just check, make sure everything goes up and down with no problem. Once you finish your work on the door you want make sure you get it back together well. These rods tend to pop out. Make sure they are up in there and then you press these clips together. They are all secure. This piece that goes in goes down in there and basically just kind of sticks to the door. Just a little sound there. On this, what I like to do is find a reference point, which is this needs to get there and that all winds up. Right, put the door panel. Let's make sure that the mirror is clipped in here. Push that back in or slide it back on, clip in the mirror. Quick testing everything window, mirror, door locks, everything's good.
We hope this helps you out, brought to you by www.1AAuto.com. Your source for quality replacement parts and the best service on the internet. Please feel free to call us toll free 888-844-3933. We are the company that's good for you on the internet and in person.
WRA50771
In Stock
Product Reviews
Loading reviews
There are no reviews for this item.
Customer Q&A
No questions have been asked about this item.
Customer service
877-844-3393
Monday - Friday 8:00am - 9:30pm ET Saturday - Sunday 8:00am - 4:30pm ET
Chevrolet is a registered trademark of General Motors Company. 1A Auto is not affiliated with or sponsored by Chevrolet or General Motors Company.See all trademarks.
Enter Vehicle Year Make Model
Specify your vehicle's year, make and model to guarantee fit.
Year
Make
Model
Options
Drivetrain
This part doesn’t fit a . Select from parts that fit.