This item is backed by our limited lifetime warranty. In the event this item should fail due to manufacturing defects during intended use, we will replace the part free of charge. This warranty covers the cost of the part only.
FREE Shipping is standard on Orders shipped to the lower 48 States (Contiguous United States). Standard shipping charges apply to Hawaii, Alaska and US Territories. Shipping is not available to Canada.
Expedited is available on checkout to the United States, excluding Alaska, Hawaii and US Territories as well as P.O. Boxes and APO/FPO/DPO addresses. Final shipping costs are available at checkout.
How to Replace Radiator Overflow Bottle 1999-2005 Pontiac Grand Am
Created on:
Tools used
Socket Extensions
Flat Blade Screwdriver
10mm Socket
Slip-Joint Pliers
Ratchet
1. Remove the radiator overflow bottle
Drain the radiator fluid into a catch pan.
Disconnect the hoses with a pair of pliers to release the clamps.
Unplug the electrical connection.
Remove the 10 mm bolt.
Unclip the bottle and remove it.
2. Install the radiator overflow bottle
Clip the bottle back down.
Secure with the one 10 mm bolt.
Plug in the electrical connection
Reconnect all the hoses.
Fill your radiator fluid reservoir back up.
Brought to you by 1AAuto.com, your source for quality replacement parts, and the best service on the Internet. Hi, I'm Mike Green. I'm one of the owners of 1A Auto. I want to help you save time and money repairing and maintaining your vehicle. I'm going to use my 20+ years' experience restoring and repairing cars and trucks like this, to show you the correct way to install parts from 1AAuto.com. The right parts, installed correctly; that's going to save you time and money. Thank you, and enjoy the video.
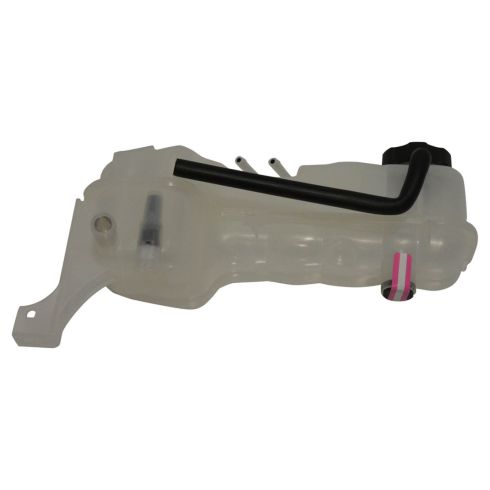
In this video, we'll be replacing a radiator bottle on this '99 Pontiac Grand Am; same as any '99 to '06 Grand Am. The tools you'll need are pliers, a flat blade screwdriver, and a 10 mm socket, ratchet and extension. A coolant recovery tank. At 1A Auto, we sell nice, new replacements. These are under pressures, so sometimes they can rupture and crack, and that's why you can leak fluid. Maybe somebody worked on your car and cracked one of these hoses or something, and broke the hose. If so, we sell a nice quality replacement. It has the sleeves in here for extra strength. It comes with a cap and everything. This one's fine on this car, so I'm just going to show you how to get it out. I'm not going to totally take it out, because it's still got coolant in it, and I don't want it to drain it out. It's pretty easy.
There are three hoses you've got to disconnect. You just use pliers, and pull those clamps off. Then you want to twist the hoses; that's how you get them started. Then you twist as you pull off. That disconnects it. You want to do that one, that one, and then this one. Right down here is an electrical connection; that's your low coolant sensor. Just unplug that. Then, just one 10 mm bolt; I use my air ratchet here. Then, basically there's another clip here. You just kind of need to work a screwdriver in there and pry it away from the fender a little bit, and then it comes up and out. Putting it in is the reverse. You clip it down in there, connect all your hoses. Put your 10 mm bolt back in. Plug in the harness. Let's tighten up this bolt. Take your pliers, and squeeze the clamp; work it back on here. If you want to, you can put a little bit of soapy water or something to help you. That's about it; three clamps, a harness, and a 10 mm bolt. Unclip this right there, and you're good. This hose back here can actually stay with it.
We hope this helps you out. Brought to you by www.1AAuto.com, your source for quality replacement parts and the best service on the Internet. Please feel free to call us toll free, 888-844-3393. We're the company that's here for you on the Internet, and in person.
603-109
In Stock
Product Reviews
Loading reviews
5.00/ 5.01
1review
5 Stars
4 Stars
3 Stars
2 Stars
1 Star
1
0
0
0
0
Helpful videos and parts
Daniel
July 26, 2022
Seems to fit perfectly in place; the previous tank had some small cracks so I did NOT want to risk a leak. I am still hooking up my sensors, have to do a cooling system flush, and change the oil/filter. My intake manifold gasket replacement chore is almost over! Thanks to 1A and its YouTube library of videos and many "little prayers", the end is in sight!
Customer Q&A
What is the rubber piece at the bottom of the the tank for I replaced the tank but I am still having low coolant issues?July 4, 2018
Anne T
10
Hello,
The bottom of the tank may have a valve or some other type of fitting. It is held in with the piece of tape in the picture. Thank you!
July 4, 2018
Adam G
Customer service
877-844-3393
Monday - Friday 8:00am - 9:30pm ET Saturday - Sunday 8:00am - 4:30pm ET
Chevrolet is a registered trademark of General Motors Company. 1A Auto is not affiliated with or sponsored by Chevrolet or General Motors Company.See all trademarks.
Enter Vehicle Year Make Model
Specify your vehicle's year, make and model to guarantee fit.
Year
Make
Model
Options
Drivetrain
This part doesn’t fit a . Select from parts that fit.