All of our auto parts are intended for Left Hand Drive USDM vehicles. If your vehicle is Right Hand Drive, please ensure the part is correct for your specific vehicle.
Item Condition:New
1 Year Warranty
This item is backed by our 1-year warranty. In the event this item should fail during intended use, we will replace the part free of charge. This warranty covers the cost of the part only.
Returns: Parts with electrical components cannot be returned once installed.
FREE Shipping is standard on Orders shipped to the lower 48 States (Contiguous United States). Standard shipping charges apply to Hawaii, Alaska and US Territories. Shipping is not available to Canada.
Expedited is available on checkout to the United States, excluding Alaska, Hawaii and US Territories as well as P.O. Boxes and APO/FPO/DPO addresses. Final shipping costs are available at checkout.
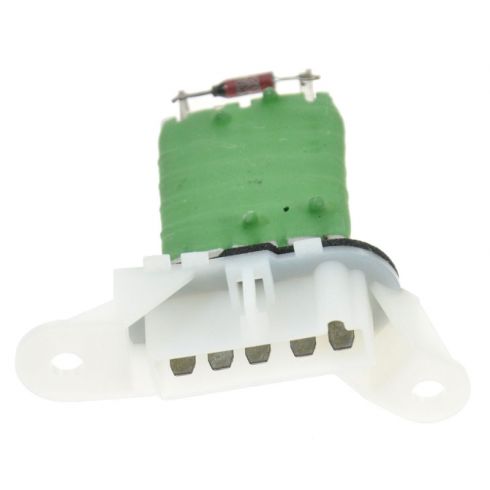
How To Replace Blower Motor Resistor 1995-2005 Pontiac Sunfire
Created on:
Tools used
Socket Extensions
6mm Socket
7mm Socket
Ratchet
Swivel
1. Access the resistor
Remove the three screws under the glove compartment.
Use your 7mm socket and driver
2. Remove the resistor
Remove the 6mm bolts and remove the resistor.
Use a swivel socket to access the bolts.
Unplug the resistor from the harness.
3. Install new resistor
Use your swivel socket to bolt it back in.
Replace the panel.
Brought to you by 1AAuto.com-- your source for quality replacement parts and the best service on the internet.
Hi I'm Mike Green. I'm one of the owners at 1AAuto. I want to help you save time and money, repairing or maintaining your vehicle. I'm going to use my 20 plus years experience restoring and repairing cars and trucks like this to show you the correct way to install parts from 1aauto.com. The right parts installed correctly, that's going to save you time and money. Thank you and enjoy the video.
In this video we will show you how to replace a blower motor resistor in this 1997 Pontiac Sunfire. It's pretty much the same as any 95-05 Sunfire or Cavalier. There may be slight differences in how you get to the blower motor as far as number of bolts that hold the panel on. All you need is a 7mm and 6mm socket. You will need a u-joint and extension for this one.
So first we're going to start down underneath the glove compartment and there's three screws. One here, here and here. And we'll remove those three screws and then this whole panel will come off. These are 7mm nuts. Once that instrument panel cover is out of place, you can see right up there this 6mm nut, you'll need to remove that to get the blower motor relay off. There is one bolt here that you can see well enough to get it out. Then there's another bolt back right here. Okay, so here's a resistor out of the car and you're able to see me get to this bolt and get it out easy enough. There's another one right in behind here okay and I'm basically going to show you the angle I use to get at it, because it's very difficult to get to. You're going to need a flexible joint like this. Basically, maybe if you're a different build or whatever you can get yourself up under there. But what I have to do is position myself in the backwards decline position, get my arms up in there first. And it's pretty hard to film this, so you have to take my word for it. Basically I'm stuffing my wrench up in there and I've got my wrench on there now.
Once the screws are out of there we are pointing down and pull the whole thing right out. Turn it around and just pull this up and unplug the harness. Okay and you can pretty much see what the problem is with this resistor, it's really corroded and that's why this car is only is only getting blower positions three and four. Here's our new resistor from 1AAuto, you can see the exact same. It's just in much better condition. I'll get in and I'll start the one you can see somewhat first. You get that one in. Let's do a test. Okay, here we have all four speeds now. Get back in my position to get this other screw in there. Really, quite honestly if you never got the screw back in you'd probably be alright. If you get under here and get the right angle with the u-joint on your wrench it's not so bad.
Now we can put that lower panel back on. The panel just goes right up in here. It has a locating pin here and there's locating pins that come down from the dash as well. They go into holes here and here. And this is a Sunfire it has three bolts, there are different slots for the Cavalier. So the Cavalier may have a different number of three, they have four of these bolts. And there you go.
We hope this helps you out. Brought to you by www.1AAuto.com-- your source for quality replacement parts and the best service on the internet. Please feel free to call us toll free 888-844-3393. We're the company that's here for you on the internet and in person.
15-80647
In Stock
Product Reviews
Loading reviews
There are no reviews for this item.
Customer Q&A
No questions have been asked about this item.
Customer service
877-844-3393
Monday - Friday 8:00am - 9:30pm ET Saturday - Sunday 8:00am - 4:30pm ET
Saturn is a registered trademark of General Motors Company. 1A Auto is not affiliated with or sponsored by Saturn or General Motors Company.See all trademarks.
Enter Vehicle Year Make Model
Specify your vehicle's year, make and model to guarantee fit.
Year
Make
Model
Options
Drivetrain
This part doesn’t fit a . Select from parts that fit.