Replaces
This part doesn’t fit a . Select from parts that fit.
Frequently bought together
Item Condition:
New
Attention California Customers:
 WARNING: This product can expose you to chemicals including Lead and Lead Compounds, which are known to the State of California to cause cancer, and birth defects or other reproductive harm. For more information, go to www.P65Warnings.ca.gov.
Lifetime Warranty
This item is backed by our limited lifetime warranty. In the event that this item should fail due to manufacturing defects during intended use, we will replace the part free of charge. This warranty covers the cost of the part only.
FREE Shipping is standard on Orders shipped to the lower 48 States (Contiguous United States). Standard shipping charges apply to Hawaii, Alaska and US Territories. Shipping is not available to Canada.
Expedited is available on checkout to the United States, excluding Alaska, Hawaii and US Territories as well as P.O. Boxes and APO/FPO/DPO addresses. Final shipping costs are available at checkout.

Created on:
Tools used
Okay, friends, one of the first things we need to do is get under the hood. Once we've done that, we're going to come right over to the oil cap. We'll go ahead and twist it counterclockwise, lift it up off of here, and we're going to take a peek. This is going to tell us exactly what kind of oil we need to use. You want to make sure you have that on hand, and you also want to have an oil filter. If we're going to be taking all the oil out of it, we might as well change the filter. Set this aside, and let's get under the vehicle. All right, so we made our way underneath the vehicle and the first thing that we need to talk about while we're under here is, of course, safety. We're going to be dealing with fluids and/or chemicals. With that said, you want hand protection and eye protection.
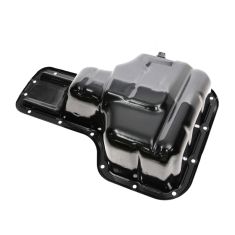
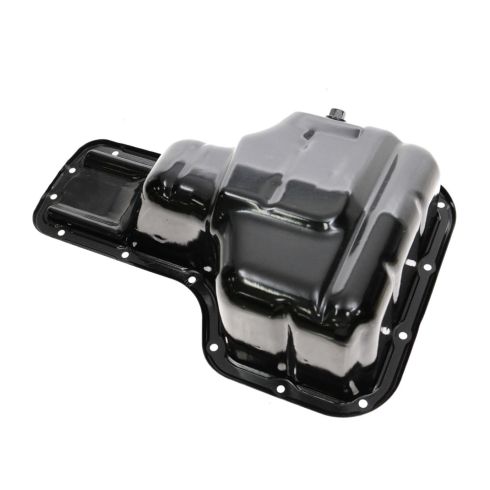
One of the first things we're going to do after that is we're going to remove our drain plug right here and make sure that that oil goes into a nice collection receptacle so you can recycle the fluid as needed. Now that we've let that drain out completely, I always just like to put the drain plug back in there only because there might be a little bit of residue in there. And it's much easier just to pour out in the bucket after we're done. Let's move along to removing the oil filter. The oil filter is going to be located right on the forward side of the oil pan. Use your small band wrench like this, break it free turning counterclockwise, and then unscrew it. Just be aware there is going to be oil that comes out of it as well. Make sure you have your bucket under there. Now the next thing we need to do is remove our mounting hardware for our oil pan. Some of these are going to be bolts, some of them may be nuts, with that said, there are 16 of them going around the whole oil pan, so let's go ahead and get them down from here. Now, we're going to do the same to all. Just keep in mind that these ones that are underneath this cross-member might be a little bit harder to get to but they're still accessible. It would be much easier to get to these inward bolts, if you were to take off this plastic cover. Coming right underneath, you can grab on and just pop it right out of there. Easy-peasy. Now that I have all the bolts out, what I did is I left the nut that's on the rearward part and the one that's on the forward part of the pan. What we need to do at this point is break the pan free from the engine itself.
The reason why I left the nuts on there is so as I pull this down, there's no way that it can potentially come down and hurt me. I'm just going to take a pry bar and go in between the engine housing and the oil pan itself. And I'm going to try to carefully pry and just see if I can separate these pieces. There's going to be RTV in here, so it's going to try to hold it for us. But what we want to do essentially is just break it free all the way across. Once you have it broken free, just go ahead and take off those nuts, just be careful not to let the oil pan hit you in the face. Now we'll draw the oil pan down. You're going to have to wiggle it around because there's going to be an oil screen in here that needs to fit through a hole. But there it is right there. And looking inside the pan, you can see where the hole is it needs to come out of. Looking up here you can see the oil catch screen and you can also see the dipstick tube, you don't necessarily need to worry about those. But what we do want to pay attention to is the area along the engine where the pan was sitting.
If you were to look at it, you're probably going to see some grey stuff coming down or maybe even possibly black, that's considered RTV and it's a sealant. We need to make sure we use a razor blade, or even a nice scraper and clean this down so it's bare metal all the way around. Once you have everything scraped down the best you can, and you're sure that all the surfaces are smooth as possible, take a nice rag and a little bit of parts cleaner. Put the parts cleaner right onto the rag and then clean all the surfaces so that there's no more oily residue. Okay, so now it's going to be time to get ready to put our oil pan up onto the vehicle. Before we can do that, we need to make sure we wipe down the entire surface that's going to go up against the engine with a nice clean rag and some parts cleaner. You don't want to have any oily residue on there. Once you've gone ahead and done that, you want to make sure you put a little bit of RTV going around the whole pan. Make sure you don't miss a spot because that's going to be the first spot that you find an oil leak. Now that we put gasket maker around the entire pan where it's going to be meeting against the engine, it's going to be time to put it up to the engine.
Just keep in mind once you touch it against there, some of the gaskets going to hit up against there and it might want to stick. So let's go ahead and try to put it up. I'm going to have two of the nuts inside my fingers so that way there, once it starts going up, I can start those nuts on the stud and that'll hold it for me. Okay, now I'm going to do the front side. And I'm not going to snug these or anything, I need to leave them a little loose because when we start putting in these bolts, you have to make sure you start them all before you snug any of them up. Otherwise, the holes might not line up. Okay, so now let's just start in the other 14 bolts here. Now that we started all of our bolts and nuts, it's going to be time to snug these up. We're not going to make them very tight because the torque for these bolts is only 80 inch-pounds. Once we snug them all, we'll go ahead and torque them. Now it's going to be time to torque these. Like I said, 80 inch-pounds. Now, the next two steps are going to be super important. Something that I want to mention is you do not want to add oil to this for at least two hours before you go ahead and fill it up. So, of course, wait two hours.
But while you're waiting, go ahead and torque up this drain plug, and you want to torque it to 27 foot-pounds. Torqued. Now it's going to be time to put our little cover in here. We just want to make sure that we have this end facing up and you're going to see that has a little hooky-do. That needs to go in and behind the oil pan area, just like this. And then click it in, make sure it's secure and it's not going to fall out. The next thing we need to do is prime our oil filter. So you're going to take a little bit of your brand new oil and fill it up so it comes up too close to the top. That's going to get the majority of the air out of there. There we are. Now, we'll just take our gloved finger, run it along the edge of the oil filter to make sure that the seal is nice and coated.
All right, let's go ahead and put it up on here. Okay, so put it on so it bottoms out. Once it bottoms out, you just want to turn it another 3/4 of a turn. One, two. There we are. Perfect. Wipe it down. Make sure everything's nice and clean. And let's get up top and start filling it up. Now it's going to be time to go ahead and fill up our oil. You want to make sure you use the funnel, of course, because you don't want to make mess all over the top of your engine. Something else you want to make sure is your oil dipstick's down. Once you've done that, go ahead and fill it up with the manufacturer-specified fluid, which is 5w30 oil. You're going to want to put in 4.4 quarts total. Let's go ahead and cap this off.
Now, the next thing we need to do is start up the vehicle. Let it run for approximately 15 to 30 seconds, turn it off, wait another 15 to 30 seconds, and then check your oil level. All right, now that we started the vehicle, we've also turned it off and let it sit for a little bit. Let's go ahead and check that oil level. Carefully pull out your dipstick, give it a nice wipe to make sure it's perfectly clean. Put it back in, remove it once again, and now we're going to inspect the level. Just looking at it, I can see it comes all the way up here and it's just below that maximum dot. In all honesty, that's the perfect level right there. You don't want to come up to the dot and you definitely do not want to come above it. If you come above the dot, you need to get under there and drain some out. This looks great. Reinstall the dipstick, go ahead and take it for a road test.