Hi, I'm Mike from 1A Auto. We've been selling auto parts for over 30 years. We're dedicated to delivering quality auto parts, expert customer service, fast and free shipping, all backed by our 100% satisfaction guarantee. Visit us at 1AAuto.com, your trusted source for quality auto parts.
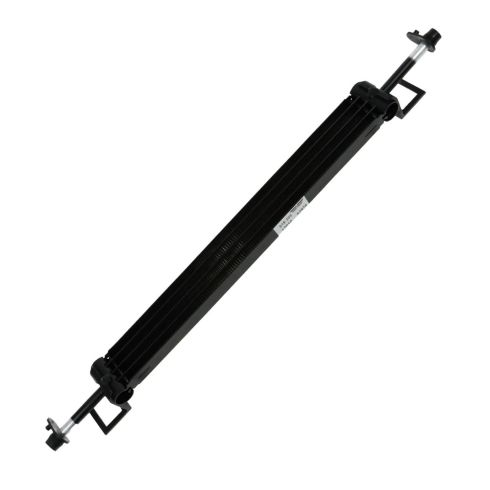
In this video, we're going to be working with our 2006 Chrysler 300. We're going to show you how to remove and replace your power steering cooler. This vehicle does not have the heavy-duty cooling package, however, that power steering cooler's process will be very similar, if not the same. If you like this video, please click subscribe. We have a ton more information on this and many other vehicles, and if you need this part for your car, you can follow the link down in the description over to 1AAuto.com. Here are the items you'll need for this repair.
Remove the three push pin connectors on the inside of each wheel well at the bumper. We've removed the wheel to make it easier to show you what's going on, but this can definitely be done with the wheel still attached to the vehicle. We're going to use our trim tool from 1A Auto and pry up the center portion of the tab, then get behind the base of it and pop it out. Now our vehicle has been modified. This isn't the bumper that belongs on it, and it was also lowered substantially, so our wheel wells are in pretty rough shape. We have a lot of pins missing along with our belly pan.
Using a 10mm socket ratchet and extension, remove the 10mm bolts securing the corner of the bumper to the fender. Normally there would be an air dam or belly pan located here at the bottom of the bumper reaching back under the motor, however, our vehicle was lowered substantially, and this pan has either been ripped off or removed. The fasteners go along the front of the bumper, and then there are a couple of – it looks like the used to be 10mm that secure it to the sub-frames as well as some of those push pin type connectors we showed you earlier in the wheel wells.
Now, this isn't the original bumper for this vehicle. No one hooked up the side markers when it was installed, so you'll want to disconnect those. There will be this little connector over here under your side marker. You'll also want to disconnect the connector on your fog lights if your vehicle is equipped. Simply lift up on these two tabs, and then pull back.
Using a trim tool, we'll remove the same four push pin style connectors that we found in our wheel well, only these go along the top of the bumper. If you're performing this procedure on a Magnum which is the station wagon, there will be six of these where Chargers have eight. You can now pull the bumper straight out and off of the vehicle.
Remove your power steering cap. Your power steering reservoir is located at the front of the engine bay on the driver side. Now, we're going to use a hand pump to siphon the fluid out. If you don't have one of these, you can pick one up cheap at pretty much any auto parts store or tool supply house or you can just use a turkey baster if you have one lying around that you don't need anymore. We'll place the suction side of our hose into the reservoir. We'll kind of wad up a paper towel around that and wedge it in there to help keep it from falling out. Make sure it's bottomed out all the way. We'll place the other side in our catch pan and just pump. Now, once you have suction going, you can just pull the top hose out of the pump and keep it lower than the reservoir and it will just continue to drain. You could just keep pumping it but this really is the fastest way to do it. If you have a piece of hose laying around, you could put the turkey baster in the end of the hose to create suction. Once you have suction, you can just pull the baster right off. Use this same method. Once the fluid has stopped draining, remove the other end of your hose. We have this paper towel handy to cap it off. Just place that in our drain bucket.
With the power steering fluid drained and your bumper off, we can now remove the power steering cooler located here on the front of our AC condenser. We've got two of the little pinch clips, one on each side, and a hose. I’m going to go ahead and compress those and slide them out of the way. I do have my drain bucket underneath here, because no matter how well you drain the fluid, there's always going to be some stuff left. Twisting the hose with the pliers carefully gripped around it, can help to free it up. Just let that drain out. We'll move onto the other side. Move your drain bucket if necessary. Now in order to remove this, these little plastic tabs we'll have to push down, and pull the cooler over on each side. Just pinch them, and pull. Just make sure all our fluid's out of our cooler.
Install your power steering cooler. Slides in. Snaps into place. Slide the hose onto both ends. Collapse the clips with a pair of pliers. Slide them back in over the ends.
Set your bumper back on. Watch out for the headlights and the fenders. Align the top holes where these plastic pins came out, and we're just going to install them for now. Don't push the actual tab down. We're just doing this to keep it in place while we line up our sides.
On either side of your bumper you'll notice you have these slotted tabs and then this opening for your bolt. These slots are going to line up to those little rounded tabs you can see on the bottom of your fender, so slide them in. Snap them on. Once you have both of the corners of your bumper set into place, go ahead and push down the middle of your plastic retaining pins to secure the top of the bumper. Re-install your 10mm bolt in the top corner of each fender. Tighten that down with your 10mm socket and ratchet. Now there is a little bit of give to these, so if you're not happy with where the corner of your bumper's lined up, you can push it into place and hold it there while you finish tightening your bolt. Install the plastic pins in your fender liner. You should have three on each side. We're missing some, so I'm going to put two on each. Once your retainers are locked in, repeat these steps on the opposite side. Reconnect the fog light connectors on both sides, and reconnect with the side markers. Again, ours aren't actually connected to anything. We're going to have to fix that later, but yours should just plug right back in, and you’ll have to close that red safety tab. After that, you'll re-install the belly pan or air dam which is missing from our vehicle. Yours should have these screws all the way along the front as well as four in the sub frame, and the three plastic pins in each wheel well.
Place some paper towels in and around your power steering reservoir as this next job can get a little messy. Remove your cap and you'll want a flashlight to see into the reservoir. Fill it about half way with ATF+4 or an equivalent automotive transmission fluid. Now, with the power steering reservoir cap off we're going to run our vehicle and move our steering wheel fully left and right a few times until the air bleeds out of the system. Check, fill and repeat as necessary.
Now, using your jack or a lift, lower the level so part of the weight is on the tires. You don't want the full weight on the vehicle just yet because it's going to make this job a lot harder. Start your vehicle and run the wheel from the full lock left and right positions a couple of times. That whining noise you're hearing, is the air in the power steering system. Your steering wheel may feel choppy and bouncy at first but once it gets easier, we'll add a little fluid and do it again.
Fill at about half of the capacity of the reservoir. If you go too high you'll have little fluid geysers coming out of the reservoir and again, that's why our paper towels are here but any mess we can avoid is less mess we need to clean up later. You can hear now that the noise has gotten smoother and a little bit quieter as well as the wheel getting easier to turn. Once you've got most of the noise to go away, lower the complete weight of the vehicle back onto the tires. Keep the processes going. You can hear it's getting quieter each time. Once it gets to about that level fill your reservoir, wipe up any excess power steering fluid, and test drive your vehicle. Now, any more noise you hear when driving the vehicle should go away after you've worked it through from driving around.
Thanks for watching. Visit us at 1AAuto.com for quality auto parts, fast and free shipping, and the best customer service in the industry.


