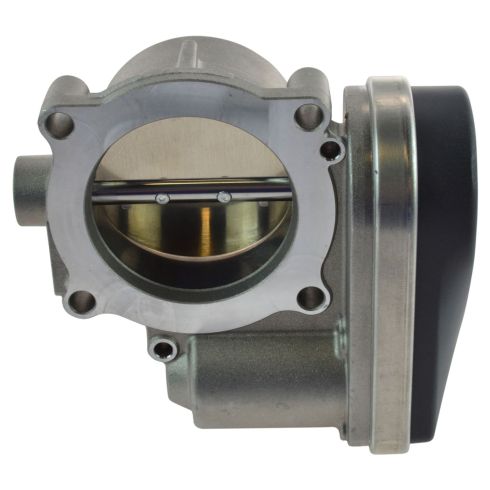
Genuine original equipment part (OEM) that was factory installed on your vehicle by the manufacturer.
Item Condition:New
Attention California Customers:
WARNING: Cancer and Reproductive Harm - www.P65Warnings.ca.gov.
1 Year Warranty
This item is backed by our 1-year warranty. In the event this item should fail during intended use, we will replace the part free of charge. This warranty covers the cost of the part only.
Returns: Parts with electrical components cannot be returned once installed.
FREE Shipping is standard on Orders shipped to the lower 48 States (Contiguous United States). Standard shipping charges apply to Hawaii, Alaska and US Territories. Shipping is not available to Canada.
Expedited is available on checkout to the United States, excluding Alaska, Hawaii and US Territories as well as P.O. Boxes and APO/FPO/DPO addresses. Final shipping costs are available at checkout.
How to Replace Throttle Body 2005-10 Chrysler 300
Created on:
Tools used
Socket Extensions
Flat Blade Screwdriver
15mm Socket
10mm Socket
Ratchet
1. Removing the Throttle Body
Open the hood
Loosen the intake hose clamp with a flat blade screwdriver
Pull the coolant hose out of its bracket
Remove the MAP sensor from the air intake
Disconnect the throttle body wiring harness
Pull the intake hose off the throttle body
Remove the two 10mm nuts from the throttle body
Remove the two 15mm bolts from the throttle body bracket
Remove the bracket from the throttle body
Remove the four 10mm bolts from the throttle body
Pull the throttle body off the intake manifold
2. Installing the Throttle Body
Put the throttle body onto the intake manifold using the locating tabs
Insert the two studded 10mm bolts onto the firewall side of the throttle body
Insert the two regular 10mm bolts onto the grille side of the throttle body
Connect the throttle body wiring harness
Put the throttle body bracket into place
Fasten the two 10mm nuts onto the throttle body
Insert the two 15mm bolts into the throttle body bracket
Connect the air intake hose to the throttle body
Tighten the intake hose clamp with a flat blade screwdriver
Push the coolant hose onto its bracket
Push the MAP sensor into the intake hose
Close the hood
Hi, I'm Mike from 1A Auto. We've been selling auto parts for over 30 years. We're dedicated to delivering quality auto parts, expert customer service, fast and free shipping, all backed by our 100% satisfaction guarantee. Visit us at 1AAuto.com, your trusted source for quality auto parts.
In this video, we're going to be working with our 2006 Chrysler 300, 3.5 liter V6. We're going to show you how to remove and replace your engine’s throttle body. This also contains the stepper motors responsible for opening the throttle body in correspondence with your vehicle’s gas pedal and how far you're pushing it down as opposed to using a mechanical cable method. If you like this video, please click subscribe. We have a ton more information on this car as well as many other makes and models. If you need this part for your vehicle, you can follow the link down in the description over to 1AAuto.com. Here are the items you'll need for this repair.
Open the hood latch on your vehicle. Open it fully. We'll loosen the clamp at the throttle body with a flat-blade screwdriver. You may want to disconnect this sensor. It looks like ours has been glued on because the clip is broken, so you can also simply pop it out of the boot. Disconnect the connector from the throttle body. Again, we have one of those little red safety tabs we have to push down and we'll push down the tab, and remove the connector.
We'll remove the two 10 millimeter nuts from the throttle body. Remove the two 15 millimeter bolts at the bottom of the throttle body bracket. We're doing this with a 15 millimeter socket and ratchet. Remove the bracket from the throttle body. Remove the four 10 millimeter bolts on your throttle body with a 10 millimeter socket and ratchet. Remove the last bolt. Remove your throttle body from the intake.
Here we have our old part that we removed from the vehicle and our new part from 1AAuto.com. This is actually an OEM replacement piece that we carry. You can see that they are exactly the same with the same four bolt mounting location. We have the same size throttle body bore and blade, the same unit on the end here, which is actually your throttle position sensor as well as the stepper motor, which moves the throttle body according to how you put your pedal down. This vehicles throttle is controlled be an electric sensor as opposed to a cable like older vehicles.
The real reason we're going to be changing this out is carbon build up on the back side. This is in normal condition however if left uncleaned and untreated can really gum up this throttle body and cause it to fail. These are cleanable but ours is pretty nasty here. We're going to see what we can do with it. But if not this new part from 1A Auto is going to go in direct fit just like our original equipment and fix you up right.
There are alignment tabs for when you set the throttle body back on to the intake manifold, be sure to utilize those. Once the throttle body is set into place, reinstall your 10 millimeter hardware. The studded ones go on the outside here, while the regular bolts will go into the two inside ones. Reconnect the electrical connector onto the throttle body. Lock the safety tab back into place.
You can now set the support bracket back over the throttle body bolts. Make sure it doesn't get caught up in any of the wiring down below. We'll spin our two 10 millimeter nuts on at the top by hand, just to keep that in place. Reinstall the two 15 millimeter bolts at the bottom of the bracket by hand. Tighten up the two 15 millimeter bolts at the bottom of the bracket with your socket and ratchet. Tighten up the two 10 millimeter nuts at the top. Install the other end of the intake boot onto the throttle body. Tighten it up with your flat-blade screwdriver. Reinstall the cooling tank line bracket on the side of the intake tube. Reinstall the MAP sensor into the intake tube. Earlier, when we removed our intake, I wanted to wait until we had the intake tube reinstalled to make sure this all lined up properly. Now that we've got it where it needs to be, we'll go ahead and tighten that down.
Thanks for watching. Visit us at 1AAuto.com for quality auto parts, fast and free shipping, and the best customer service in the industry.
04861691AA
In Stock
Product Reviews
Loading reviews
5.00/ 5.01
1review
5 Stars
4 Stars
3 Stars
2 Stars
1 Star
1
0
0
0
0
Even though my order was not delivered at the time promised. My order was list and 1a auto replaced it. And I got my order the following week which was okay. I was satisfied. Thank Patrick (I think it's he's name). He was patient with me.
D
August 14, 2018
I would recommend 1 a auto for the fact that my order misplaced and was not delivered next day air. I received my order a week and a half later. But when ups couldn't find my order. 1 a auto replaced the order and delivered to me the following week. But I want to thank Patrick (i think that's his name) for assisting me with my replacement part. The part solved my issue. Thanks
Customer Q&A
No questions have been asked about this item.
Customer service
877-844-3393
Monday - Friday 8:00am - 9:30pm ET Saturday - Sunday 8:00am - 4:30pm ET
Dodge is a registered trademark of FCA US LLC. 1A Auto is not affiliated with or sponsored by Dodge or FCA US LLC.See all trademarks.
Enter Vehicle Year Make Model
Specify your vehicle's year, make and model to guarantee fit.
Year
Make
Model
Options
Drivetrain
This part doesn’t fit a . Select from parts that fit.