Hi, I'm Mike from 1AAuto. We've been selling auto parts for over 30 years! We're dedicated to delivering quality auto parts, expert customer service, and fast and free shipping, all backed by our 100% satisfaction guarantee. So visit us at 1AAuto.com, your trusted source for quality auto parts.
In this video we'll be working with our 1996 GMC Sierra. We're going to show you how to remove and replace your power door lock actuator. We're doing this on the passenger side, but the driver's side will be the same. If you like this video, please click subscribe. We have a ton more information on this and many other vehicles. If you need this part or your truck, you can follow the link down in the description over the 1AAuto.com.
Here are the items you'll need for this repair.
Remove the two Phillips head screws inside of the armrest on the door. Do this with a Phillips head screwdriver. To remove the bezel around the interior door handle, you need to kind of get in there with a trim tool or a flat blade screwdriver, and push down on the tab to release it. There are three: one at the top, one at the bottom, and one on the side.
Remove the extension at the top of the door panel by prying out with a trim tool. Using your trim tool, pry up at the back of the power window switch. Lift it up and pull back to release the hook at the front. Disconnect the connector for your tweeter. Pop up the tab on this two pin connector at the front of the window switch, and pop the connector out, and then push down on the tab for the main connector and remove that from the switch. I'm using a pick here. You could also use a small flat blade screwdriver or a trim tool if you had to, really whatever works best for you.
Using the trim tool, pop out on the door reflector and remote the connector. This is another one of the ones we'll have to lift up on the tab with a pick. Using a trim tool, pry out the bottom of the door. You may need to work it a little bit to figure out where the tabs are. You'll also need to pop out this pin at the top on the front of the door. Once all the tabs are out, lift the panel up and remove it from the door.
Peel off the inner water shield on the door. There's also a small piece over in the corner. Make sure your window is rolled all the way down. There are ten 7 millimeter screws around the perimeter of the inner panel. One under the speaker here that's a little tricky to see, and a 10 millimeter at the front. We'll need to remove all of those with a socket and ratchet. Pull the panel forward. Pull out the handle rod. It may help to have a tool to help you get some leverage on it. You'll also want to pop that out of its guide clip. Same thing with the lock rod down here. We'll also need to pop this out of its guide rod and pull it out of the lock actuator as well. Pop out the tab for the courtesy light in the door. Lift up on the cover for the door lock actuator, and remove that connector. You need to fish it out and around. Pop that retainer through, and then pop out all the rest of the retaining clips to remove the harness from the door.
You'll also need to unplug the window motor and the door speaker and pull the harness through the door. Slide the door panel forward until the window roller is out of its channel, then slide the guide out of the back and remove the assembly from your vehicle.
Remove the four 1/4 inch screws from the bottom of the door lock actuator. Ours is missing one, but you're remove them the exact same way. Remove the actuator.
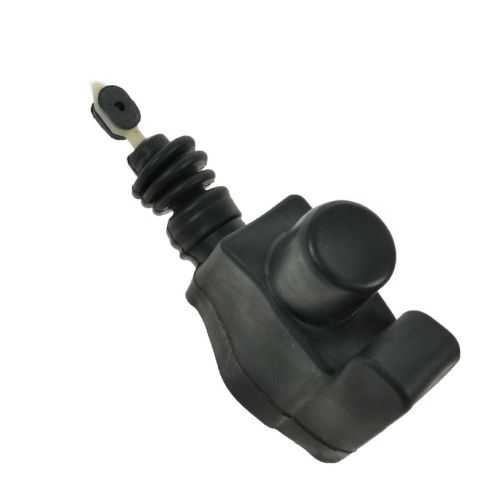
So here we have our old door lock actuator that we removed from our truck and our new part from 1AAuto.com. If you remove this rubber sheathing on the old part, you'll see that they're exactly the same. We have the same two-pin connector at the back, the same body and the same actuator arm on both pieces. We also have four new screws that come with this. We'll need to remove those with a Phillips head screwdriver and install it onto our door panel just like our original equipment.
Install your new lock actuator and the new Phillips head screws, as well as your lock washers and nuts included with your new part. Using a 9/16th wrench and a Phillips head screwdriver, tighten down the four new screws for your door lock actuator.
Reconnect your door speaker and your window motor, and send the rest of your wiring harness back through the door. Slide the back half of your window regulator back into the window track. Once the back is in, slide forward and install the front part of the regulator into the glass as well. Reconnect the door lock as well as the door handle. Don't forget to engage the lock actuator, and snap both rods back into their guides.
Realign your door panel. Reinstall your wiring harness. Make sure that all the tabs and retainers go back in their appropriate places. Make sure you run the harness through, and reconnect the door actuator as well. Lock the clasp in for your reflector, courtesy light, and reinstall the ten 7 millimeter screws around the perimeter, as well as the one 10 millimeter. Reinstall the water shield. Sometimes this adhesive doesn't really want to stick a second time, if that's the case, it's all right to put some tape on there to secure the edges.
Pull your wire harness back through the door and lay the top edge into the door frame. Line up the plastic containers and push them all back into place. Reinstall the inner door handle bezel by lining it up and snapping it in. Reinstall your reflector. Place the upper door extension into place. Reinstall the two Phillips head screws in the armrest.
Reconnect your door speaker as well as the two electrical connections on the power window switch. Slide the front hook into the door panel. Snap the back into place, and you're good to go.
Thanks for watching. Visit us at 1AAuto.com for quality auto parts, fast and free shipping, and the best customer service in the industry.