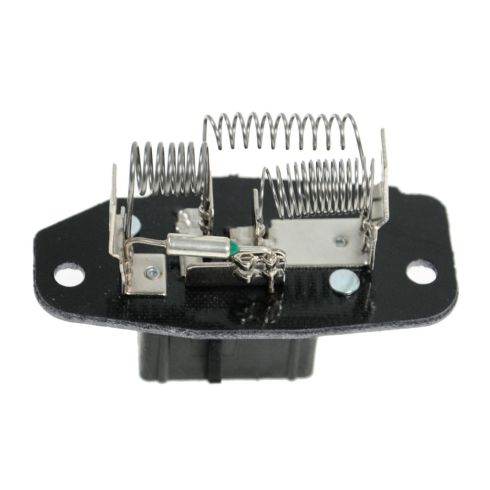
All of our auto parts are intended for Left Hand Drive USDM vehicles. If your vehicle is Right Hand Drive, please ensure the part is correct for your specific vehicle.
Item Condition:New
Attention California Customers:
WARNING: This product can expose you to chemicals including Lead and Lead Compounds, which are known to the State of California to cause cancer, and birth defects or other reproductive harm. For more information, go to www.P65Warnings.ca.gov.
Lifetime Warranty
This item is backed by our limited lifetime warranty. In the event that this item should fail due to manufacturing defects during intended use, we will replace the part free of charge. This warranty covers the cost of the part only.
Returns: Parts with electrical components cannot be returned once installed.
FREE Shipping is standard on Orders shipped to the lower 48 States (Contiguous United States). Standard shipping charges apply to Hawaii, Alaska and US Territories. Shipping is not available to Canada.
Expedited is available on checkout to the United States, excluding Alaska, Hawaii and US Territories as well as P.O. Boxes and APO/FPO/DPO addresses. Final shipping costs are available at checkout.
How to Replace Blower Motor Resistor 1999-2007 Ford F250 Super Duty Truck
Created on:
Tools used
Socket Extensions
Flat Blade Screwdriver
Phillips Head Screwdriver
Rust Penetrant
8mm Socket
Anti-Seize Grease
Ratchet
Needle nose pliers
1. Diagnosing the Problem
Turn your vehicle on
Try to run the air conditioning at all its different speeds
If the fan speed doesn’t change at each setting, the blower motor resistor is not working
2. Removing the Blower Motor Resistor
Remove the two 8mm bolts from the resistor
Pull out the resistor by hand
Disconnect the resistor wiring harness
If the harness will not separate normally, use needle nose pliers to break parts off the plastic resistor housing
Use a flat blade screwdriver to pry the resistor away from the plastic housing
Use the screwdriver to pry the resistor housing off of the wiring harness
3. nstalling the New Blower Motor Resistor
Apply Penetrating oil to the resistor wiring harness
Put the new resistor into place
Start the upper bolt by hand
Start the lower bolt by hand
Tighten the 8mm bolts
Connect the wiring harness
4. Testing the Blower Motor Resistor
Step 4: Testing the Blower Motor Resistor [6:40]
Turn your vehicle on
Try to run the air conditioning at all its different speeds
The fan speed should be different at each setting
If it is still not working, disconnect the wiring harness, apply grease and more penetrating oil, and reconnect the wiring harness
Retest the blower motor
Brought to you by 1AAuto.com, your source for quality replacement parts and the best service on the internet. In this video, I'm going to show you how to replace the AC and heater fan speed resistor on this 2003 F-250, same as any '99 to '07 F-250 and F-350. In a perfect world the only tool you'll need is the is the 8 millimeter socket with a ratchet and a small extension but most of these go bad because the contacts corrode so you'll need some needle nose pliers as well as a flat blade screwdriver to force the resistor and the harness plug apart. Then some penetrating oil and grease to condition the contacts before you put it back together.
With they key on, turn on the ... Now if you listen you can hear the blower motor and as I turn it up you don't really hear any difference in the sound of the motor. Then when I go to high ... okay, so I'm basically missing my 2 middle speeds and this is not the switch, it's usually the resistor. Blower motor resistor is right here on the passenger side. This is it right here and it's held in by 2 8 millimeter screws, one up there and then there's one down below that you can't really see. For the bottom one, I've got an 8 millimeter socket. If you have a small extension like that it'll help but you can just do it with a socket and ratchet. Okay, I'm just going to hit fast-forward here so you don't have to sit there and watch my hands working a ratchet.
Now once the bolt's not giving the ratchet much resistance then you can just reach in there and take it out the rest of the way with your hand. Again, fast-forward for that top bolt. Use the ratchet and then once it doesn't give resistance, use your hand. You might ask why didn't I unplug it first, because generally these things are so corroded together that they don't just unplug in the conventional manner. What I usually do is take a pair of needle nose pliers ... You don't want to break the harness part of the connection but ... I just start breaking the resistor side. I'm going to fast-forward here as I go at the plastic part of the resistor side. Again, do not break the part of the plug that the wires go into. You want to just break off the plastic that is part of the resistor. You can look at your new resistor to see which part that is. Now I'll trade in for a screwdriver and now I'm just trying to pry away the remains of the resistor from the connection.
Once you get it pretty much to that point ... This doesn't want to come apart ... Now you've gotten the resistor part off ... now the plastic part ... Put your screwdriver in there, pry up ... I generally like to take a little penetrating oil and clean up the contacts a little bit. New resistor from 1A Auto, only the color is a little different. Put it back in place. Start our upper bolt a little bit by hand first. If I reach in here with my left hand underneath, I can feel the hole and start our lower bolt as well. Make sure it's in there well. Now I'll just use my 8 millimeter socket with my ratchet and extension and tighten up those 2 screws. When you tighten them up, you want to tighten them firm but don't over-tighten them because you could strip the plastic housing. Okay, that's installed. Now we can take our lead and plug it back in.
At this point you're going to want to run a test, see if you have all your speeds back. I found on this truck that I actually ... it changed and that was because the contacts still weren't making good contact so I actually unplugged it again, sprayed some more penetrating oil in there, then re-plugged it in and just moved the connection around a little bit and that restored my fan speeds. Also, putting a little bit of bearing grease or something more permanent on there, that helps make a better connection with the prongs clips. Now you can hear speed 1, 2 ...
We hope this helps you out. Brought to you by www.1AAuto.com, your source for quality replacement parts and the best service on the internet. Please feel free to call us toll free 888-844-3393. We're the company that's here for you on the internet and in person.
HCA40092
In Stock
Product Reviews
Loading reviews
4.85/ 5.013
13 reviews
5 Stars
4 Stars
3 Stars
2 Stars
1 Star
12
0
1
0
0
Amazing
joshua
February 14, 2018
I've tried a couple other resistors from other companies and they have not worked or went out in the first couple days but I got to say this one has been going strong, everything I haveorderes from 1Aauto has worked as good as I wished, you can check out my install on YouTube on my channel
Good Product
Z
February 26, 2018
Easy to install; works. The hard parts was removing the 15-year resistor.
The Way To Go
Joseph
August 1, 2018
How am I going to write fifty characters or more for a transaction that was perfect. The part arrived in a timely way. It was what I needed and the installation was uneventful.(easy) I would do it again in a New York second.
Thank You for your outstanding service
Joseph Dungan
Works great
B
October 23, 2018
Resistor went in easy, old one not so much. Contacts were rusted to plug. Needed to replace that also. After that it was great to have all the fan speeds
Very impressed
ELI
December 28, 2018
Before this purchase, I ordered the same part from a competitor's website...never again. Wrong part shipped, I had to pay for shipping for return, etc. Lesson learned. Went to 1aauto and I got the right part with half the time in shipping, at a lesser price. Not bad. Have been ordering parts from 1aauto ever since.
exact replacement
Daniel
February 15, 2019
How-to video for this part was imperative-thanks. Location, diagnosis, and cure was spot-on.
Jury is still out
Tim
March 19, 2019
I replaced the factory part that was 19 years old and did restore all of the fan speed settings. Recently the lowest setting quit working again while I was on a road trip. A quick email to 1AAuto and a replacement was on the way to me. In the timeframe it took for me to get the replacement the lowest speed started working again. Not sure if I have a loose connection, a faulty part or something else wrong. For the price of the part though it is a good value and customer service is awesome!
Original replacement!!!
Mason
February 26, 2020
I used this Resistor to replace the original. A 1998 Ford E150 Sherrod Conversion van. Every thing works perfectly fine, as it did in 1998, thanks to 1A Auto! My "Go To Parts People ".
Blower motor resistor
H
November 11, 2020
Other then the plug on the truck breaking apart and just wiring in each in the proper locations it work wonderfully. I like 1A parts.
Blower motor resistor
william
March 31, 2021
Works good ! Kinda tuff to get to and mount but its worth it ! Now ac blows slow medium and high etc ! Worth the cash and done it myself ! Thank you 1aauto for being there for me !!
Should have done it sooner.
Edwin
October 19, 2021
Works great
Joe
September 4, 2022
works great perfect fit
Exact fit!
Bill
July 4, 2023
Great part!
Customer Q&A
where is this item located on the truck?September 11, 2015
James C
10
Under the glove box. Two bolts to remove
September 11, 2015
Howard C
10
Depending on what year your truck is, most SD's the blower resistor is located under the hood in the top left corner on the AC "box". About 3" to the right and down from the blower motor, you will see the connector. Unplug connector, unscrew 2 8mm screws and the resistor will come out.
September 11, 2015
Thomas N
10
On the passenger side firewall, under the hood, to the lower right of the blower motor housing (viewing the blower from the passenger fender). Held in with 2 - 9/32nd head screws.
September 11, 2015
Patrick H
what is the part # for the harness that it connects to?May 25, 2016
Silvio D
10
This will plug right into the factory harness that come from your vehicle. We do not carry it separately.
May 25, 2016
Derek C
Customer service
877-844-3393
Monday - Friday 8:00am - 9:30pm ET Saturday - Sunday 8:00am - 4:30pm ET
Ford is a registered trademark of Ford Motor Company. 1A Auto is not affiliated with or sponsored by Ford or Ford Motor Company.See all trademarks.
Enter Vehicle Year Make Model
Specify your vehicle's year, make and model to guarantee fit.
Year
Make
Model
Options
Drivetrain
This part doesn’t fit a . Select from parts that fit.