WARNING: This product can expose you to chemicals including Lead and Lead Compounds, which are known to the State of California to cause cancer, and birth defects or other reproductive harm. For more information, go to www.P65Warnings.ca.gov.
Lifetime Warranty
This item is backed by our limited lifetime warranty. In the event that this item should fail due to manufacturing defects during intended use, we will replace the part free of charge. This warranty covers the cost of the part only.
FREE Shipping is standard on Orders shipped to the lower 48 States (Contiguous United States). Standard shipping charges apply to Hawaii, Alaska and US Territories. Shipping is not available to Canada.
Expedited is available on checkout to the United States, excluding Alaska, Hawaii and US Territories as well as P.O. Boxes and APO/FPO/DPO addresses. Final shipping costs are available at checkout.
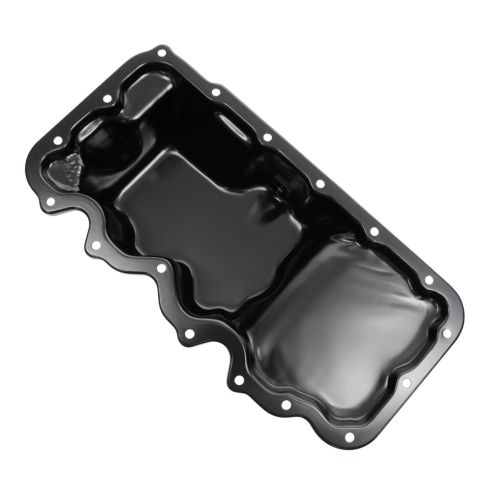
How to Replace Oil Pan 2000-04 Ford Focus
Created on:
Tools used
13mm Socket
Socket Extensions
Pry Bar
Jack Stands
8mm Socket
RTV
Ratchet
Floor Jack
Pick
1. Removing the Oil Pan
Raise and support the car with a jack and jack stands
Remove the oil drain plug with a 13mm socket and ratchet
Drain all the oil
Reinstall the drain plug finger tight
Remove all the 8mm bolts around the oil pan
Use a pry bar to break the oil pan lose
Pull the oil pan straight down and wiggle it out
Clean off the residue gasket on the engine block
2. Reinstalling the Oil Pan
Wipe the new oil pan to clean the gasket surface
Put a small bead of RTV around the pan
Wipe the engine block to remove any oil residue and debris
Carefully reposition the pan on the engine
Get a few bolts started to hold it in place
Reinstall the rest of the bolts by hand
Snug all the bolts from the center out in a cross pattern
Check that the drain plug is tight
Let dry for at least 20 minutes before adding oil
3. Adding Oil
Pull the hood release lever
Release the safety latch
Insert the prop rod
Remove the oil fill cap
Add the appropriate amount of oil
Reinstall the oil fill cap
Start the car for a few seconds
Shut it off and let it sit for a minute
Pull the dipstick out and check the oil level
Add oil if necessary
Close the hood
Hi, I'm Mike from 1AAuto. We've been selling auto parts for over 30 years.
We're going to raise and support this 2000 Ford Focus. We're going to use our two post lift. You can use a jack and jack stance. So we're going to remove the drain plug. I'm going to use a 13 millimeter wrench. Loosen it up. Make sure you have a drain pan underneath to drain the oil into. We'll drain all the oil out.
Alright I'm going to put the drain plug back in. And then just snug it up. Not too tight you don't want to over-tighten it.
Alright we're going to take all these eight millimeter bolts out on the oil pan. They go all around the perimeter of the pan. Around back there. I'm going to use an eight millimeter socket and extension, and a ratchet. I went all around the pan and now I'm getting the last one out.
Alright I'm going to try using a pry bar to get this oil pan separated from the engine. We sell these pry bars at 1aauto.com. Just try to go in here and pry a little bit. It's glued to the engine so it might take a little effort to try to get it down. If you were using this you'd want to be a little more careful. You've got a replacement pan so if we bend the pan it's not as critical. And we got it separated and pulled down. Like that. You can pull the pan right out. You can use the scraper, a razor blade, some emery cloths and brake clean to clean it all up.
As you can see this is our old oil pan, this is our new oil pan from 1aauto.com. If you look at the holes the all line up, they're all machined the same. The structure of the oil pan is the same. Flip it over. The bottom shape is the same. Comes with a new drain plug. Get yours at 1aauto.com and you'll be ready to rock and roll.
Alright I'm going to put some RTV sealer on it before. I'm just going to wipe it down with a little rag and some brake parts cleaner. Let that dry. Then I'm going to put a small bead of this RTV sealer all around the pan.
Now, all the surface is all cleaned up it's ready for our pan to be installed, but before I send it up I'm just going to wipe it right down with some brake cleaner on this rag, because generally a little bit of oil drips while you're cleaning.
Alright now there's no oil on that surface now I can send up the pan. While you're doing this make sure you don't hit anything and rub off the RTV. Now I can push it up. Get some of the bolts started. Get one started here. Get one started here. Start this one.
Alright and that's the last one. Now we can tighten them all up. We'll start in the middle. I'm going to use my ratchet. I'm just going to snug it up. Once you start feeling it get tight then that's pretty good. Not too tight and then we'll just go in a cross pattern to evenly distribute the RTV. This one's a little bit tricky to get too. Take the ratchet off and just use the socket and the ratchet. Snug that up. That's the last one. As you can see the bead of the RTV came out just a little bit. That's a good amount. It didn't gush out and pretty much if you look around there's no spots where it's bare so I know I got good coverage of the RTV.
Alright we're going to double check the drain plug to make sure it's tight. Loosen it up a little bit and snug it up. Okay, and then we're going to let this dry for about 20 minutes before we put oil in it.
Alright I'm going to pop the hood. Right here underneath just pull that lever to release the latch and just push to the right, pick it up, and then put the prop rod right here. Now we're going to fil our oil. Loosen up this oil cap. Right on the oil cap it should say what kind of oil it is. It says 520.
Alright now we're going to add our oil. This vehicle requires about four and a quarter quarts of oil so we're going to put about four quarts in it and then we'll check it. Pull the funnel out. Put the oil fill cap back on.
Alright I'm going to start it up and let it run for a little bit.
Alright we're going to check the oil level so take our dipstick out. I'm just going to wipe it first with a rag. Reinsert it. Pull it out, take a look. It's kind of hard to see, but it looks like ... It looks almost to the top. In between those two holes is where you want it. Closer to this full hole would be ideal. We'll just put a little bit more oil in. Put the hood down.
Thanks for watching. Visit us at 1AAuto.com for quality auto parts, fast and free shipping, and the best customer service in the industry.
OPA07793
In Stock
Product Reviews
Loading reviews
5.00/ 5.02
2 reviews
5 Stars
4 Stars
3 Stars
2 Stars
1 Star
2
0
0
0
0
Great value
Richard
April 29, 2019
The product is superior quality price is excellent the shipping was fast and free.
Problem but customer service fixed it
Matthew
August 15, 2024
It did appear that the pan was as the image looked. The one problem I had was the pan was not the correct one based on the VIN number. While I was frustrated with the delay in receiving my part 1A Auto did a wonderful job in handling the return process. The one fear I have with purchases online is the possibility of a return. This made things easy and I will continue to order my parts from 1A knowing this.
Customer Q&A
No questions have been asked about this item.
Customer service
877-844-3393
Monday - Friday 8:00am - 9:30pm ET Saturday - Sunday 8:00am - 4:30pm ET
Ford is a registered trademark of Ford Motor Company. 1A Auto is not affiliated with or sponsored by Ford or Ford Motor Company.See all trademarks.
Enter Vehicle Year Make Model
Specify your vehicle's year, make and model to guarantee fit.
Year
Make
Model
Options
Drivetrain
This part doesn’t fit a . Select from parts that fit.