WARNING: This product can expose you to chemicals including Lead and Lead Compounds, which are known to the State of California to cause cancer, and birth defects or other reproductive harm. For more information, go to www.P65Warnings.ca.gov.
Lifetime Warranty
This item is backed by our limited lifetime warranty. In the event this item should fail due to manufacturing defects during intended use, we will replace the part free of charge. This warranty covers the cost of the part only.
Returns: Parts with electrical components cannot be returned once installed.
FREE Shipping is standard on Orders shipped to the lower 48 States (Contiguous United States). Standard shipping charges apply to Hawaii, Alaska and US Territories. Shipping is not available to Canada.
Expedited is available on checkout to the United States, excluding Alaska, Hawaii and US Territories as well as P.O. Boxes and APO/FPO/DPO addresses. Final shipping costs are available at checkout.
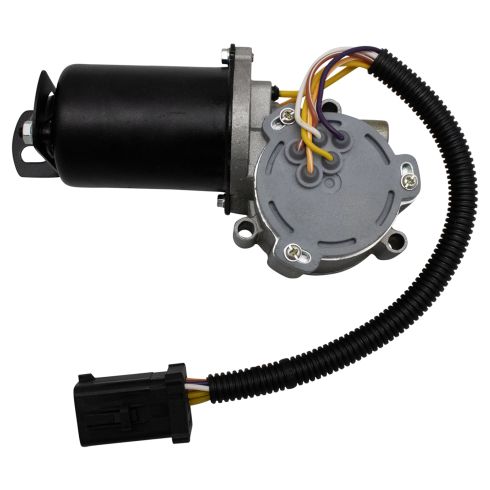
How To Replace 4x4 Transfer Case Shift Motor 2004-08 Ford F150
How To Change Rear Differential Fluid 2004-14 Ford F150
Created on:
Tools used
Flat Blade Screwdriver
RTV
10mm Socket
Ratchet
Needle nose pliers
Pick
1. Removing the Transfer Case Shit Motor
Disconnect the transfer case shift motor wiring harness
Remove the two 10mm bolts from the shift motor wiring harness bracket
Pull down the wiring harness
Remove the locking clip from the harness with pliers
Disconnect the wires from the harness with a pick
Remove the three 10mm bolts from the transfer case shift motor
Thread the lower 10mm bolt partially in
Tap the shift motor with a hammer loosen it
Remove the lower 10mm bolt
Pull off the shift motor
2. Preparing the Transfer Case Shit Motor
Pry the bracket off the shift motor with a flat blade screwdriver
Clean the shift motor mounting area
Apply RTV to the shift motor mounting area
3. Installing the Transfer Case Shit Motor
Put the shift motor into place
Insert the three 10mm bolts into the shift motor
Push the wires into the wiring harness
Push the locking clip into the harness
Put the bracket into place
Insert the two 10mm bolts into the bracket
Tighten the five 10mm bolts
Tighten the two 10mm bolts on the side of the shift motor
Push the wiring harness into the bracket
Connect the wiring harness
Brought to you by 1AAuto.com, your source for quality replacement parts and the best service on the Internet.
Hi, I'm Mike from 1A Auto. I hope this how-to video helps you out, and next time you need parts for your vehicle, think of 1AAuto.com. Thanks.
In this video, we're going to show you how to replace the transfer case shift motor on this 2005 Ford F150. It's the same part and similar process on these F150s from 2004 to 2008. The items you'll need for this are a new transfer case shift motor from 1AAuto.com, a 10 millimeter socket and ratchet, needle nose pliers, a flat blade screwdriver, a pick, and RTV.
Your transfer case shift motor is located right here. Just push the tab on this harness and disconnect it. Then, remove this 10 millimeter bolt and this 10 millimeter bolt. We'll fast forward as Mike does that. Now just pull that bracket free and pull the harness down.
Pull your harness down and this brown and black wire come from another sensor. Just note the brown one's towards the outside and black is on the inside. You need to remove these from this harness. You look in. There's this red locking clip here. Take a pair of needle nose pliers, and pull that out. Now take a little pick or a electrical screwdriver, and there's just little tabs here you have to pry up and pull on the wires. Sometimes it helps to just pull on them a little bit and make sure they're free. Pry up on the tab. Pull the wire at the same time. That comes out. Then pry up on the tab and pull the wire that comes out.
Now remove the other three 10 millimeter bolts holding your transfer case shift motor in place. Replace this lower 10 millimeter bolt just half way. Then using a rubber mallet just hit your transfer case shift motor, and that'll help break it free. Then remove that 10 millimeter bolt and pull the motor free.
Using a flat blade screwdriver, pry this bracket off your transfer case shift motor. Then clean up the area where the transfer case shift motor used to go, and replace the gasket with some RTV. You want to make sure that you trace all the way around with no gaps.
On the bottom, is the old transfer case shift motor. Above it, is the new one from 1A Auto. You can see they're identical and will fit exactly the same. Take your new transfer case shift motor and push it into place. Just line it up. Then replace this 10 millimeter bolt and the 10 millimeter bolt up here in the bracket, just to hold it in place.
Put the black one, again, on the inside. Just to push it in. You should hear it click. Then do the brown one. Then this locking clip goes in. Now, feed that bracket back up into place and then replace the two 10 millimeter bolts that went through the bracket. Now go through and tighten up all five of the 10 millimeter bolts that hold your transfer case shift motor into place. Then tighten up these two bolts on the side of your transfer case shift motor. Push the harness into that bracket. Then reconnect it.
We hope this video helps you out. Brought to you by www.1AAuto.com, your source for quality replacement parts and the best service on the Internet. Please feel free to call us toll-free, 888-844-3393. We're the company that's here for you on the Internet and in person.
Tools used
Razor Blade / Gasket Scraper
Gear Oil
13mm Socket
Hammer
Torque Wrench
RTV
Drain Pan
Ratchet
3/8 Inch Drive Ratchet
Cloth Rags
1. Draining the Differential
Have a drain pan ready
Remove all but the top two 13mm bolts from the differential cover
Pry out the differential cover with a flat blade screwdriver
Allow the fluid to drain
2. Removing the Differential Cover
Remove the remaining two 13mm bolts from the differential cover
Pull off the differential cover
3. Cleaning the Differential
Put a rag into the differential to protect the gears
Scrape the gasket residue off with a razor
Remove the rags
Clean the sediment out of the differential reservoir
Wipe down the outside of the differential
4. Preparing the Differential Cover
Apply RTV to the gasket mounting area
Put on the gasket
Apply RTV to the gasket
5. Installing the Differential Cover
Make sure the differential cover mounting area is clean
Push on the differential cover
Start the 13mm bolts into the differential cover
Tighten the 13mm bolts to 20 foot-pounds of torque in a crossing or star pattern
6. Filling the Differential
Remove the differential fill cap with a 3/8" ratchet
Clean any sediment of the fill cap
Add gear oil to the differential
Add limited slip differential additive to the differential if desired
Mix half limited slip differential additive and half gear oil
Add the mixture to the differential
Add gear oil to the differential until it leaks out the side
Replace the differential fill cap with a 3/8" ratchet
Brought to you by 1AAuto.com, your source for quality replacement parts and the best service on the Internet.
Hi, I'm Mike from 1A Auto. I hope this how-to video helps you out, and next time you need parts for your vehicle, think of 1AAuto.com. Thanks!
In this video, we're going to show you how to service your rear differential fluid on this 2005 Ford F150. The items that you'll need for this are a 13mm socket and ratchet, drip pan, razor, RTV, torque wrench, four quarts of 75W-140 gear oil, and a hammer.
We come under here, there's two tags on your real differential. This tag says 75W-140 synthetic oil only, so that's telling you what oil to use. And not sure exactly what that tag is but it probably tells you about the rear end. But these are 13mm bolts. Leave two bolts at the top of the cover and then, using a flat blade screwdriver, you want to just pry open the bottom of the cover. It helps if you just hit it up into place with a hammer and you'll start to see the fluid trickle out. You want to make sure you have a drip pan underneath. Just keep hammering until when you pull back on the screwdriver it drains. When it's done draining, remove those last two bolts and then pull your cover off.
Now put some paper towels in over the gears. This will just protect them while you do the next step. Using a razor, just scrape off all the old gasket around where your cover was. When you're finished, you can remove those paper towels. At the bottom of your differential there's a little reservoir that collects sediment. Just try to get as much of that out of there as you can and then wipe down the outside of the differential.
Take your rear differential cover. We're going to use a new one that we've just painted, but you can use your old one. Then just put some RTV all the way around it. If you're using a new differential cover you most likely have a gasket, so you just put that into place and then trace around the outside of the bolt holes. If you don't have a gasket because you're using your old one you just want to make sure that besides just tracing on the outside that you also circle around each of the bolt holes with the RTV.
Now make sure that the outside of your rear differential is clean so that the gasket can seal properly. Then put it into place and replace those bolts. We'll just fast-forward as Mike replaces the rest of those and tightens then up preliminarily. Now torque each of these to 20 foot-pounds in a crossing pattern.
Now back here is your fill cap. Using a 3/8 ratchet just open up that fill cap and pull it out. It's magnetic so it will have some sediment on it. You just want to clean that off. Then, using your 75W-140 gear oil, just squirt it in. Here, we're going to add some limited slip differential additive. We'll just squirt some directly in and then we're going to take an empty bottle of gear oil and just squirt it into the empty bottle. Then fill the bottle all to the halfway mark with some regular gear oil. Then we're just going to squirt that mixture into our differential. Then top it off with some more gear oil. If it starts to trickle out because the oil's reached the bottom of that fill hole then you're all set and you can just put that cap back in and tighten it up. Then just wipe down the area and you're all set.
We hope this video helps you out. Brought to you by www.1AAuto.com, your source for quality replacement parts and the best service on the Internet. Please feel free to call us toll-free, 888-844-3393. We're the company that's here for you on the Internet and in person.
600-911
In Stock
Product Reviews
Loading reviews
4.55/ 5.011
11 reviews
5 Stars
4 Stars
3 Stars
2 Stars
1 Star
9
1
0
0
1
2008 f150 4x4 transfer case motor
William
December 30, 2017
Perfect! My truck would not go into 4 wheel drive, high or low, no dash light. Installed new motor, very easy job. Works perfect.
shift motor
K
January 18, 2018
part was fine and fixed my problem. thanks. would recommend 1a auto to everyone.
Great same as oem
Leonardo
April 17, 2018
Fir right in same as original the video on how to install was great
Transfer case motor
Daniel
February 9, 2020
Exact fit fast shipping easy online ordering.
Transfer case motor
Kent
February 15, 2022
Perfect fit, working great
2004 Ford F-150 transfer case shift motor
Neil
June 20, 2022
The replacement part went right in and has worked now for over a year. The truck is used in 4wd about one to two times a month so, no issues with use.
Ray
November 18, 2022
ordered two, had two shipped, neither worked
went to a local supplier
F-150 Transfer Case Shift Motor
George
January 19, 2023
Easy Install, great price, quick ship. Talked to Charlie at 1A who ordered the correct motor, which works fine. Thx.
Great service
Amy
February 20, 2023
Arrived quickly. Had to reuse old bracket and make slight alteration to studs on actuator for my 2005 F-150. All in all as described and arrived quickly.!
Perfect fit
Cary
March 15, 2024
Works great perfect fit
Transfer Case shift motor install
Ken
August 13, 2024
I am 73 years old. My transfer case shift motor stopped working. I could not put my transfer case in 4 high or 4 low range. I went to 1A Auto videos and it showed how easy it was to install. I ordered the motor, and had same day shipping. After it arrived the hardest part of installing it was to get my old tired body under the truck. It took less than half an hour to do this. Works perfect. And actually I made a mistake. The hardest part of this job was getting my body back up off the ground. Don't be afraid to do this yourself.
Customer Q&A
Are these shift motors new or remanufactured?August 20, 2020
Brandon G
10
Thank you for your inquiry. This is a brand new part, not re-manufactured. Please let us know if you have any further questions.
August 21, 2020
A C
Customer service
877-844-3393
Monday - Friday 8:00am - 9:30pm ET Saturday - Sunday 8:00am - 4:30pm ET
Ford is a registered trademark of Ford Motor Company. 1A Auto is not affiliated with or sponsored by Ford or Ford Motor Company.See all trademarks.
Enter Vehicle Year Make Model
Specify your vehicle's year, make and model to guarantee fit.
Year
Make
Model
Options
Drivetrain
This part doesn’t fit a . Select from parts that fit.