Replaces


Frequently bought together
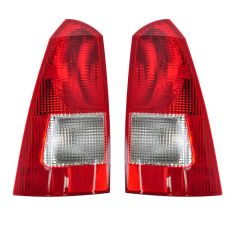
Part Details
Specifications
Assemblies may include halogen or incandescent test bulbs that should be replaced before installation.
Attention California Customers:
 WARNING: This product can expose you to chemicals including Chromium (Hexavalent Compounds), which is known to the State of California to cause cancer, and birth defects or other reproductive harm. For more information, go to www.P65Warnings.ca.gov
Lifetime Warranty
This item is backed by our limited lifetime warranty. In the event this item should fail due to manufacturing defects during intended use, we will replace the part free of charge. This warranty covers the cost of the part only.
FREE Shipping is standard on orders shipped to the lower 48 States (Contiguous United States). Standard shipping charges apply to Hawaii and Alaska.
Shipping is not available to a P.O. Box, APO/FPO/DPO addresses, US Territories, or Canada for this item.
Expedited is available on checkout to the United States, excluding Alaska, Hawaii.
Final shipping costs are available at checkout.

Created on:
Tools used
Hi, I'm Mike from 1A Auto. We've been selling auto parts for over 30 years.
What's up, guys? I'm Andy from 1A Auto. Today I'm going to show you how to remove and reinstall the rear taillight on this 2001 Ford Focus. If you need parts for your vehicle, click the link in the description and head over to 1aauto.com.
First we're going to pop the hatch. We'll use the key fob. Push the button and open the hatch.
Inside this rear hatch you're going to need to take this wingnut off right here. Just grab it and twist it off. Pull that off. Then you're going to take a Phillips head screwdriver. We're going to take this Phillips head screw out. Just pull that screw out. Grab the light assembly. Just going to slide it out just like that. There's a connector right here. You disconnect the connector here. Just push down on the button release the connector. There's the button. Just push that down.
A little wire retainer right here. Pull on that. We're going to disconnect this connector. There should be two little lock things on this. This one they're actually broken. Pull that out just like that and there's your taillight assembly.
Let's reinstall this. Line this connector up. This one happens to be broken so it's not going to lock in place, but we press it on like that. This wire retainer goes right here.
It's kind of hard to get this one in. I'm going to connect this lower bulb first. That's for the reverse light bulb. Connect that, and then you can reinstall that retainer. There's a couple of pins. This pin lines up with that hole. There's another pin that lines up with that hole. Get that in position. With that all set, we can take the screw and tighten this down. Just snug, not too tight. It is plastic. I'm going to reinstall the wingnut. Get this lined up. Get it on there. Tighten it down. There we go.
Thanks for watching. Visit us at 1aauto.com for quality auto parts, fast and free shipping and the best customer service in the industry.
Tools used
Brought to you by 1AAuto.com, your source for quality replacement parts and the best service on the internet. In this video we're going to show you taillight replacement. Both replacing the bulbs or replacing the whole taillight assembly on a Focus three door. Tools you'll need are a Phillips screwdriver and that should be about it, actually.
There's a screw right here, and then, in underneath, there is a finger nut right there. You can just grab on that out with your fingers and twist it. The first thing we'll remove. The light comes out. If you're looking to replace a bulb, right up here, this turns counterclockwise and comes out. This one, same thing. Counterclockwise and comes out. To replace this whole assembly you're going to want to pull these little tabs off. There, that's off. These bulbs just pull out and I'm not sure, on this car, whether that should be a orange bulb or not. Looks a little weird. Think it should be clear. This one pulls out, goes back in.
For reinstallation, we can put our bulbs back in. Put these little harness holders back into place. Put that down in. Start our screw in. Back under here, put our thumb screw in. Don't make it too tight because as it gets older it'll tighten up more and it'll be hard to get off.
We hope this helps you out. Brought to you by www.1AAuto.com, your source for quality replacement parts and the best service on the internet. Please feel free to call us toll free. 888-844-3393. We're the company that's here for you on the internet and in person.

1ALTP00415