Replaces
This part doesn’t fit a . Select from parts that fit.
Frequently bought together
Part Details
This intake manifold will only work with Dorman OE Solutions intake manifold gaskets
Item Condition:
New
Attention California Customers:
 WARNING: This product can expose you to chemicals including Lead and Lead Compounds, which are known to the State of California to cause cancer, and birth defects or other reproductive harm. For more information, go to www.P65Warnings.ca.gov.
Lifetime Warranty
This item is backed by our limited lifetime warranty. In the event this item should fail due to manufacturing defects during intended use, we will replace the part free of charge. This warranty covers the cost of the part only.
FREE Shipping is standard on Orders shipped to the lower 48 States (Contiguous United States).
Shipping is not available to Canada. This item cannot be Shipped to AK Alaska, HI Hawaii, US Territories, P.O. Boxes, APO/FPO/DPO addresses or Expedited due to size limitations.


Created on:
Tools used
Hi, I'm Mike from 1AAuto. We've been selling auto parts for over 30 years! We're dedicated to delivering quality auto parts, expert customer service, and fast and free shipping, all backed by our 100% satisfaction guarantee. So visit us at 1AAuto.com, your trusted source for quality auto parts.
In this video we're going to be working with a 2004 Ford Crown Victoria with a 4.6L V8. We're going to be showing you how to remove and replace your vehicle's upper intake manifold, which is the plastic portion of the manifold, that also has some cooling components in it that are prone to cracking and leaking. Fortunately, 1A Auto carries this part and installing it yourself is something that can easily be done in the driveway.
If you like this video, please click subscribe. We have a ton more information on this and many other vehicles. If you need this part for your car you can follow the link down in the description, over to 1AAuto.com
Here are the items you'll need for this repair: flat blade screwdriver, full metric socket set, ¼ ratchet, 3/8 ratchet, socket extensions, full metric wrench, M-8 allen bit, drain pan, jack, jack stands, groove jaw pliers, 5/8 quick disconnect tool, paper towels, gloves, safety glasses, rust penetrant, brake cleaner, wire brush, thread sealant, coolant, funnel, torque wrench
To show you why we're changing our intake manifold here, this is very common problem. You can see, all this damp coolant right here at the bottom on this flange. Now it could be the gasket to the bottom of this, which we'll have to remove the intake to replace anyway. Or it's possible that there's a crack in the plastic of the manifold, which is very common on these as well. Either way, we sell this part as a complete assembly. Since it's all coming out anyway, we're going to switch it all over while we're in there.
To relieve the fuel system pressure in a Ford Crown Vic, as well as a variety of other Ford Vehicles, you could remove the fuel pump relay. However, if you don't know where it is, or you're having a hard time finding it, behind this panel, on the driver's side of your trunk is your inertia switch. This is designed to shut off your fuel pump. If the vehicle is in a collision, or the rear gets hit, simply pop that tab up with a small, flat blade screwdriver, through that access hole, and it'll cut off our fuel pump.
Start the vehicle and let it run until it stalls. When the vehicle stalls, the pressure in the fuel system has been relieved and we can now work on it safely without spraying gas everywhere. Your battery is located at the front passenger side of your engine bay. Using an 8mm, or a 5/16 wrench, loosen the clamp on the negative side of the terminal, wiggle it loose. Once you've removed the negative battery terminal, isolate it away from the battery so it doesn't accidentally reconnect while we're working.
Using an open drive on the end of a 1/4 inch ratchet extension, loosen up this screw at the center of the engine cover, lift it up, slide forward and remove it from the vehicle. Disconnect the electrical connector on your mass airflow sensor, release the two clips securing the air box lid down, lift up and push down to the center of the vehicle to release it, remove the two breather hoses up by the throttle body and using a flat blade screwdriver, loosen and remove the intake boot clamp here at the throttle body, wiggle that boot and remove from the vehicle.
Before removing your serpentine belt, be sure that the path is indicated somewhere in the engine bay. Either on the original sticker, like ours has here. If yours is missing, simply take a marker or paint pen and draw one somewhere under the hood. Using the open end drive of a 3/8 ratchet, place it into the square inlet on the serpentine belt tensioner and rotate clockwise. Remove the belt from the pulley, carefully release the tension, remove your ratchet and take your belt off the rest of the way.
It's a little tricky to get it off this idler pulley here so be careful not to cut it on this piece of steel. The rest should come off pretty easily. Your alternator is located here, at the top of the engine, dead center. To remove we'll pry it up a little because this connector's stuck. You may be able to do this by hand, but lift up on that tab and remove it. Lift up on the boot for the power lead and remove the 10mm nut underneath. We'll do this using a 10mm socket and ratchet. Remove the power lead. Regardless of whether we're replacing the alternator or just removing it to get it out of our way for another job, we'll reinstall that nut in there just to make sure we don't lose it. Remove the four 10mm bolts at the top of the alternator, going back to the intake manifold as a stiffener. We'll crack all of these loose with our 10mm socket and ratchet and remove them and the plate the rest of the way by hand.
We'll also need to just pop this connector off of our power lead and lay that off to the side. Using a 10mm socket and ratchet, I've used a longer ratchet here than we did before because there's a lot more torque on these, we'll remove the two 10mm bolts at the bottom of the alternator. You may need a small extension to help get your socket post the water pump pulley for the driver's side lower alternator bolt. You don't have to remove the two bottom 10mm bolts as these are notched on the alternator and you can simply slide it up once they're loose. Once the bolts are loose, you can lift up and slide the alternator off of them to remove it from the vehicle.
Your radiator cap is located at the front of the engine bay on the passenger side, right in line with the passenger side engine bank. Simply unscrew that and place it somewhere dry and safe. Raise and support your vehicle. We're using a lift to make it easier to show you what's going on but this could easily be done at home with a jack and jack stands. Under your vehicle, on the front driver's side, we have a coolant drain here. I happen to have a piece of hose lying around that fits over it. If you do too I recommend using it to put into your drain bucket to make this process a lot cleaner and easier.
We'll then use a 19mm socket and ratchet to open up our drain. Once your coolant's finished draining, go ahead and tighten down that drain plug. You could just be able to snug this by hand because that's just plastic, we don't want to break it using a wrench. Once we refill our cooling system we'll clean this off and double check for leaks. Using a pair of pliers, collapse the clamp on your upper radiator hose and set it into its hook so it'll stay open like that. Work it off and slide it down the hose.
This is probably stuck on there pretty good, as you can tell. There's a few different tricks to remove these but one my favorites is to get a big pair of pliers, like these groove jaw pliers we have here. Clamp it on to the hose and twist. Now, you don't want to bite it too hard or you're going to tear the hose. You do want to get enough grip to make it rotate a little. It can take some time but just keep working it back and forth, like that. Before we remove this, I've already done it but you're going to want to make sure you have a drain bucket underneath your vehicle. Even though we drained our cooling system it still tends to pool up in places, which means we could have another leak and a mess that we need to contain.
Remove the two 10mm bolts with a socket and ratchet. Remove your thermostat housing. Our thermostat's a little stuck so we'll take a flat blade screwdriver, put it in the top there, and just help pop it up.
Remove the cables on the side of the throttle body. To do this, the outer one here, simply rotate, just to get a little better leverage on it, and lift up. It's just on a little slotted tab there. Once that's removed, we'll keep our throttle body pushed in with our thumb. Slide the end of the wire around to this notch, and slide the cable through. Release the tension on the throttle body and unhook the spring. There's not a lot of tension on this so you should be able to just pop that off by hand. Remove the two 10mm bolts on the top of the throttle cable retainer bracket. Alternatively, you could remove the two cables separately but this is just as simple. It's just a matter of preference.
Then, because we're removing so many parts here and we want to stay organized, I'll just put those two bolts in back a couple of threads so they don't fall out and we know exactly what hardware goes where when we put it all back together. Follow the throttle cable around and remove it from the retainers on the EGR heat shield, as well as down here next to the throttle body. These are just little plastic retainers so just kind of spread them with your fingers, and then pop them out. Carefully feed the cables and the bracket out of the way. You can feed them back and lay them over the side or you can simply push them back toward the firewall like we're going to do here. Again, there's multiple ways of getting the same results.
Remove the coolant feed line to the throttle body deicer, squeeze the clamp, move it back, wiggle the end with your pliers to free it up and then pop it off. Just push that up, out of the way for now. We also have vacuum line here. Same thing, there's no clamp on this. We're just going to grab it, wiggle it to free it up, pop it off. Remove the two 10mm bolts on the EGR tube heat shield. There's one here, by the idle air control valve and another one on the other side, closer to the actual EGR valve.
Remove the EGR tube heat shield from the vehicle. Once again, I'm going to throw those bolts back in a couple of threads. Stay organized, remember where everything's going. EGR components are constantly getting hot and cold and are much more prone to rust and seizure that other parts in the vehicle. Much like exhaust parts and exhaust manifolds. We're going to spray some penetrating oil. I've put a paper towel under there to contain the mess on the back where it slides around the tube. As well as the threads where it goes into the EGR valve. Using the appropriate size wrench, which we don't have. I believe it is an inch and a 16th. Possibly a 27 or a 28mm, you are going to remove this flare nut that goes into the EGR valve. However, in a pinch, a nice pair of groove jaw pliers, should be able to bite on there enough to loosen it up. Be sure when you're loosening this, that the nut is turning but the tube is not. If the tube's turning, use more heat and more penetrating oil because twisting that tube around is just going to break it and add a lot more to your job.
Disconnect all of the connections on the EGR valve. We have a black vacuum line at the top, red one below that. Be very careful as those are plastic vacuum lines and you want to be sure not to crack them if they've become brittle. Disconnect the electrical connector. Disconnect the large vacuum port, wiggle it with some pliers if you need to. This is on the front of the throttle body assembly here, on the elbow.
Disconnect the large breather hose here, next to the vacuum port. Just rotate that out of the way. Disconnect the electrical connectors for the throttle position sensor. As well as the idle air control and hang them off to the side. You can't get these mixed up because one is just a two pin connector while the other is a three so they're only going to go on one way. Remove the five 8mm bolts securing the throttle body and elbow assembly onto the top of your intake manifold. Once all five bolts are out, remove the assembly from your vehicle.
The fuel rail inlet is here. Pop this safety tab off, make sure yours is on a retainer and it's going to hang, if not, place it somewhere safe. Be sure to wear proper safety equipment, especially for this step and the following ones involving the fuel rail. This is a quick disconnect line tool that simply slides over. Push your fuel line in and pull the quick disconnect into it and you'll feel it set into place. Once it sets into place, push from the connector and pull the line out. You can mark all of these electrical connectors if you'd like to but they are all different and locked out in different places. You shouldn't be able to mix them up.
Remove the cooling temp sensor and this three pin connector on this little vacuum modulator here, at the end of the fuel rail. Again, a matter of preference. I'm going to disconnect all of these vacuum connections down here at this valve because then I can leave them all attached to the fuel rail and take it all out as one piece, which makes it a lot less confusing to put back together later. We'll then right down and disconnect all of our injectors, ignition coils. These connectors are completely different and tied together so you shouldn't be able to cross them or plug them in the wrong order or onto the wrong part.
There are four ignition coils and four fuel injectors on either side. We'll also need to disconnect this ground clip and then remove the two 8mm bolts on our fuel rail. Remove the two 15mm bolts on this heat shield. We have one up top here, nice and easy to see and another one down under the harness that's a little more difficult to see. When I remove it, you'll see where the ratchet is, you should be able to find it, no problem. There are a couple of ways you can choose to do this. You can disconnect the retainers, holding the harness onto this heat shield. Or you can simply lift it up and just move it out of the way. Pop this retainer for the alternator harness off of the bolt and then we'll run right down the line again and disconnect all of our injectors and ignition coils. We'll then remove our two 8mm bolts.
Now, in removing the fuel rail, we want to grab each injector, and pop them up and out of the intake manifold. We'll then remove the fuel rail with all the injectors still attached from the vehicle. Using a 7mm socket and ratchet, remove the bolt to the ignition coil and then pop the ignition coil right out. We'll repeat this step on the remaining seven coils. You can mark these to make sure they go back in the same cylinder if you'd like. However, as long as they all work, it's really just an unnecessary step but some people like to keep them in place. If that's how you want to do it you just a paint marker and just throw a number on each one so you know which cylinder they go to and everything goes back in. Compress the clamp on the end of the coolant hose at the back of the intake. It looks like ours is just going to slide up nice and easy. You might have to move the clamp and then wiggle the hose as we've had to with many of the other ones. Since it's not dripping we'll just hang it out of the way.
We'll then go on to remove the remaining eight 10mm bolts from the intake manifold. We have five on the passenger's side, right in a row. Three remaining on the driver's side. Lift up, carefully remove the intake manifold from the vehicle. You want to watch out because we have a lot of loose wires hanging around. We also have a little retainer on the back of our harness it looks like, that we need to pop off. Which is why we take this slow because we don't want to risk jerking and breaking something like that. Remove your intake manifold from the vehicle.
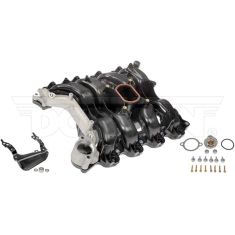
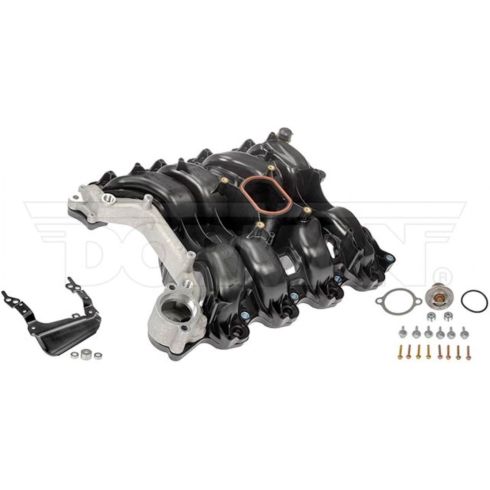
Here we have our old intake manifold that we removed from our vehicle and our new part from 1AAuto.com. Now, this part still has some coolant and fuel and such in it, so I'm not going to move it around too much. You can see that we have all the same bolt locations on it. I even have all the hardware in place on the old intake manifold. It comes with all new gaskets for the throttle body. As well as, where it bolts on to the lower plenum and into the head. You could see the intake shape and design is exactly the same and we have the same cooling jacket up here at the front. This does have some different ports in it as well as some different openings because these manifolds fit a wide variety of the 4.6L Fords.
We will need to change over our coolant temp sensor here. It comes with a bunch of new hardware, which will allow us to block off this port, which isn't needed for our particular application. It also comes with a brand new thermostat, which is a great thing to change any time you lower your cooling level. Just because, it's a cheap part and it's a great thing to take care of while you're in there to make sure that your repair goes smoothly. It also comes with some stiffening brackets. These may not be applicable to your particular vehicle but again, this kit fits a wide variety of the 4.6L motors, so it does come with some extra parts, as well as some universal parts that are going to fit various applications.
Don't be afraid if you have some extra parts left over or some things you didn't use. These are very prone, and our motor did it, to cracking here and creating a coolant leak. If you're having this problem, or any other cracks or issues with your intake manifold, this new part from 1A Auto is going to go in direct fit just like your original equipment and fix you up right.
Now, we'll remove the gaskets and clean the mating surfaces. You want to put some paper towels down into all the intake runners to make sure that we don't have any dirt and debris fall down into them. You want to kind of try to keep a cup shape. It's not going to be perfect but the closer you keep it to that cup shape, make sure that everything's still touching. Then when we remove this we can just grab the edges, pull up and bring all that dirt and debris up and out with it. We'll then remove the old gaskets. We'll now use some break clean and a paper towel to wipe all the dirt and debris off of the gasket surfaces. Want to make sure you get this nice and clean so that our gaskets seal on there nice.
Just to show you a comparison, while this side looks a lot cleaner than it did when we started, this is nowhere near clean enough to get a good seal with our new gaskets. What you really want to do is get them nice and clean, like this side over here. While this still isn't perfect because we do have some pitting and corrosion from the various fluids and chemicals that come in contact with these surfaces, you can see the old outline of our gasket rings are perfectly clean and clear, so we'll get a nice good seal back onto our engines. Once the surfaces are nice and clean, pinch the tops of your towels together to keep any debris inside. See why we do that? All the debris that came out of that one.
Now we'll use these paper towels, since they're already dirty, we'll wipe up any coolant and dirt and debris that's down in the valley of our engine. We also have some broken plastic pieces here from our intake we're going to want to get out. All of these things are hazardous like the coolant getting through this opening and down into our torque converter and flex plate could cause rust and other issues. Whereas all this fuel from removing the injectors, as well as these leaves and other debris down here could present potential fire hazard that we don't want to risk. We've got it open so we might as well clean it out.
Before installing your new intake manifold, be sure that all of the integrated gaskets, as you could see here, are properly seated and in good condition. This is a little different than the piece we removed, which had its own gasket. These integrated ones are going to be a lot easier to work with and they're going to seal a lot better. Lift the old intake manifold up and out of this piece of sound deadening here, which we'll then set out new intake manifold into, just drops in there.
I'm going to leave all my old hardware in this intake manifold for now, just to keep it out of the way, make it a little less distracting. As we go along, you can see things like the coil hold down bolts are a little bit different, it actually comes with some screws in the hardware bag supplied with your new kit that we'll be using for that. Everything else, I know where the bolts go and as I need them I'll remove them from this manifold and install them here just to keep things clean, easy and organized.
Carefully lower your new intake manifold back into place. We'll now take all of our 10mm hardware, we'll just get those started in by hand for now, just a couple of turns to make sure that everything lines up and seats nicely. Make sure that nothing is pinched under the manifold, that it's fully seated, before we start tightening anything down. Go ahead and snug all the bolts down with a 10mm socket and ratchet. Jump around a little from front to back and side to side when doing this to make sure the manifold sits down evenly. However, we're not going to get them tight yet because we will need to torque them. When installing an intake manifold like this, torque sequence is just as important as the torque specification. In this particular case, it's going to be 18 foot-pounds or 25 newton meters. We're going to use our torque wrench and a 10mm socket and the pattern I follow here is going to be very important to making sure our manifold sits and seals correctly.
We'll start with the second bolt from the front on the driver's side. We'll then do the middle bolt on the passenger's side. Then we'll go one bolt back from there. Front bolt on the driver's side. The one directly opposite it on the passenger's side. We'll then go to the rear most driver's side bolt. The rear most passenger's side bolt. The front most passenger's side bolt. The last bolt in the sequence is going to be the second to rear most on the driver's side, which is actually the long 15mm bolt that goes through our heat shield so we'll torque that down then.
Remove the cap that comes on your new manifold and install the cooling line. Remember to compress the spring clamp while reinstalling and release. Reinstall all of your ignition coils. Our new intake manifold comes with new plastic screws for the ignition coils. Be sure to use those. They still use the same 7mm socket and ratchet.
Reinstall your fuel rail. Give a little push over all the injectors to make sure that they seat in properly. Reinstall all four of your 8mm fuel rail hold down screws. Once those bolts are tightened down, reconnect all of your electrical connectors. Remember the gray ones are for fuel injectors, and the larger black connectors are for your ignition coils.
We also need to reconnect retainer for our alternator connector wire there. We also have to reconnect this vacuum modulator over here. Don't worry about the coolant temp sensor connector just yet, because we do have to change that over from the other side. We also have our ground connection, which sits on the rear fuel rail stud here. As well as the vacuum fitting that connects to all the other vacuum lines here in this little harness. We can then take our fuel supply line, just put it in until it clicks, make sure it doesn't come off and then reengage the safety.
This could've been done in the vehicle easily, just this same way. However, I didn't remove the coolant temp sensor when I took the manifold out. I'm just going to use a 19mm wrench now, spin it out, so we can put it in our new intake.
Now we use a wire brush to clean all the old dirt and debris off of the threads of the coolant temp sensor. Apply some thread sealant onto the threads of the sensor. You only need to go 3/4 of the way around here, you don't have to cover the whole thing and reinstall the sensor. Some people will use RTV Gasket Maker, or Teflon Tape for this. That does work in certain situations but thread sealer really is the right stuff for the job. Tighten your sensor back in, your 19mm wrench. You can also use a socket and ratchet. I like to use a wrench because I can see how close I'm getting to the sensor. I don't want to risk breaking it. Don't worry if it doesn't thread all the way in, just thread it in until it stops and reconnect the electrical connector.
We'll now install the M8 Allen plug with an M8 Allen socket and a ratchet. This plug is included with our kit. Since we don't use this port for our application, we just want to seal it off, and close it up. Reinstall the heat shield bracket here on the driver's side. Be sure to line up both bolts for tightening either one down. This long 15 goes at the top and will be the last bolt to help tighten down our intake manifold. This shorter one with the threaded ends will sit down on the back side of the motor. Be sure to reconnect the wire harness to it's bracket if you disconnected it. You want to get both of these bolts lined up first before you tighten either one down where there's only two points of contact. Makes it very easy for this to get misaligned.
Remember, since this is one of the intake manifold bolts, this long 15 at the top will also need to be torqued to 18 foot-pounds. Clean off the gasket surface on the throttle body elbow the same way you did on the manifold. Ours doesn't look that bad so I just wiped it off real quick with a clean rag. Reinstall the throttle body elbow and all it's related parts onto the top of the intake manifold. Reinstall your five 8mm screws to then tighten down with our 8mm socket and ratchet. Again, make sure that the alignment goes smoothly. We want to put all of them in hand tight first. Reinstall the EGR tube into the EGR valve. Again, if you have the appropriate wrench, tighten it up with that. We don't, so we're going to get it as tight as we can with a pair or groove jaw pliers. You could also use a small pipe wrench on this or another type of adjustable wrench.
Reinstall the EGR tube heat shield over top. Again, our new part supplies two 7mm plastic screws for this in place of the bolts we had in there, on the original manifold. These will work just fine. I'll tighten them down with a 7mm socket ratchet and extension. Reconnect the electrical connector on your EGR valve and the vacuum fittings. Remember red on the bottom, black one on the top. We'll then reconnect the vacuum line on our throttle body and swing the breather hose from the valve cutter back on there as well. Route the throttle and cruise control cables back around and lock them back into their retainers.
Reinstall the 10mm bolts in the retainer bracket. Tighten those back down with your 10mm socket and ratchet. Open your throttle body by hand, insert the pin and rotate the throttle cable into it's channel, allow it to line back up. Snap the cruise control cable back into place and reinstall the return spring by hand. Reconnect this breather vacuum hose here, as well as the coolant icer hose here. Use your pliers to slide that clip back into place. Reconnect the three pin throttle position sensor harness and the two pin idle air control harness at the back. Install your new thermostat followed by the new O-Ring.
Place your thermostat housing back on. Make sure that it goes on there nice and straight. Tighten down both 10mm bolts. We'll do this first with a socket and ratchet and then torque it to 18 foot-pounds.
Reinstall the upper radiator hose to the thermostat housing. Set the clamp back into place and if yours locked together like ours did just give it a quick pop with a flat blade screwdriver. It should spring right back into place. Don't forget to relocate this stud from the old manifold to the new one with a 10mm socket and ratchet. It's not critical but it is part of keeping the engine cover on this particular model. If yours has it, you'll want to be sure to switch it over. This is located in a straight line behind the coolant temp sensor. It's going to be the only opening left in our intake manifold. We'll just tighten that back down until it bottoms up. Reinstall your alternator onto the studs. Reinstall that top bracket. We'll start these screws in finger tight. We'll then tighten down the backs fully. Once the rear bolts on the top bracket are in place, we'll tighten down the bottom bolts. We'll then tighten up the two 10mm top bolts and reconnect the electrical connector as well as our power lead. Tighten the 10mm nut with your socket and ratchet, reinstall the boot.
Install the serpentine belt first around the harmonic balancer with a crank pulley. Make sure that it's seated on there fully. We'll now take the passenger's side of the belt, route it under my water pump, back up over top of the water pump. From here, it'll go over the top my tensioner pulley, under my AC compressor on the bottom passenger side, through this tight little gap here and over the idler pulley. I'll then go to the bottom driver's side and route the belt around my power steering pump. I'll put some tension on it by hand, make sure that everything is seated properly on its pulley's. Then use the drive of a 3/8 ratchet and the square opening of the tensioner and turn that clockwise to relieve the pressure and install my serpentine belt over the top of my alternator before releasing the pressure and removing my ratchet.
Reinstall the intake boot onto your throttle body and tighten the clamp back down with a flat blade screwdriver. You can also use, I believe, it's a 8mm socket and ratchet on the hex of this clamp as well. Reconnect the IAC and breather hoses. One is larger than the other so they'll only go in one way. Push the air box lid down and it until it seats fully back on its hooks. Push the lid down, snap both clamps back into place, reconnect the mass airflow sensor.
Reinstall your engine cover by sliding it back over the hooks in the front and placing it over the stud at the top. Reinstall the nut and tighten it down with a 1/4 inch drive extension. Reconnect the negative battery terminal and tighten it back down with your 5/16 or 8mm wrench. There's no need to crank these down, just go on there until it's nice and snug. Push down fully on your inertia switch to reengage it.
Refill your vehicle's coolant. With the radiator cap off and your coolant system filled, start the vehicle. To prime your fuel system, turn the key to run position without starting the car, and allow the fuel pump to turn on and off. When it turns off, shut your key off, repeat the cycle two more times and then start the vehicle. Set it to vent heat on the lowest fan setting, just so you can feel it and keep an eye on your engine's coolant level.
Once our cooling system opens up, meaning that our thermostat and allowed the flow of coolant through our engine block and heater core, which is why we have the heat on to allow coolant through the heater core, this level will drop. We'll need to keep it topped off and wait for it to finish bubbling and settling so we know all the air is out of our system by driving our vehicle. Once your vehicle has finished bleeding, be sure to top your coolant level back up. Remove your funnel and reinstall the cap.
Thanks for watching. Visit us at 1AAuto.com for quality auto parts, fast and free shipping, and the best customer service in the industry.
Tools used
Tools used
Okay, so let's get started on our 2005 Ford Crown Vic intake. This is a peek at the top, a peek at the bottom, as you can tell, comes with all those gaskets. We've got some brackets, all the hardware you're going to need, and a brand new thermostat with the gasket. Let's get started.
So before we get started on the hood, we're going to make our way to the trunk. You're going to come over to the left side and you're going to see this. Open this up. You're going to see this little switch right here. This is an inertia switch, and what it does is, in case the vehicle is going to crash or roll over, this is going to trip and it's going to pop up just like this. When you see it in the off position like that, make sure that the fuel pump is shut off. Now, let's continue upfront.
Next, what we want to do is start the vehicle and let it die out because of no fuel.
After you take off the cap up top, you're going to go ahead and come down here. You're going to find the pit cock. You can just kind of loosen that up. If it's stuck on you, you can use a 19-millimeter and then I'm going to try to collect any coolant that comes out down inside my collection bucket.
The next thing we want to do is relieve your negative battery terminal. Set this aside so there's no way you can touch the battery.
Next, I'm going to use a quarter-inch ratchet with an extension, and I'm going to get this out of here. Lift that up, slide it forward. The next thing we're going to do is relieve tension on our tensioner so we can get the belt off. It's a great idea to remember which direction your belt goes. You want to make sure you map out your belt routing in case you can't remember. You could also take a picture. Let's get this right out of the way. Last thing I want is any coolant getting on this.
So, one of the next things I like to do is spray down that EGR tube because we're going to need to loosen that up and/or take it off. So get a little bit of penetrant on there and then follow it down to where it connects on down there. If you look right up along the driver's side exhaust, you're going to see the lower part of that EGR tube. We're just going to cover up the O2 sensor with whatever you've got. I'll use a rag. And I want to try to keep any chemicals I can off of that. Let's let that sit and do its job.
Next thing we're going to do is get this hose off of here. You have a clamp right there. You can use an 8-millimeter or a flathead and then one down here. So we'll loosen those. Give it a little wiggle. That looks good. Come over here. There's a little green tab. You're going to press on that with your index and then just draw this off of here. Okay. Off of there. Set this aside.
Although there's not much that anything can get inside this, let's prevent it anyway just by shoving a nice rag in there. Be careful not to push on that flap.
So what we're going to do now is we're going to start disconnecting the electrical, okay? You've got your coils, your fuel injectors. You've got this up here. This one right there. So pretty much anything that's electrical on this side and then we'll work our way over to that side. If you see a red connector like this, that's the lock. You just kind of pry that up and it pops and then squeeze with your index and draw it off. I always like to take a peek to see if I see any funny colors and then I move along.
Let's do these. Get your coil and then the tan is the fuel injector.
Now that all that's disconnected, you don't necessarily need to worry about these two if you felt the need to remove them. You could do that so you can move this; it's completely up to you. Now that I have everything disconnected that I want to get disconnected on this side, I'm going to do the electrical on the other side. You've got this wire that goes over the alternator. Once again, you definitely want to make sure that your battery's disconnected before you touch this. We did disconnect it. Tuck this aside.
The next thing I'm going to do is I'm going to start disconnecting the electrical right here. Grab this. Pull that right off of there. Twist it aside. We'll come right up here, pressing on this. Awesome. If you look on the backside of this, you're going to see a little yellow connector. That's a press tab. You're going to press on that and then you can draw this away. Cruising right along, we'll go right here.
And now we're going to disconnect the fuel injectors and the coils right down the line.
Now that I have all those disconnected, we'll come right over here. You've got this little wire. This is going to be something that's going to be easy to forget but you definitely don't want to forget it. So, put it wherever you'll be able to find it and be able to see it. If you're worried about it falling down, which I am, I'm going to put a little tie on it, something that I can easily find. So I just went ahead and grabbed something nice and bright. I had a wire laying around. I'm just going to it on there, and I'll very easily find this for sure.
Let's go right up here. I'm going to use some long pliers. Give it a little twist to break it free and then draw it all. If you follow this hose right here, this goes to your heater core and then down to the intake. We're going to remove this clamp, slide it up, and get this hose off of there as well. There might be a little bit of coolant. We did drain the cooling system, so the majority of it will be out. But just in case there is a little bit, make sure you have hand protection and eye protection. Okay. That hose came right up off the intake. Looks great. Just take a peek at those hoses and make sure that they're not dry and brittle.
So now I'm just going to grab a rag. Right under here, I'm going to grab this metal clip. Just try to lift it up. What this does is it just kind of holds this in so it can't come loose, not that it would anyways but it's kind of a precautionary. Next, you're going to use one of these, okay? And the size is a 5/8. This is going to slide right over the line. Before that though, I'm going to use a little bit of penetrant, put this right on just like that, and then you just kind of press. Once you press, squeeze this in a little bit towards the fuel rail, give it a little twist, and then draw it away carefully. Go ahead and get your tool off of there and take care of your fuel-soaked rag. So there's our tool and there's the size, 5/8.
Let me grab some of these pliers, and I'm going to remove this clamp right here for the upper hose. There might still be a little bit of coolant in here, so be careful. Grab the hose. Just give it a little twist to break it free. Okay, if for some reason, it doesn't want to break free, you can grab your small pocket screwdriver or whatever you've got, maybe a pick. Come right in through here and maybe a teeny bit of penetrant. I'm just going to work this around, let the penetrant do its job. Like I said, I just used a teeny bit. You don't want to overdo it. This is rubber and it's probably not the best for it. There it is. Set this aside.
So the next thing we want to do is remove the bracket from this area. So you can start wherever you'd like. I'm going to come right down here and use a 10-millimeter. Loosen that up just like that. If you feel right underneath, you're going to notice that it has almost like a cutout where it's going to sit right over that bolt, so you don't technically need to pull these all the way out. These up here, you do want to pull out. Remove the alternator with the bracket.
The next thing I want to do is get this bracket off of here. It kind of comes up and over this. To do that though, you have to get this throttle position sensor out of the way. To remove that, there's going to be a little torque spit on the backside. It looks like this. It's a little star. And the size is a T-20. There's two bolts, there's one up top and one down bottom. Remove them. Okay, carefully slide this out without twisting it. If you take a peek in there, you're going to see a little slot. You don't have to worry about it being messed up because it's going to line up with the backside of that intake. Set those bolts and the sensor aside.
If you look right along here, you can see this wiring harness. It has a little piton that presses into the bracket. Remove it. There we are. There's going to be another one on the other side, but we'll worry about that later.
Let's move along to getting this bracket off of here. To do that, I'm going to remove this 15-millimeter bolt, and it's going to be about probably this long so just so you know. I'm going to use a ratchet ranch, because why not? And there's going to be another bolt on the back which is also a 15-millimeter. It feels nice and loose. Like I told you, super long. Let's get that back bolt. Where's that bolt? Okay. Get that out of there. So it kind of goes into the back of the engine and goes up against the bracket. Let's get the bracket out. You're going to have to do a little twist and shout. There it is. So, assuming this is the back of the engine, this comes through just like that and then it screws into the engine. You've got your other bolt that comes through just like this. Boom.
So, next, if you look along the backside of the intake, you're going to see another bracket. There's going to be two 10-millimeter headed bolts. Remove those. That bolt off of there and of course the bracket.
I'm feeling along this big wiring harness and I can feel that there's another anchor point, so you're just going to want to get that off of there. You can use a pry bar, whatever you've got, and just try to get it separated.
This is looking great. At this point, let's remove all eight coils. Make sure, when you lay them out, you lay them out so you can remember exactly which position they were in. So this one's obviously in the front. I'm going to put it first. Second, third, brrrp, right down the line. Give it a little twist. It should slide right up, and that's what they look like.
So now we're going to move along to taking off this EGR tube right here. To do that, use an inch and 1/16 wrench. I'm jut going to give it a couple loving bonks with my rubber mallet, see if I can get it to break free. Perfect. Let's loosen that right up. Do the same to the lower one.
So we made our way back underneath the vehicle. We're going to follow that left-hand exhaust and come right up here to where the EGR tube is, and you can feel this big old nut. That's the same size nut as the one up top so you don't have to worry about figuring out the size. It's an inch and 1/16. The only problem with this one is generally speaking it gets frozen on there really bad. So what I like to do is apply a little bit of heat, so I'm going to do that now.
Obviously being careful for anything that I could melt. You don't want that O2 sensor wire anywhere near there. I'm just going to move this heat around. I'm going to go up around the nut area, and then I'm also going to go down along here. Once you feel as though you have everything warmed up enough, continue with that wrench. I'm just going to hit this with some penetrant, and then I'll let it sit and do its job.
If you're going to be inside of an enclosed area, make sure it's well-ventilated.
Yeah, nice. All right, we got that to break free. Little bit of heat, that's the way to do it.
So this is still a little warm but I got it so it's turned by hand and I got it off of the exhaust pipe there.
So, now, I'm just going to grab that EGR tube and carefully pull it out of here. The next thing we're going to work on doing is getting this off the top of the intake. So, to do that, I'm going to leave the majority of these all attached obviously. An exception of this one right here that goes over to the fuel rail area. So, I'll just try to pull this boot off. There we are. And now you're going to see mounting screws or bolts here, here. And then of course on the backside, we'll remove all those.
If you take a peek right inside here, you can see just how dirty it is. I would like to clean it out so I will and I would recommend you do the same. Now, it's going to be time to get the fuel rails off of here. To do that, I'm going to remove the 8-millimeter bolts 1, 2, 3, and 4.
So now you can wiggle these around and all that's going to be holding it in is the fuel injectors. They have little rubber O rings, so you can just try to pop this up. Sometimes it's hard to do just by hand, in which case you would use something as simple as a pry bar.
So, next, it's going to be time to remove the fuel rail from the intake. Sometimes there's going to be fuel that's still in there even though you tried running the vehicle to try to make sure there's no fuel on there. So, just grab a couple rags and just kind of lay them out and hopefully they'll just collect whatever mess might come out of here. With that done, now I'm going to use something as simple as a pry bar and I'm just going to try to go and lift up the fuel rail. There we go. Okay, got a little bit of fuel coming out. That's okay. We've got our rags. It's bound to happen. Awesome. Okay. Now that we have both these off, let's go ahead and lift this up and get it out of here.
So, now that we have that fuel rail off of here, it's important to make sure you get these little rubber gaskets out of here and it's just as important to make sure that you replace these. If you have any of these that are still stuck in the fuel injectors, it's also important to make sure you get those out and you put them with the coinciding part on the engine.
I'm just going to use my small pocket screwdriver, just try to pry this out of here. There we are. And there's one of the gaskets and then the other one's right here. We'll replace them both.
At this point, I'm going to use some long-nose pliers, and I'm going to pull these out of here. Screw right along that belt cover and then lift straight up. When you take these out, make sure you put them in an order you can remember, so I'm going to go with the front being all the way over there and then I'm going to work my way this way.
We're cruising right along. Let's go ahead and get this thermostat housing off of here with the cover.
Okay. That one was really in there. I always replace these anyway whenever I do an intake.
Let's get the coolant temp sensor out of here. Use your 19. There we go. You'll notice that, when it was tightened in, it wasn't completely down so pay special attention to that. When you tighten this up onto the new intake, you definitely don't want to tighten it completely down.
So now we're going to use a 10-millimeter and we're just going to come down the line. Whenever you're removing these, it's always a great idea to start at one end and work your way to the far end. Don't start in the center. Nothing going on up here because we already removed those.
Let's take a peek, making sure that they're all the same length. Nothing special about them. Grab your rubber mallet. Okay. So, at this point, everything's nice and free. But when we lift this up, we want to make sure that nothing can fall down inside this engine underneath here because right where these tubes connect onto, that leads right down into the engine. Okay, everything is clear. There's nothing that can fall down that I can see in front of me at least.
Okay, so now before we go any further, it's important to make sure you grab some rags or whatever you might happen to have and just kind fo put them right down inside these holes right here, okay? You don't have to shove them all the way down. You want to leave them so you can still grab them out of there of course, but what we're trying to do is just make sure that nothing can fall down inside these and potentially cause damage to the engine.
I'm going to grab this gasket. Lift it up and out of here. Take a look at that. Boy, that's no good right there. I'm sure this had a coolant leak. Nice.
The next thing I want to do is clean up this whole upper area here and obviously there are some large areas that I'm going to want to clean up before I get to scraping. So I'll just use my vacuum. I'll clean it up as good as possible along here. We'll scrape it and clean it up again. Do the same over there and then of course we'll worry about cleaning this out when we're done.
I'm trying to scrape out and away from any of these holes.
So now once you feel as though you've cleaned this down enough on all the mating surfaces where those intake gaskets are going to ride, which is pretty much just right around all these little holes, you obviously want to make sure that it has a nice seal. Just kind of feel along with your finger, and just feel if you feel any raised areas. If you do, just make sure you clean those off. If you don't and this seems as good as this one is, I would just vacuum this off, try to get off any existing crud that's on there, and then we'll move along to the other side. But it is very important that you don't skimp and, if you think that maybe there's an issue that could be right here, take care of it now. Last thing you want to do is get this thing all back together and then run it and realize you have an issue because you didn't clean this up like I asked you to.
Okay, so this looks pretty great. You might notice a little bit of discoloration in certain areas but, as long as you don't feel any raised areas or pitted areas, you're doing all right.
So now that we cleaned down all the mating surfaces along the engine, let's go ahead and do one last touch-up with the vacuum. It's important to make sure you vacuum out the spark plug holes in case any crud fell inside there. Just get anything out you can.
So now that we cleaned down all the mating surfaces along the engine, let's go ahead and do one last touch-up with the vacuum.
Any time you're going to be leaving your engine open for a while, it's always a great idea to make sure you cover it.
So we made our way over to the bench. I want to take a quick peek at this intake so we can see what's going on. If you look along the forward end, this is where the thermostat is going to go. You might notice that you have an extra hole. You've got this one right here. This is where the sensor is going to go for the coolant temperature sensor. But this one right here, that one's actually just kind of like where you're going to have a little air-breather. So you take one of these and then you would just put it in. But of course, before you put it in, you need some sort of seal, so I like to use this stuff right here. It's just white Teflon tape. You can also use the goo if you prefer that. I'm going to wait on installing that until we've got this all into the vehicle though. It also comes with new mounting bolts for your coils. You're going to want to use these and not the original ones because the original ones won't work in this particular intake. If you look where the coils are going to mount on to, it's just plastic. It's not like the original ones where they had the metal grommet in there. So, you need to have the super course bolts here. And of course when you're putting them in, make sure you torque them down so they'll be nice and torqued but they won't be overtightened and break the plastic.
Real quick before we blast off back to the vehicle. I just want to show you the underneath of the original. You're going to see that you have this insulator right here, and unfortunately this one is just disintegrating and we don't have one that's available to us at this time so we're going to install the new intake without it. But if you do have access to one, go ahead and slide that on before you start the install.
One of the coolest things about our new intakes is that they come with the gaskets preinstalled right inside there. They don't come with this big old clunky thing that you got to try to wind up perfectly. Let's go ahead and carefully pull these rags out of here. Just watch for any debris that might come out. This one obviously had some crud. We'll clean that off. I'm just going to take the vacuum. Get this crud off of here and we'll continue.
Before we go ahead and put the intake on, just double-check the gaskets and make sure nothing came loose. I'm just going to carefully put this on top.
Get these bolts in here. I'm just going to start them all in by hand before I tighten any of them down.
All right. So we made our way back over to the bench. We have our fuel rail right along here, and these are the fuel injectors that went along this bank, and these are the fuel injectors that went along this bank. I tried to keep them as even as possible so I knew exactly where they go. Now that we've said that, what we're going to do is we're going to move along to stripping down these injectors. We want to replace those O rings, okay? Super important. There should be one up on top. This one's missing. I already took it off. Got another one down here. Let's go ahead and pick it off. Now, if you take a peek, you might notice it's pretty dirty. And these little holes right down inside there, that's where the fuel comes squiring out of, okay? So you want to make sure that those are nice and clean. I'm just going to take a rag, put a little bit of cleaner on it, and try to wipe that down. Nasty. I'll go right along those little holes, find a clean spot in my rag, of course. Those look pretty great. Let's see if we can get around where those seals go.
Once that looks good, move along to the next. We'll do the same to all. So now I'm just going to take a little bit of this cleaner. It'll go right on here and that's going to act as a lubricant. You can slide these right on here. Use your little pocket screwdriver. It should go on hopefully. Okay, I'm going to do the other side. Same thing. Slide it right on there. Do the same to all eight.
Now that I've put gaskets on all my fuel injectors, it's time to install them into the rail. It's important to remember that the rail is actually upside down right now. So when you put these on, don't go putting your connector facing in this direction. That's going to face right at the engine. It's going to go in this direction. I'm going to use a little bit of this cleaner as a lubricant and then I'm just going to slide it right in. Easy peasy. Do them all the same way.
Perfect. Let's get it over to the vehicle. Let's get this fuel rail. I'm just going to set it right over where it's going to go and I'm going to check that other side right there. Okay, that looks pretty decent. So now what I'm going to do is I'm going to stay along this side and I'm going to press these in, continuing with this crud cleaner. Just a teeny little spritz. It should help these press right in.
Perfect. I'm going to go over to the other side.
The bolt for the fuel rail is the one with the little stud.
Grab my regular ratchet.
Okay, it's nice and snug. We're going to do the same to all four corners.
All right, that's the last one. Let's move along.
So now we're going to torque these. We're going to go just like this. You've got one right there. You're going to have number 2 directly across. We're going to go number 3. That's number 4, 5, 6 all the way back in the back right there, 7 all the way in the back, number 8 right here and then we're going to finish this with this one. Torque these to 18-foot pounds.
And then the last one's going to be number 9, which is located right here but we're going to do that after the bracket.
Put my next long bolt. And then I'm going to start in that bottom one on the backside of the engine as well. If you look at this bolt, you're going to see it has the flat side and then the nut side. You want the flat side pressing that bracket right up against the engine. Torque this to 18-foot pounds as well. Make sure you get this completely tightened up all the way against the engine. That feels nice and tight. Awesome.
At this point, we've torqued down the entire rearward portion of the intake, and we also have this right here, which is where we're going to move along to next. I'm just going to put on the thermostat with the housing and everything. And then when I tighten these up, that'll pretty much finish up tightening up the intake onto the engine.
Put that thermostat. I'm going to take that nice gasket that they gave us. Put it right on here like that. And then I've got my housing. Make sure that this is nice and clean. This looks pretty decent. Just put it right up on top of here just like that. Grab your bolts. Slide those down through.
Torque these to 18-foot pounds as well. Double-check that gasket. Make sure it's on there well. Looks good.
It's time to get the throttle body on here. Pay special attention to this area right here, right where the gasket is going to ride. Make sure it's as clean as possible. Take your five bolts. Get ready for an install. Start all of your bolts in before you tighten any of them down. We're just going to bottom these out nice and lightly, and then we'll torque them to 89-inch pounds.
Torqued.
I'm wrapping this sensor in a little bit of Teflon tape, and then I'm going to put it in here. Something that's important to remember on this sensor when you tighten it. When we removed it, it wasn't tightened all the way to the bottom so it was bottomed out. You just want to tighten it so it's snug. I'm just going to go by feel here. Once it feels it gets a little harder to turn in, that's where I'll stop. Okay, right there I kind of feel a lot of tension. This can go a teeny bit more when I bring this so it's right along that passenger side. That looks great. You'll notice it's not all the way down.
We're going to do the same to this little plug which is going to go right here, and this is kind of where you're going to be able to bleed out any air that might be inside the cooling system. You really don't need to go around very many times, just one, one and a half times. That's it. This one you should feel it get fairly tight. Right there. I have some tension on it. I'm just going to go a teeny bit more, and that's it.
Let's trap the alternator in here. I want to show you something. If you take this and you try to put it down, you're going to notice that the original bracket is going to hit up against this plenum. Obviously you don't want that to happen. What I'm going to do is I'm going to take out these two 10-millimeter headed bolts and then I'm going to figure out which one of these two brackets fits. I'm going to go with...it's probably this one.
Try the one that I was thinking it is. I'm just going to come around. Make sure that the bolt holes line up. That looks pretty decent. The only thing that I do notice is, if I hold it so it's flush with the alternator, it kind of lifts up a little bit.
So, inside your kit, you're also going to notice that it comes with a couple of these small spacers. We're going to go ahead and use those. Start these in here just like this. Got my spacer. We'll go right underneath. Let me start this bolt in.
Awesome. You're going to notice that the alternator is sitting all the way down on these bolts inside of those ears. The bolts that are coming out of the engine look like this. The alternator ears are going to sit right over it, and then we're going to tighten these up. Let's snug these up.
I'm just going to double-check these bottom ones because I just snugged them real quick. Nice and tight.
Tight. It's time to install that throttle position sensor. Just slide it right in there. It fits right in nice and tight. I'm going to start this one in. Now I'll put it in the lower one as well.
Now that both of those are started, we'll go ahead and snug them up. That one's nice and tight. I don't want to go too far. They're just very small torque spits. That's good. Oh, yeah.
Let's get this coil back in here. And then it came with brand new screws. It's important to use the screws that the intake came with. I'm going to use a 7-millimeter swivel socket. Get right in under here. And then I'm going to snug this up until it bottoms out. It feels like it's a little snug. Try to wiggle it around. If it feels like it still wiggles, give it just a teeny bit extra but that's it. The last thing you want to do is use the full pressure of this ratchet even though it's just a quarter inch. We're going to do the same down the line.
Now we're just going to do the same over on this side of the vehicle.
So now it's time to start connecting some of this electrical. We're just going to go right down the line. Add this one. Give it a little tug. The tan or grey, whatever you want to call it, goes into the fuel injectors. Give it a little tug. Move along to the coil. Same thing. Fuel injector. And then right on down the line.
Get this electrical. We've got the fuel. It's going to come right here. This is your lock. Press it right on there. Listen for a click. Give it a tug. You have to tug this after you click it in. That feels great. Lock it in.
Get this right here. And then this one. This is looking awesome.
Double-check what we've done. Okay, get this. It's going to go right on the backside here. Awesome. So, you've got this hose right here, the cooling hose. That goes over to the heater core. It's going to go down into the intake right here. There's a little rubber boot. I'm just going to get it off of there real quick. It's just a protective boot to make sure nothing gets inside there during shipping and whatnot. Something like this I like to keep around in my junk drawer but that's a story for another day.
Grab that clamp. Give it a little squeeze.
Slide that right down over that. Give it a tug. Beautiful.
Okay, so it's time to get the EGR tube on here. You've got the male end. That's going to go right up here into the EGR, and this is going to go all the way down along the backside of the engine to the exhaust.
So when you're putting this down along the backside of the engine, you just want to make sure you've got it on the underside of that steering shaft. You don't want it to be on the wrong side. I'm just going to start this in a few good threads so it can't strip them out or anything but it's also going to hold it from falling back out. And I'm not going to tighten it until I start in the other one as well. Okay. I got a bunch of good threads. Let's get underneath and hook up the other side.
Let's get this lower one on here. Make sure you give it a couple good turns to make sure it's threading on before you try to tighten it with a wrench. The last thing you want to do is cross-thread this. You can see how it's at an angle. You just have to wiggle your tube around until it lines up. That's going on very good. I can wiggle this around and you can see that it's not cross-threaded.
Okay, it's bottomed out. Let's give it a little bit more, and that's it.
So if you look up here and you see that your O2 sensor wire is just kind of flopping around, it should have a bracket right about here which obviously this one's broken and that'll hold it up and safe away from the exhaust heat. I'm just going to use one of these wire ties and just kind fo secure it real quick.
You want to make sure it's nice and tight, and then trim off any excess.
So here's the upper portion again. We're just going to make sure that that's nice and snug. Okay, so that just bottomed out right there. I'm not giving it very much pressure. Now I'm just going to give it a teeny bit more but I don't want to go very hard because obviously I don't want to tweak this intake. That's it right there.
Next thing we want to do is the bracket and our kit came with two new bolts. You've got one hole here and one hole right there. We're going to line this up just like this so it's facing that direction.
Carefully start in those bolts.
And they're just threaded into the plastic, so it's important to make sure that, once you put these in, you don't have to necessarily take them back out a bunch of times. That would be great. Okay, both those are started. I'm going to use my ratchet to turn them in.
Both those are snug. The bracket's tight. Don't forget this little ground wire right around these hoses and then right up onto this top stud. Get this hose right here. Slide right up on there.
Get this. We've got a little anchor. Make sure that wire comes up along this side and right over to the top there. Okay, just bottomed out right there. It's going to go a teeny bit more and that's it. You don't want to go very hard. This is very breakable. Make sure you cover this. It's super important.
We've got this wire and go right up in here to the alternator. And then, of course, you've got the anchor point. Slide it on there. And now let's move along this slide right here and start plugging it in. So now it's time to get these connected in. It's important to remember that the black ones go for the coil and these little tan, grey, whatever you want to call them, go for the fuel injectors.
This one. It's a little bigger. It comes right up here. And then don't forget that red lock. Slide it in. Push in that red lock, give it a tug. Get this one right here. Another red lock. It goes on the throttle position sensor and you push that lock. Perfect.
Time to get the hose on here. I like to replace the original spring clamps. They get weak over time.
Make sure it's nice and tight. Give it a little tug and a twist. That feels great.
We've got our air intake tube here. Make sure that this is nice and clean inside. You can tell where it lines up. It's got little hookies that go over that nub. Let's snug this up.
Don't forget this one right here. Click it in. Give it a tug.
It's time to install the serpentine belt. First, you want to take a peek at it. Give it a little roll like this. If you see a whole bunch of cracks going across these, you know it's no good. Also if you look at the backing and you can see that you see some of the lining on the inside coming through, that would also mean it's no good. This one looks decent so I'm going to reuse it. The way I'm going to start is I'm going to go over the crank on the bottom just like that. I'm going to bring the top part up and around this water pump over the tensioner and then down around the AC compressor. I'm going to come all the way up to this idler pulley and sit it right on there.
At this point, I'm going to work my way on the other side. I'm going to do that power steering pump, and then I'm going to hold up on my slack like this. Take a peek at everything. Just make sure you're sitting on all the grooves. You're not coming over and off the top or anything anywhere. It feels like it moved on the crank which is very probable. I'm just going to give it a couple of spins. That looks good now. I'm going to grab my tool for the tensioner. I'm just using my ratchet. Slide it right up and over and on to those grooves. Okay, just give this a couple of little bonks like this. Gets everything settled in nice.
Let's make sure we close up this petcock. It's only plastic so just give it a teeny bit. I'm going to get this little drain hose back off of here. And if there's any mess, of course, you just clean it up.
So now's going to be time to fill this cooling system. The way I look to do it is with something like this. And basically what this contraption does is it applies vacuum to your cooling system. I'm going to power up the hose. It's going to rush a whole bunch of air by through this hose. And then once it builds up the pressure into this green zone and it just kind of hangs out for a while and doesn't seem to build up any more pressure, I'm going to turn off the air, close this off, and I'm going to make sure that it doesn't drop. If for some reason this meter drops quite a bit, goes into the yellow, or even worse would be red and just continues to drop, we know we have a leak and that would, of course, be very bad because we'll have to find it.
So, with that said, let's get started on that. I'm going to grab my coolant and it's a great idea to use manufacturer's specified fluid. We went with the concentrate but, of course, it has to be mixed 50/50. So what I did is I grabbed a separate container, I mixed it, I took out half, I put half in this one and then I filled up the rest with water. So it's 50/50 mix at that point. If yours says concentrate, you need to mix it yourself. If it already says 50/50 mix, don't add any water.
I've got this on here. I've got my safety glasses and my hand protection of course. I'm going to turn on the air. This valve is open. This one's closed. So what it's doing right now is it's creating a vacuum inside the system. You can see this upper hose crumping down. So right now I'm going to watch this gauge right here, and I'm just going to make sure it gets up and above that 25 as I said before. And once it stops going down and it just kind of hangs out, that's where I'm going to stop it. As you can tell, it hasn't moved in quite a while. So I'm going to hold this down. I'm going to turn this just like that, and then I'm going to turn off that air. Get this right out of here. At this point, I'm going to continue watching this needle and I'm going to give it about 15, 20 minutes to make sure nothing happens. I want to make sure that this thing holds pressure.
Okay, we took a little break. We came back and the needle really hasn't moved much at all if anything. So now I'm just going to fill it up, get my little tube here. All right. I'll open this up and it's going to start drawing coolant out of here. If you're using this tool, it's important to make sure that the area that you're taking the fluid from doesn't run empty because then, of course, you're going to suck air into the system and you're going to have air...you're going to go air bound.
Okay. So we're at zero negative pressure, which means that we don't have any more vacuum in the system so I'm just going to close this off. Carefully lift this up. We've got our coolant filled up. So now I' going to use one of these little funnel buddies, and that's just going to help make sure that nothing overflows and makes a big mess. So I've got my adaptor. Right on there. And this right here.
Let's get the cover on. You've got these little things up here and then you've got the little hooks that they're going to slide over. Just reach down and line them up. Make sure that one's in. Feels good. This should want to go up and over that stud. I'm going to take my little nut. Put it up on here.
Come back here to the fuel shutoff. Make sure it's reset. Put this back up.
Let's grab that negative battery terminal. Carefully put it on here. Make sure you tighten it up.
So now it's going to be time to try starting the vehicle. When we do that, we want to pay special attention to up here and make sure nothing funny happens. If you see any check engine light, which should be located right up here, we know we're going to turn it right off and check to see what's going on.
I'm going to turn the key to the on position and wait a second. This is going to prime that fuel system. I'm going to turn it back off and do it one more time. And then here we go. It's going to run a little rough at first, and then it'll smoothen out. I'm looking up here. I see nothing, an exception of just it telling me that I'm not buckled up.
We're going to look right over on the right side of the gauge cluster here right where the temperature is. And you want to pay special attention to this. Make sure it doesn't go rising all the way up and get into that hotline. If it's coming up here, make sure you turn it off. You might have a little bit of air in your system.
Okay. Now that the fluid is at the full line, we'll just cap it up and you should be good to go. Take it for a road test.