WARNING: This product can expose you to chemicals including Lead and Lead Compounds, which are known to the State of California to cause cancer, and birth defects or other reproductive harm. For more information, go to www.P65Warnings.ca.gov.
Lifetime Warranty
This item is backed by our limited lifetime warranty. In the event that this item should fail due to manufacturing defects during intended use, we will replace the part free of charge. This warranty covers the cost of the part only.
Returns: Parts with electrical components cannot be returned once installed.
FREE Shipping is standard on Orders shipped to the lower 48 States (Contiguous United States). Standard shipping charges apply to Hawaii, Alaska and US Territories. Shipping is not available to Canada.
Expedited is available on checkout to the United States, excluding Alaska, Hawaii and US Territories as well as P.O. Boxes and APO/FPO/DPO addresses. Final shipping costs are available at checkout.
How to Replace Blend Mode Actuator 2006-10 Ford Explorer
Created on:
Tools used
Socket Extensions
8mm Socket
7mm Socket
Ratchet
Flashlight
1. Removing the Vent Mode Actuator
Pry out the trim button on the bottom trim
Remove the trim
Remove the two 7mm bolts from the knee dash panel
Remove the 8mm bolts from the vent mode actuator
Remove the vent mode actuator
2. Installing the Vent Mode Actuator
Place the seal on the new actuator
Insert the actuator into place
Tighten the 8mm bolts to the vent mode actuator
Insert the knee dash panel into place
Tighten the two 7mm bolts to the knee dash panel
Press the lower trim into place
Press the trim button onto the lower dash
Hi, I'm Mike from 1AAuto. We've been selling auto parts for over 30 years! We're dedicated to delivering quality auto parts, expert customer service, and fast and free shipping, all backed by our 100% satisfaction guarantee. We've created thousands of videos to help you install our parts with confidence. That saves you time and money, so visit us at 1AAuto.com, your trusted source for quality auto parts.
In this video, we're going to show how to replace the automatic temperature door actuator on the driver's side. This is a 2006 Ford Explorer. Pretty much the same for this generation Explorer, as well as Mountaineer.
We hope this video helps you. Please click subscribe. Check out all our other Ford videos, as well as videos for all kinds of makes and models.
The items we'll need for this video: interior trim removal kit, 7-8mm socket, ratchet, socket extensions, flashlight
Here's a 7 millimeter socket with a ratchet extension and there are two 7 millimeter bolts: one here and one here— remove those. Hold this panel straight back and remove it. Then your actuator is hid underneath.
There’s one of the mounting bolts right here, pretty easy to get to. There's another one up in further. You can see right there, that you can get to with a small 8 millimeter socket and a ratchet, and then the third one is reachable. You can see it right to the left of that corrugated tube. There's a third one that we can reach with an extension and a flexible joint. I have a flexible joint on here. The tape that you see just helps it so that the joint stays a little bit rigid. And we feed that in the long extension right in onto the screw. Then that one is kind of midway up, just the 8 millimeter socket with the ratchet, and remove it.
The last one's a little easier to get to, just a straight extension and your 8 millimeter socket. Remove it. Reach up in there. Hold the actuator straight out and bring it down. Get that out of the way. As you bring it down, there's a tab on the upper part of the connector, push the tab down, push the connector out of the way. The tab is this way when you're pushing it.
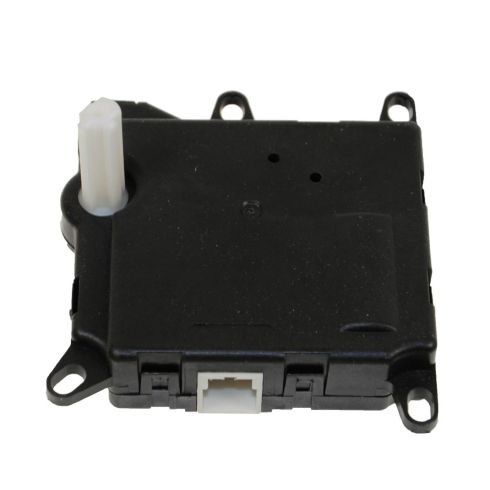
Here’s the original one from our vehicle and a new actuator from 1AAuto.com. You can see they're generally the same. Slight differences. Just cosmetic though. Once you bot the new one in from 1A Auto, if you're having issues with the temperature settings in your vehicle, this may be able to fix up your problem. There's a little seal, just put it on the actuator, and then you can just slide it right up in there. Line up the actuator pin with the hole in the air box.
Start with your easiest 8 millimeter bolt right down in the bottom corner. Before I put the other two in, I'm going to reconnect my lead. Guide it into place. It's hard to see. Take another one of your 8 millimeter bolts and, you've got to do this by feel a little bit, get it up in place. I'll tighten it up. This duct, here, actually connects right there. There's two alignment tabs and then the clips. These tabs go into the little holes. Push in place, and reinstall your two 7 millimeter bolts at the bottom. Again, this has a little alignment tab. It goes into the hole, here, to help you line it up. Then there's a plug at the front.
Thanks for watching. Visit us at 1AAuto.com for quality auto parts, fast and free shipping, and the best customer service in the industry.
HCA40142
In Stock
Product Reviews
Loading reviews
4.67/ 5.06
6 reviews
5 Stars
4 Stars
3 Stars
2 Stars
1 Star
5
0
1
0
0
Part has worked well for several months but is failing again
jerry
February 14, 2017
This part solved the problem but has recently started failing again. It has been about nine months since I installed it.
Part worked
M
July 29, 2017
Installed it with no problem. It was a perfect match for the previous part. All systems go. Thanks
Great service
R
April 22, 2019
this was a great place to order my part from. would order again.
worked perfect
J
December 14, 2020
Got the part I ordered and received it sooner then expected and worked perfect
Donald
August 23, 2021
This one has no other than 5 stars i installed it in the wrong place because there is 3 others just like it and when I called not only did they send me instructions they sent me a video very happy
I have a Ford exploer 2003 XLT 4.0 V6 and I have a question need guidance my heater wont work in my back top vents it works on my front vents and lower vents in the back. But my top vents for the back it blows cold air when I want to blow hot air please help me thanks
October 6, 2018
Abraham T
I have a 2012 Ford Expedition King Ranch 2WD. Air is not blowing in back but clicking coming from 3rd row. I have dual climate control. Will this work?January 24, 2020
Michele S
10
Thank you for the inquiry! This item will wok on your vehicle only if it has a 119" Wheel base. We can certainly take a look if you are able to provide your VIN#. This part is correct for the rear vent. We aren't able to diagnose your vehicle, but it is possible this is the part you may need. Please let us know if you have any questions.
January 24, 2020
Andra M
10
Yes
January 25, 2020
R U
10
Yes!!! This will work. I had the same problem and it fixed the problem.
January 26, 2020
T Y
Is the rear actuator on the drivers side or passenger side? The video you have for the rear part show you installing the front one under the dash.September 23, 2021
Cameron C
10
On my 2014 expedition, it is on the passenger side. Not too hard to get to and you don't have to disassemble all the trim to get it out. Caution though, if you drop a small wrench like someone who is writing this, you may lose it to the hidden crevice gods and never get it back unless you remove all the trim, which did not happen.
September 23, 2021
V I
10
The actuator I replaced was on the drivers side at knee level
September 23, 2021
Duane D
10
Drivers side.
September 24, 2021
C K
10
It is on the drivers side rear bump...
September 24, 2021
Thom M
Customer service
877-844-3393
Monday - Friday 8:00am - 9:30pm ET Saturday - Sunday 8:00am - 4:30pm ET
Mercury is a registered trademark of Ford Motor Company. 1A Auto is not affiliated with or sponsored by Mercury or Ford Motor Company.See all trademarks.
Enter Vehicle Year Make Model
Specify your vehicle's year, make and model to guarantee fit.
Year
Make
Model
Options
Drivetrain
This part doesn’t fit a . Select from parts that fit.