Hi, I'm Mike from 1A Auto. We've been selling auto parts for over 30 years. We're dedicated to delivering quality auto parts, expert customer service, fast and free shipping, all backed by our 100% satisfaction guarantee. Visit us at 1AAuto.com, your trusted source for quality auto parts.
We're going to remove this whole panel. We're going to start by taking off the spare tire jack crank. Take that off and now there's a series of clips they have Phillips head screws in them. We'll show you how to get them out.
There's four across the front. Two more which are missing on this vehicle and then there's two clips back here which are a different style, although I'm pretty sure they should be this Phillips screw style. The way these should come out is you turn them counter-clockwise and very lightly, almost pull up on the screwdriver while you're doing it so they come out. Then once you have that out the whole clip will come up and out. You may run into them where they don't want to come out that easily, in that case you'll probably need a little 90 pick tool, although sometimes you can be successful getting. Sometimes you can get a fingernail under there, but what you'll probably have to do is get a pick tool right in underneath just to pry up a little bit when you turn it and pull it out.
These ones back here are a different style you pry up. Pull the center up and pull it out. Although I'm pretty sure these should be the Phillips screw style. I should have all the clips off, panel lifts up and off. I'm going to remove this cover. Two 10mm bolts on this side and one over on the passenger side. Remove those, 10mm socket and ratchet. Loosen the throttle body clamp with a flat blade screwdriver. Then you just kind of pull up and down on the whole ducting.
There are tubes that go in the side, once you pull it off the throttle body you can twist a little bit and pull those tubes free. Clamp for the air filter, pull that off and there's two connectors. One easy to see here, press down on the tab and disconnect. You may press on the tab, use your screwdriver and pry a little bit to help loosen it up. Connector's off and then there's another connector. Press the tab and disconnect. And the intake tube comes up and out.
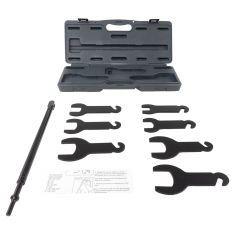
To remove the fan, you want to have fan removal tools. This is designed to go onto the bolts that hold the fan pulley on. It holds, once you get it on there correctly, it can hold the pulley bolts with that. Then a 36 millimeter wrench goes onto the bolt. Then you can use a ratchet for some more leverage. Once you break it free then your fan will spin right off. Then just get around the radiator hose. Up and out.
Pair of pliers and loosen the radiator hose clamp. Pull it back and you let it go and twist the hose to break it free and remove it. Now there's an eight millimeter bolt here, and one pretty much in the same location on the other side—remove those. We can lift our fan shroud up and out. Eight millimeter socket with a ratchet and extension will remove—hem those bolts out and the fan off. You can pull your shroud up and out.
Ours is broken because this vehicle has a lift kit on it that they had to break in order to put it on. Four thirteen millimeter bolts holds the fan clutch to the fan blade. Remove those. The blade is separated from the clutch.
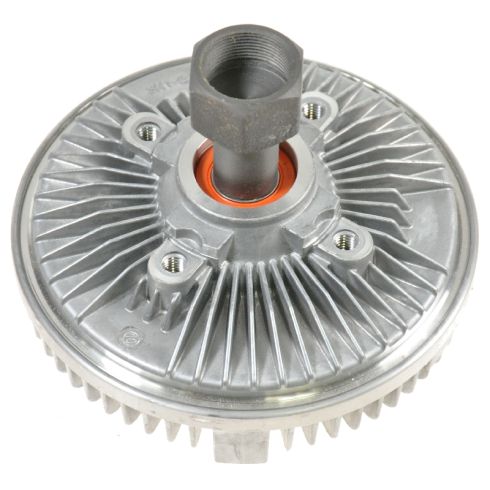
Original fan clutch from the vehicle. New fan clutch from 1A Auto. See they are slightly different as far as their look but their measurements are the same. Same depth. Has the same bolt pattern for the fan blade. Again, they look slightly different but the new one from 1A Auto is going to function just like the original.
If your vehicle is having problems with overheating and your clutch is not engaging, then a new part from 1A Auto is going to fix your problem.
Re-installation of the new clutch. Reattach it to your fan blade, and you can see we're using a new fan blade from 1A Auto as well.
Start in your four bolts, tighten them to fifteen foot-pounds. Probably the easiest way to get these together is actually to do the fan and shroud itself. My shroud's badly damaged. You basically just feed the shroud and fan down in together. Once it gets to a certain point, grab the fan, then just keep feeding the shroud down in. This will work for most vehicles. Doesn't work very well for mine, because the shroud has been broken, because somebody put a lift kit on the vehicle. There we go. Keep it everything in the right place. Then get the fan on a couple threads. Shrouding, and look down, make sure it goes into the little clips. Little clip here and the other side, then put your bolts in on this side. These are eight millimeters so we'll tighten them up. Tighten your fan up.
All right, now take your special fan tool and make sure you put it in. It's holding the correct way. This should be tightened up 40 to foot-pounds. There's no real good way to torque it, so I'm just going to take my wrench and get it tight and we'll call that 40.
Alright, remove the shipping cap and put your radiator hose back on. Squeeze the clamp back into place and release it.
Put your air intake in place. Back in place over here. The tab winds up there and this clamp goes on. Just reach down and make sure nothing's getting pinched. Lock that down into place and your mass air flow connection, reconnect it. Reconnect this connector. Tube down here goes in there. Flat blade screwdriver to tighten up the clamp that holds it onto the throttle body. Put the throttle body cover back in place and kind of move it around a little bit, figure out where the bolt hole is. I'm actually cheating, just looking right through here. See there, start it up and then push this side down into place and start my two bolts over here and then tighten them up.
Put the cover back on. It's in place, you can see all the holes. These back clips, just make sure the center's popped up. Push them down in, push the center in and then these ones across the front, clip in first and just push the center right in to lock it.
Thanks for watching. Visit us at 1AAuto.com for quality auto parts, fast and free shipping, and the best customer service in the industry.