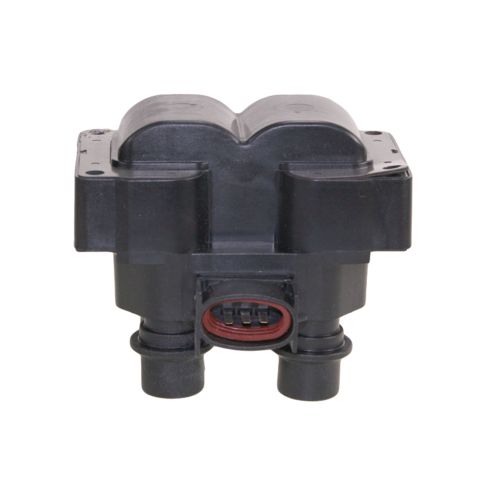
TRQ ignition coils will have your engine running like new. TRQ ignition coils are manufactured to precise specifications using premium raw materials to optimize each vehicle's ignition system. To ensure peak performance, TRQ recommends replacing ignition coils in sets to prevent electrical output imbalances. All products are fit and road-tested in our Massachusetts R&D facility to ensure we deliver on our promise of Trusted Reliable Quality.
Product Features
High dielectric epoxy and reinforced bobbins for extended service life
Rubber, Silicone, or Phenolic Resin Shell: Prevents premature boot wear
Application Specific Design: No modifications required
Item Condition:New
Attention California Customers:
WARNING: This product can expose you to chemicals including Lead and Lead Compounds, which are known to the State of California to cause cancer, and birth defects or other reproductive harm. For more information, go to www.P65Warnings.ca.gov.
Lifetime Warranty
This item is backed by our limited lifetime warranty. In the event that this item should fail due to manufacturing defects during intended use, we will replace the part free of charge. This warranty covers the cost of the part only.
Returns: Parts with electrical components cannot be returned once installed.
FREE Shipping is standard on Orders shipped to the lower 48 States (Contiguous United States). Standard shipping charges apply to Hawaii, Alaska and US Territories. Shipping is not available to Canada.
Expedited is available on checkout to the United States, excluding Alaska, Hawaii and US Territories as well as P.O. Boxes and APO/FPO/DPO addresses. Final shipping costs are available at checkout.
How To Replace Ignition Coil Ford 1997-2002 Expedition
How to Replace Passenger Side Ignition Coil 1997-99 4-6L V8 Ford F-150
How to Replace Ignition Coil 1998-2011 Lincoln Town Car
How to Replace Drivers Side Ignition Coil 1997-99 V8 4-6L Ford F-150
How to Replace Ignition Coils 1991-2003 Ford Escort ZX2
Created on:
Tools used
Socket Extensions
Rust Penetrant
7mm Socket
Ratchet
1. Access the ignition coil
Pull the airbox off and out of the way.
2. Remove the ignition coil
Remove the four 7mm bolts.
Use penetrating oil to help remove the bolts.
Mark the spark plugs for reinstallation later.
Unplug the spark plugs.
Disconnect the wiring harness.
Remove the coil.
3. Install the new ignition coil
Clip in the wiring harness.
Bolt the four 7mm bolts in.
Plug the spark plugs back in, using your marks to put them in the correct locations.
Put the airbag back into place.
Brought to you by 1AAuto.com, your source for quality replacement parts and the best service on the internet.
Hi, I'm Mike Green, I'm one of the owners of 1AAuto. I want to help you save time and money repairing and maintaining your vehicle. I'm going to use my twenty plus years' experience restoring and repairing cars and trucks like this to show you the correct way to install parts from 1aauto.com The right parts installed correctly, that's going to save you time and money. Thank you and enjoy the video.
In this video, we're going to replace the ignition coil on this '97 Expedition or one of the ignition coils. These coils, Ford used on many cars and trucks with either the 4 cylinder they either used one coil for 4 cylinder, or V8 they use two coils. This thing can fit anything from a 2.0 liter 4 cylinder to a 5.4 liter V8. The only tool you'll need is a ratchet and a socket with extension, a 7mm socket. Only the location of the coils is going to vary depending on what vehicle you have.
To replace this driver side coil, first you need to kind of get your air box and just kind of bring it up and move it out of the way. Now that we got the air box out of the way there's four 7mm bolts here. One here, here, down here, and then back there you can't really see. You can see probably the top of my can of penetrant. I'm going to do the best I can to use this little red tube to spray some penetrant on all the bolts under here and that will make them a little easier to come out.
Ok, so I've run into little bit of a problem here. You can see that these two bolts came out and actually my third bolt over here that you can't see is out. This bolt here, the head was so rusty it actually stripped, so what I'm going to do I'm going to take a marker and I'm going to start with the one closest to me. Mark that as one, two, three. Make sure we got two marks there, one, two three, and the one without marks is the fourth one. That way I know the number one stared closest to me and then clockwise around. Now I can unhook these. Now what I'm going to do, I'm actually just going to take my coil, and unfortunately on a rusty bolt in a truck like this, it's kind of the only way. What I did is I just broke that bolt. I'll be able to put my coil back on with three bolts and, not ideal, but it will hold it just fine. Hope that when you're doing your truck, it will all come apart easy. But if not, if you lose one bolt, it'll be ok.
Ok so I'm ready to bolt in my new one, I've got a little bit of a problem here. This one bolts on, on top here where our broken bolt went so I can't quite get it there so what I'm actually going to do is I'm going to put this clip on right here and then I'm going to put the coil on top of it so it's pinched down in there, then I'll start my bolts. I'll get these going and I'll tighten them up and we'll be all set. Plug this in and then these will kind of settle down right where they were anyways. There's my number one mark very close to me. That's got three marks on it, two marks. Last but not least, this guy has no marks. Now we can start her up and make sure everything's running good. Put the air box back here. Everything sounds good!
We hope this helps you out. Brought to you by www.1AAuto.com, your source for quality replacement parts and the best service on the internet. Please feel free to call us toll free 888-844-3393. We're the company that's here for you on the internet and in person.
Tools used
Socket Extensions
Flat Blade Screwdriver
7mm Socket
Ratchet
1. Transferring the Ignition Coil Wires
Hold the new ignition coil pack next to the old ignition coil pack
Pop one ignition coil wire off the old coil pack
Pop the wire onto the corresponding spot on the new coil pack
Repeat these steps for the remaining three ignition coil wires
Put the new coil pack aside
2. Removing the Ignition Coil
Disconnect the ignition coil wiring harness
Remove the four 7mm bolts from the ignition coil
Pull the ignition coil off the engine
Pull the ignition coil wiring clip out of the coil
3. Installing the Ignition Coil
Start the four 7mm bolts into the ignition coil
Put the new ignition coil into place
Tighten the four 7mm bolts
Connect the ignition coil wiring harness
Hi, I'm Mike from 1A Auto. We've been selling auto parts for over 30 years. We're dedicated to delivering quality auto parts, expert customer service, fast and free shipping, all backed by our 100% satisfaction guarantee. Visit us at 1AAuto.com, your trusted source for quality auto parts.
Your passenger side ignition coil is right here on the front of the engine, on the passenger side. The best way to do this is to start by holding your new ignition coil in its place and pulling the wires off one at a time, so that you don't get them mixed up. All right, there's one. There's two. There's three, and the last one. Make sure they're fully snapped on. With those on the coil, you can set it aside.
Now you're going to want to remove the plastic electrical connector from the side of it. You can do that with your flat tip screwdriver. If you slide it in the upper and lower tabs, it allows you to pull the connector off, just like that. The ignition coil has four bolts holding it to the engine itself. They're seven millimeters. There's two on the top, and then on the bottom. You can't see them, but they're on the opposite corners. We're going to start with the bottom ones, because they're the most difficult. Use your 7mm socket with an extension. With all four bolts loose, you should be able to hopefully just pop this off from the bracket. Nope, one of them's not quite there. There we go. On the bottom front corner, there's actually another little device hanging off the screw, so you have to pull the screw completely out.
At this point, you can take your new coil, and put the screws into the new coil. Remember the bottom front one is a special one. We'll put it right in place, and then start off by hand tightening all of the screws, because you don't want to cross-thread them. That'll make for a very bad day. Now you can use your 7mm ratchet to get on the bolts. I like to start with the bottom, because I do all the most difficult stuff first. The last part of the process is to snap the connector back onto the coil, just like that.
Thanks for watching. Visit us at 1AAuto.com for quality auto parts, fast and free shipping, and the best customer service in the industry.
Tools used
Socket Extensions
8mm Wrench
7mm Socket
Ratchet
1. Disconnect your battery
Use an 8 mm wrench to disconnect your negative battery terminal
2. Remove the ignition coil
Unbolt the ignition coil with your 7 mm socket, ratchet and extension.
Unplug the wiring harness
3. Install the new ignition coil
Bolt the ignition coil down with your 7 mm socket.
Reconnect the wiring harness.
4. Service the rest of the ignition coils.
Repeat steps 2 and 3 until you have serviced all the coils.
Reconnect your negative battery terminal with your 8 mm wrench.
Brought to you by 1AAuto.com your source for quality replacement parts and the best service on the Internet. In this video we're going to show you how to remove and install a new coil in this 2011 Lincoln Town Car. This has a 4.6L, the same as many of these vehicles. The tool you'll need is a 7 mm socket with a ratchet and extension.
With your 8 mm wrench disconnect your negative battery cable.
Okay, replacing your coil and spark plugs is pretty easy. I'm going to show you on this side; because, it's easier to film and get to. The other side is just as easy. You do just need to remove your intake hose which is three clamps and a couple of hose connections on the back and you remove that whole intake hose and get to your coils pretty easy. Okay, so the coils are held in place by a 7 mm bolt. Get the socket ratchet down on there. It can be a little tough to break loose. I'm just going to get my socket off of here before I get too far. Okay, this connection you just reach underneath and there's a little tab right here. Squeeze that tab and the harness pulls loose. You can just kind of pull your coil up and out like that. This happens to me a lot. I've removed a bolt but it twisted in the socket so it's now stuck. What I do I take a screwdriver or something that fits right up in there. Let's see here, and then I just drop it and basically that usually almost always gets the bolt from the socket. Just make sure you watch where it goes.
Okay original coil. New coil from 1A Auto. You can see pretty much all the same. It has the same connector and everything. Put it right down in. Press it in. Okay your 7 mm bolt. Reconnect your lead, you're all set. Just repeat that for the other seven cylinders. Then reconnect your battery and your engine should be purring like a kitten.
We hope this helps you out. Brought to you by www.1AAuto.com. Your source for quality replacement parts and the best service on the Internet. Please feel free to call us toll free 888-844-3393, we're the company that's with you on the Internet and in person.
Tools used
Socket Extensions
Flat Blade Screwdriver
7mm Socket
Ratchet
1. Removing the Air Filter Box
Loosen the air intake hose clamp with a flat blade screwdriver
Disconnect the hose from the air filter box
Pop out the air filter box
Put the filter box aside
2. Transferring the Ignition Coil Wires
Hold the new ignition coil pack next to the old ignition coil
Pop one ignition coil wire off the old coil pack
Pop the wire onto the corresponding spot on the new coil pack
Repeat these steps for the remaining three ignition coil wires
Put the new coil pack aside
3. Removing the Ignition Coil
Disconnect the ignition coil wiring harness
Remove the four 7mm bolts from the ignition coil
Pull the ignition coil off the engine
Pull the ignition coil wiring clip out of the coil
4. Installing the Ignition Coil
Put the new ignition coil into place
Start the four 7mm bolts into the ignition coil
Tighten the four 7mm bolts
Connect the ignition coil wiring harness
5. Installing the Air Filter Box
Connect the air filter box to the hose
Push the air filter box pins into place
Tighten the air hose clamp with a flat blade screwdriver
Hi, I'm Mike from 1A Auto. We've been selling auto parts for over 30 years. We're dedicated to delivering quality auto parts, expert customer service, fast and free shipping, all backed by our 100% satisfaction guarantee. Visit us at 1AAuto.com, your trusted source for quality auto parts.
We're going to unscrew the clamp that's holding the air filter box in place, and once it's nice and loose like so, you can lift straight up on the air filter box and it will pop right out. You can see on the bottom it has these two posts that it sits in, and they slide right into these rubber grommets in the body itself. You can just set that aside and get it out of your way wherever it happens to fit. Right there looks like a perfect spot.
You don't want to mix up your coil wires, so what we're going to do is we're going to have the new coil just held here in place, and we'll pull the coil wires off one by one and snap them onto the new coil. That way you don't get them mixed up. Once that's done you can set the coil aside and we'll pull the old coil off.
To disconnect this connector you'll want to take a flat tipped screwdriver and kind of pry it in the upper tab and lean it back, and then you can do the same thing to the bottom and you can see it pops off just like that.
With the connector out of the way you'll use your 7 millimeter socket with an extension to reach the four bolts that hold the coil to the engine. With all four screws loose you should be able to pop it off the engine.
Then this one has the extra little device on here that you'll need to undo to get the coil out of the way.
Now you can pull your new coil right into place. Put this bottom screw in first, then you can do the other four as well and start threading them in by hand. With all four screws loosely started by hand, then you can go in with your 7 millimeter ratchet and extension and socket, and tighten them up.
Now we'll connect the connector on the side of the coil. All you have to do for that is push it right in and it will snap right into place.
Now you can take your air filter box and put it right back into place. Slide it in this end first, and then on the bottom you've got these two pins that you can push down into the body. Once it's connected at the body you can use your flat tipped screwdriver to tighten the hose clamp.
Thanks for watching. Visit us at 1AAuto.com for quality auto parts, fast and free shipping, and the best customer service in the industry.
Tools used
Socket Extensions
Flat Blade Screwdriver
7mm Socket
Ratchet
1. Removing the Ignition Coil
Move the accelerator cable aside
Remove the four 7mm bolts from the ignition coil
Disconnect the ignition coil wiring harness
Pull out the ignition coil
Note the order of the spark plug wires
Pull the spark plug wires off the ignition coil
2. Installing the Ignition Coil
Push the spark plug wires onto the ignition coil in the order noted in Step 1
Push the ignition coil into place
Insert the four 7mm bolts into the ignition coil
Connect the ignition coil wiring harness
Put the accelerator cable into place
Brought to you by 1AAuto.com, your source for quality replacement parts and the best service on the Internet.
Hi, I'm Don from 1A Auto. I hope this how-to video helps you out, and next time you need parts for your vehicle, think of 1AAuto.com. Thanks.
In this video, we're going to show you how to replace an ignition coil on this Ford ZX2. This has a 4 cylinder motor. This procedure is the same for a lot of fords with this 4 cylinder, two liter, dual overhead cam engine. The only tools you'll need are a 7 millimeter socket with a ratchet and an extension. You'll also need a small flat blade screw driver.
To get to the ignition coil, I'm going to pull the accelerator cable out of the way without bending it. Then I'm going to remove four 7 millimeter screws that are on either side of the coil. We're just using a 7 millimeter socket with a ratchet, and we'll speed up here as we take those screws off. You can see every once in a while we do switch to an extension on the bolt. You can use an extension it just makes it a little bit easier.
There are two ears on the connector that go to the coil. I'm using a pocket screwdriver to just gently pry between the connector and the ears. Pry them away from the connector to slip it off. With that done we can pull out the coil pack. As you can see here, we've got cylinders 1 and 3 on the top and 4 and 2 here. It's even labeled here on this one. If the new one doesn't come labeled either reference this video or take a picture of it. Mark it down the side, whatever way you think you will be able to remember it. The coil wires come off by squeezing the ears and wiggling them off.
To put the coil back in, I want to make sure I get my numbers lined up correctly. Just snap them back on. With that back in, I'm just going to make sure: 1, 3, 4, 2. What that 1, 3, 4, 2"? is referencing is the cylinder number and on this 4-cylinder if you start from left, which is the passenger side as your looking at the engine from the front, starting from left to right, it's number 1, then 2, then 3, then 4. Those are the cylinder numbers. They're numbered sequentially on the motor, but then when you hook them onto the coil you need to put them in the proper sequence so they fire in the right order. The coil can only go in one way. Put my 7 millimeter bolts back in.
It's pretty straight forward. Unbolt it, unplug it. Make sure you plug it back in the same way, as far as the spark plugs go. Obviously plug the power and feed connector back in. Then bolt it back in and tighten it down.
We hope this video helps you out. Brought to you by www.1AAuto.com, your source for quality replacement parts and the best service on the Internet. Please feel free to call us toll-free, 888-844-3393. We're the company that's here for you on the Internet and in person.
ICA61697
In Stock
Product Reviews
Loading reviews
5.00/ 5.07
7 reviews
5 Stars
4 Stars
3 Stars
2 Stars
1 Star
7
0
0
0
0
Danquris
November 19, 2018
There were good quality but need a how to video to reinstall the new crankshaft position sensor on a 93 Ford Ranger 2.3 liter engine
Boosted performance
A
January 23, 2020
I cannot believe the difference these coil packs made on my 00 Ranger. The truck has the 2.5l 8 plug motor so I needed 2 of these packs. The take off and top end power improved greatly. I was quite surprised because I thought coil packs either worked or they didn't. Well apparently they lose performance over time because these new ones are fantastic. I love 1aauto's diy videos too. Very happy with purchase.
Ignition Coil for my 97 Ford Escort
Romeo
June 3, 2021
My Ignition Coil is already overdue for replacement and I decided to install this Coil. The result was very impressive, I can tell the difference after the installation. My car is now running very smoothly, the engine is very quiet. It runs like a new car again. Thank you 1A Auto.
Fixed my cylinder 2 miss fire
Everett
November 19, 2021
Just what I needed. Easy install
I would buy from 1Aauto again like I just did with all around shocks. Great job gentalmen.
James
August 19, 2023
All I have to say was that the delivery was right on time, the coils were packed very well and installed perfectly. I also at the time did a tune up ( new wires and plugs NGK) and the 96 ranger ran beautiful.
and still is with 252246 miles.
Adam
September 19, 2023
Did what it was supposed to do! Good quality product for sure!
Perfect match
michael
September 27, 2023
Dropped right in and was an exact match to the old part.
Customer Q&A
can i use this coil pack on either driver side or passenger side of my 1999 4.6 liter ford f150?December 15, 2021
Ruben N
10
Yes, this part will fit your vehicle.
December 15, 2021
Emma F
10
I believe you can. I think they are the same on each side. I would compare the old ones to the photos on the website.
December 15, 2021
Justin H
Is it necessary to replace both coils, I have a 96 ranger 2.3L with 8 sparkplugs?July 28, 2023
James D
10
Might as well while youre at it
July 28, 2023
Jacob P
10
No. You can replace just one coil. I did that on my car and it runs fine.
July 29, 2023
Michael K
10
It is not necessary to replace both, but it is recommended! If the coil is still in good condition you would not need to replace it.
July 29, 2023
Meghan R
Customer service
877-844-3393
Monday - Friday 8:00am - 9:30pm ET Saturday - Sunday 8:00am - 4:30pm ET
Mazda is a registered trademark of Mazda Motor Corporation. 1A Auto is not affiliated with or sponsored by Mazda or Mazda Motor Corporation.See all trademarks.
Enter Vehicle Year Make Model
Specify your vehicle's year, make and model to guarantee fit.
Year
Make
Model
Options
Drivetrain
This part doesn’t fit a . Select from parts that fit.