Hi, I'm Mike from 1A Auto. We've been selling auto parts for over 30 years.
Hey everyone, Sue here from 1A Auto and today on our '06 Honda Element we're going to be replacing a serp belt tensioner. If you need that part or any other part for your car, click on the link below and head on over to 1Aauto.com.
Going to take two of these plastic pins out, there's one. The plastic clips on this car are all busted. They have been since the first day so I'm replacing all of them. Hopefully you don't have this frustration and yours are working properly. I never thought I'd say make sure you're wearing safety glasses when you take plastic clips off. Now with all those clips out of the way we can bring this plastic shield down enough that we can get to the belt, so now I'm going to bring the vehicle down and go from the top.
I'm going to be removing this front mount. I already have a floor jack underneath on this end with a wooden block on it and I'm just snugging on top of the oil pan. Not a big fan about using the oil pan but we're not going to actually be jacking or hoisting anything up, we're just supporting it and we're probably going to move it up like two inches.
First thing I'm going to do is disconnect the three mounting bolts for this and that's a 17 millimeter socket. I already took the liberty of spraying these things down because it doesn't look like they've been off for years. You want that engine supported right now even though you're just loosening these up because the engine will actually start to ... As the mount is on, it will start to pivot down and the bolts will get pressure on them and you could end up crossing threads, stripping it actually.
So I could take the nut and the washer off. Well, there's no washer. Take the nut off the side that's not on this mount and I can still work on the other two bolts. Now I can take the nut off that long stud. This side has a washer definitely. There we go, several washers, and then the bolt. Now with the engine supported I'm going to pull this ... I have to take this ground strap off, 10 millimeter. Now we can really see the serp belt tensioner and how easy it's going to be and the movement that we have.
So a 14 millimeter wrench and I'm going to put pressure on it. Actually, I'm going to pull on it and that releases the tension. Now I can slide the belt off, bring that tensioner down, get the belt out of my way. Now there's a crank down below and the AC compressor and that's why I took that plastic splash shield off earlier. Sometimes because the belt is so wide you just have to twist it and guide it up, pull it out.
There's two mounting bolts to the power steering pump and they're a 12 millimeter socket. They're really easy to get to. There's one right there and then one directly below this pulley. I can just feel it with my hand, so that's a 12 millimeter socket. Once you have those broken free, so now when I take this top bolt off I'm going to set it aside and mentally make a mental note that that's for the top before I pull the bottom one out and then I will make sure that they are the same length before I mix them. This is not something you want to be feeling with what you can't see and you're wondering why it wouldn't tighten up when you put it back together. That's too short.
Let's see if they're the same length, and they are, they're identical so now I know I can use either one on the top or bottom. Now just grab your power steering pump and just set it aside. Clear up, clearly out of the way and here we go. There is a hidden mounting bolt on this and it's right inside here so there's one in front, one inside there, and then one below this pulley. They're all a 12 millimeter socket. One right here. I almost physically cannot see any of these, I can just feel them. I do not want to take the pulley off because that would mean that I would have to take the pulley off the new one to install it and I don't want to do that.
I think I see ... I'm going to need just a slight extension I think. So I ended up using a one inch extension with a 3/4 inch deep socket. Now I can get in there easy. I'm going to get that front mounting bolt out of the way, set that over here. I'm going to grab the one in the back. Take that back mounting screw out of the way or bolt. Now the last one's a center one. That's the longest, can lift it right up out of the way.
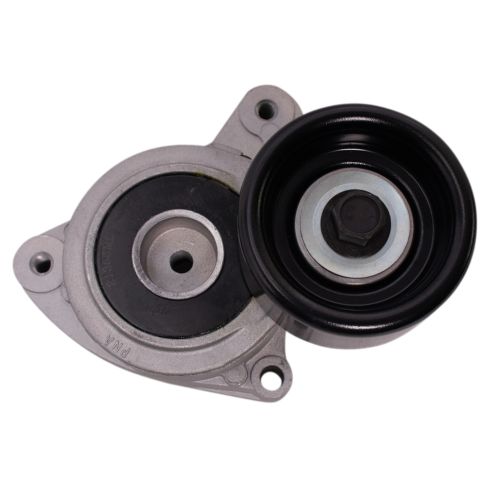
Here we have our new serp belt tensioner from 1A Auto. It comes with already mounted pulley bolted on there. This is the factory serp belt tensioner and you can see a lot wrong with this one. They're identical in design except that this one is old and worn out. You can see when I go spin this pulley it stops because it's a sealed bearing and it's not worn out yet. This one the pulley is rusted causing the belt to break down on the back side of the belt and it makes a lot of noise and the bearing is wasted. You can hear that.
If you need this part or any other part for you car, click on the link below and head on over to 1Aauto.com.
So now to install it I'm going to reverse procedure. I'm going to put the center bolt in first that way it will at least keep it centered and will keep the other two mounting holes. Put the front one in first and now the back one. Which if you look you've got them all started, make sure they're not cross threaded and we can take our 12 millimeter socket and start tightening them up.
Now that I have all three mounting bolts snug down I'm going to torque them to the spec and it is 16 foot-pounds. Just double check, it's not that tight but there we go. Now we're ready to put the power steering pump back. This has just the two mounting bolts. We'll keep the threads, install them by hand and then the last mounting bolt is the one on the bottom. Locate it. Tighten that one down.
Once I have both mounting bolts snug down, the torque specs is the same as the tensioner, 16 foot-pounds. Double check. Now we're ready to ... I think I'm going to install the bolts before I put the mount on.
Even though we looked this belt up and I hoped ... You know, I put in that is has power steering AC, I always double check before I go in there and get all frustrated and I basically put my two thumbs in and confirm that they're pretty much the same length. There's no obvious difference here other than that this is worn out and this has got some kinks in it from packaging so now we're clear to go ahead and install this.
So I'm guiding the new belt, keeping it flat as I can so that I can guide it down between the actual car frame or body should I say, and the engine block. These can be a bit frustrating. So I'm going down below and I'm going to make sure that I can root it around the AC and the crank and that I can take the top part of it and bring it around the water pump pulley.
Once you have wrestled with that belt and got it all lined up, can open the top here and the new tensioner is a 15 millimeter, not 14 and you're going to pull the tensioner. Before I let go of this tension I'm going to make sure the belt isn't all grooves, it's not misaligned, and I'm going to bring that tensioner down.
Now it's time to reinstall the mount. First thing I'm going to do is take that ground strap off and line up everything the best I can here before I lower the engine. Just going to snug that, make sure it's out of my way and now with everything pretty much ... At least it's on the long stud. I'm going to lower that engine slowly and let it down in small portions, make sure it lines up. I'm going to put that bolt in before I let that jack completely down and I'm going to thread those other two bolts on ... Nuts on. I'm going to add the washers that were on there and put those on.
Now I can just thread all these ... The bolts and the two nuts down with my 17 millimeter socket and don't forget to tighten up that 10 millimeter. Now it's clear to let the engine the rest of the way down and remove your jack. Now I've got new clips to put in the splash shield. Just line up the holes and push the tab in. There was three that we took out to do the dry belt. There we go.
Thanks for watching. Visit us at 1Aauto.com for quality auto parts, fast and free shipping, and the best customer service in the industry.