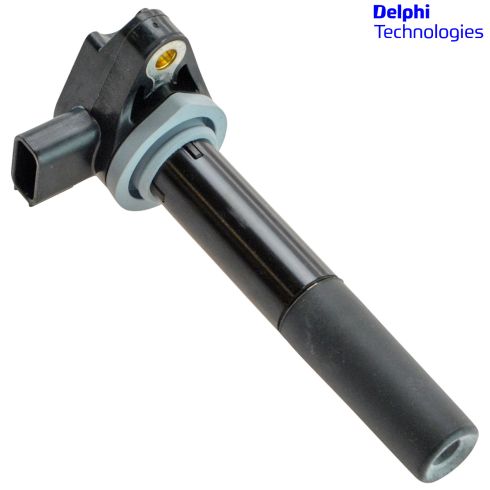
The ignition coil pack is a crucial part of your ignition system. It's function is to convert the 12 volt power of your vehicle's electrical system in to 35,000 or more volts. This produces a high intensity spark at the spark plug which then ignites the fuel in the cylinder. Coils in general will wear out over time.
Why Delphi?
As an Original Equipment Supplier, Delphi Automotive products from 1A Auto come directly from the source. You wont have to worry about going to the dealership for Original Equipment - these parts are the exact same as the original. Delphi products come with the same quality from the dealership at a lower cost to you.
Item Condition:New
Lifetime Warranty
This item is backed by our limited lifetime warranty. In the event this item should fail due to manufacturing defects during intended use, we will replace the part free of charge. This warranty covers the cost of the part only.
Returns: Parts with electrical components cannot be returned once installed.
FREE Shipping is standard on Orders shipped to the lower 48 States (Contiguous United States). Standard shipping charges apply to Hawaii, Alaska and US Territories. Shipping is not available to Canada.
Expedited is available on checkout to the United States, excluding Alaska, Hawaii and US Territories as well as P.O. Boxes and APO/FPO/DPO addresses. Final shipping costs are available at checkout.
How to Replace Ignition Coil 1999-2010 Honda Odyssey
How to Replace Ignition Coil 2001-05 Honda Civic
Created on:
Tools used
Socket Extensions
Flat Blade Screwdriver
T40 Bit
10mm Socket
Ratchet
1. Removing the Engine Covers
Remove the four 10mm bolts from the upper engine cover
Lift off the upper engine cover
Loosen the two plastic clips on the lower engine cover with a flat blade screwdriver
Lift off the lower engine cover
2. Removing the Ignition Coil
Disconnect the ignition coil wiring harness
Remove the T40 Torx bolt from the ignition coil
Pull the ignition coil up and out
3. Installing the Ignition Coil
Push the ignition coil into place
Insert the T40 Torx bolt into the ignition coil
Connect the ignition coil wiring harness
Repeat Steps 2 through 3 for the remaining coils
4. Installing the Engine Covers
Push on the lower engine cover
Tighten the lower engine cover clips with a flat blade screwdriver
Push on the upper engine cover
Insert the four 10mm bolts into the upper engine cover
Brought to you by 1AAuto.com, your source for quality replacement parts and the best service on the Internet.
Hi, I'm Mike from 1A Auto. I hope this how-to video helps you out, and next time you need parts for your vehicle, think of 1AAuto.com. Thanks.
In this video, we're going to replace an ignition coil on this 2003 Honda Odyssey. We'll just do one, but all six cylinders are basically the same procedure. The front side's very easy. Their backside is easy as well, but you just can't see things as well. You have to do it a little more by feel. The only tools you'll need are a 10 millimeter socket with a ratchet and extension, a flat blade screwdriver, and a T40 Torx driver, and Honda recommends you replace these coils at a hundred thousand miles.
I have a 10 millimeter socket, and I have an extension because one of these, anyways, goes down in there, but there are four bolts that hold the engine cover on here. Now you need a flat blade screwdriver, and there are basically two little clips. Turn them a quarter of a turn counter-clockwise. Now just make sure that they come out and there is another plug on the end here that you have to pull up just firmly and pull that out. Now I'm looking at it from the passenger's side and you can see the coils right down here: one, two, three. Then for the rears, there's actually there's no cover and you can see the tops of the coils. There's one here, two, and three. There's plenty of room to reach back in there and take them out.
First thing, each one has a harness and there's just a little tab that you press in and disconnect the harness. I'm just going to do one to show you. I'm using a T40 Torx bit and a socket, and there's plenty of room right in here. Just loosen this bolt up. I'm going to remove it, and then grab your coil, shake up and down a little bit, pull it all the way out.
Here's a new coil from 1A Auto. It's an exact replacement. Put it in, right down on. You'll feel some resistance, just push it down on firmly and put your screw in. Start it with your fingers; T40 bit back in and tighten on their firm, not too tight, though. Reconnect and repeat for the other cylinders.
Now you bring this down. You put your thumb on here. You can see that go right in, see these plugs go right in. Push it down on, push that into place. Okay, and turn these a quarter turn clockwise. Put the engine cover back in place. I'll spare you some of this. I'm just tightening up those bolts. I basically just put them in by hand first, make sure they're going in correctly. Then just tighten them up firm. You don't have to have them really that tight at all, and you should be all set.
We hope this video helps you out. Brought to you by www.1AAuto.com, your source for quality replacement parts and the best service on the Internet. Please feel free to call us toll-free, 888-844-3393. We're the company that's here for you on the Internet and in person.
Tools used
Flat Blade Screwdriver
10mm Wrench
10mm Socket
Ratchet
1. Removing the Ignition Coil
Turn the two clips on the engine cover with a flat blade screwdriver
Pull off the engine cover
Disconnect the ignition coil wiring harness
Remove the 10mm nut from the ignition coil
Pull the ignition coil out of the engine
2. Installing the New Ignition Coil
Push the ignition coil into the engine
Connect the ignition coil wiring harness
Fasten the 10mm nut onto the ignition coil
Repeat these steps to replace each ignition coil
Put the engine cover into place
Tighten the two clips on the engine cover with a flat blade screwdriver
Brought to you by 1AAuto.com, your source for quality replacement parts and the best service on the Internet.
Hi, I'm Mike from 1A Auto. I hope this how-to video helps you out, and next time you need parts for your vehicle, think of 1AAuto.com. Thanks.
In this video, we show you how to remove and reinstall the coil. Actually in these vehicles, the 1.4 and 1.6 liter, there's a coil per cylinder. It's recommended to replace these every 100,000 miles. For this, it's pretty easy. All you need is a flat blade screwdriver and a 10 mm wrench or a socket with a ratchet.
Replace the coils. You probably should do it every 100,000 miles. It looks like, actually, this car has been done pretty recently. It's pretty clean. It's pretty straightforward. There are a couple of little locks up here and this piece comes off. There's a harness here. Use your screwdriver and push on the tab up closer to the top and the harness disconnects from each one. Then, you need a 10 mm wrench or socket and ratchet to undo the nut. Pull firmly on the coil, and it comes up out.
Like I said, this looks fairly new. Put it down in. If you want, you can actually connect your harness first. Push the coil down on, put your nut back on and then tighten it up firmly. Like I said, probably every 100,000 miles replace all four. Put this back down and then you go, and they turn 90 degrees to lock in place.
We hope this video helps you out. Brought to you by www.1AAuto.com, your source for quality replacement parts and the best service on the Internet. Please feel free to call us toll-free, 888-844-3393. We're the company that's here for you on the Internet and in person.
GN10168
In Stock
Product Reviews
Loading reviews
There are no reviews for this item.
Customer Q&A
No questions have been asked about this item.
Customer service
877-844-3393
Monday - Friday 8:00am - 9:30pm ET Saturday - Sunday 8:00am - 4:30pm ET
Honda is a registered trademark of Honda Motor Co., Ltd. 1A Auto is not affiliated with or sponsored by Honda or Honda Motor Co., Ltd.See all trademarks.
Enter Vehicle Year Make Model
Specify your vehicle's year, make and model to guarantee fit.
Year
Make
Model
Options
Drivetrain
This part doesn’t fit a . Select from parts that fit.