WARNING: This product can expose you to chemicals including Lead and Lead Compounds, which are known to the State of California to cause cancer, and birth defects or other reproductive harm. For more information, go to www.P65Warnings.ca.gov.
Lifetime Warranty
This item is backed by our limited lifetime warranty. In the event this item should fail due to manufacturing defects during intended use, we will replace the part free of charge. This warranty covers the cost of the part only.
FREE Shipping is standard on Orders shipped to the lower 48 States (Contiguous United States). Standard shipping charges apply to Hawaii, Alaska and US Territories. Shipping is not available to Canada.
Expedited is available on checkout to the United States, excluding Alaska, Hawaii and US Territories as well as P.O. Boxes and APO/FPO/DPO addresses. Final shipping costs are available at checkout.
How to Replace Vapor Canister Purge Valve Evap Solenoid 2006-10 Honda Civic
Created on:
Tools used
Gloves
Socket Extensions
14mm Socket
Painter's Tape
10mm Socket
Ratchet
Needle nose pliers
Trim Tool Set
Pick
1. Removing the Cowl Cover
Open the hood
Prop the hood in the maintenance position
Pull the weather seal off the cowl cover
Remove the three plastic pins from the cowl cover with trim tools or needle nose pliers
Pop the cowl cover out of the cowl
Disconnect the windshield washer house coupler
2. Removing the Cowl
Apply rust penetrant to the 10mm bolt on each side of the cowl
Remove the 10mm bolt from front of each side of the cowl
Apply rust penetrant to the two 12mm bolts on each side of the cowl
Remove the two 12mm bolts on each side of the cowl
Apply rust penetrant to the 10mm bolt on the rear of each side of the cowl
Remove the 10mm bolt on the top of each side of the cowl
Apply rust penetrant to the 10mm bolt in the middle of the cowl
Remove the 10mm bolt in the middle of the cowl
Pull the cowl forward and out of the engine bay
3. Removing the Vapor Canister Purge Valve Evap Solenoid
Locate the valve near the rear atop of the throttle body
Loosen the hose clamp
Remove the hose from the valve
Disconnect the wiring harness
Remove the two 8mm bolts from the purge valve
Remove the purge valve
4. Installing the Vapor Canister Purge Valve Evap Solenoid
Place a tiny layer of white grease around the o-ring
Insert the purge valve into place
Tighten the 8mm bolts to the purge valve
Connect the wiring harness
Connect the hose to the purge valve
Tighten the hose clamp
5. Installing the Cowl
Put the cowl into place
Install the 10mm bolt on the front of each side of the cowl
Use masking tape to hold a 10mm bolt in your socket
Install the 10mm bolt in the middle of the cowl
Install the 10mm bolt at the rear of each side of the cowl
Insert the two 12mm bolts on each side of the cowl
6. Installing the Cowl Cover
Clean the bottom of the windshield with glass cleaner
Connect the windshield washer hose coupler
Put the cowl cover into place
Pop in the cowl cover clips
Push the three plastic pins into the cowl cover
Push the weather seal onto the cowl cover
Hi, I’m Mike from 1A Auto. We’ve been selling auto parts for over 30 years!
We're going to open our hood. There are two positions for the prop rod. There's a normal position and then there's also a further maintenance position. So I'm going to set it in that one. Get a little more access to get this cowl panel off.
I'm going to start by removing this weather seal. Simply just lift it and pull it right off. Let me put that aside so we can reuse it. To remove this upper part of the cowl cover, there's three clips. There's one here, one in the center, and then one on the passenger side. So I'm going to use a clip prying tool. Slide it under there. You can kind of feel the clip underneath. Just try to pop it up. I'm just going to use the needle nose pliers to squeeze the clip together underneath. Pop it up. I'm going to lift up this center part. Just kind of pull it off of the metal. Pull it out and up. It's got clips to it. Lift it straight out. It's got a bunch of clips. Get the other side free. This one's just kind of stuck in it. Push down here. I'm going to lift up here. There we go. Kind of roll it forward because the washer, window washer, hose is underneath. Pop it out.
Let's see. There's a coupler right here, so I will disconnect it right here. Clip that back in. You can see all of the clips that are holding this in. We take us out. Move this metal cowl piece that's underneath the plastic. There are two 12 millimeter bolts on both the driver's and the passenger side, and then a 10 millimeter bolt in front of those on bolt the driver and the passenger side.
I'm going to start with the 10 millimeter bolts. Put that bolt aside. These look a little bit rusty, so I'm going to spray some rust penetrate on them. Again, I'm working on the 10 millimeter one first. Switch to a 12 millimeter socket to remove these two bolts. I'm going to spray some rust penetrate on these. Now I move them out a little bit. I'm going to turn them back in, because I want to work the rust penetrate into the threads. Now I'm going to start turning them back out. I may have to repeat this a couple of times to get them to come out smoothly. And I've gotten it out without breaking it.
And the same over here with some rust penetrate. We're going to just do the same thing. Go in and out, applying rust penetrance, just trying to work it in the threads so these bolts come out smoothly. In addition to these bolts, there's one bolt at the rear that's sort of vertical on either side, both the driver's and the passenger side. I'm going to spray some rust penetrant on that one because we can see the backside of it. This is a 10 millimeter. Got it broken free.
I'm going to reach in there. I'm going to remove it with my hand. And do the same for the bolt on the other side. One final 10 millimeter bolt directly in the middle. Spray some rust penetrant in there as best I can. Just trying to get that bolt out and to fall at least on this cowl piece. Didn't sound like it went all the down, so maybe it's still caught in the cowl piece.
I'm going to carefully pull the cowl piece out. Actually, I can see the bolts. Fell down here under the wiper transmission. So I get it. You want to be careful removing this. It’s got some thin edges on here. You could cut your hands, so just be careful taking this out of here and handling it. We're going to put it aside, because we can definitely reuse this obviously.
Now, we have access to the back of the engine. EVAD purge valve is located here on top of the throttle body. To remove it, take some needle nose pliers and squeeze this clamp out of here. This one is stuck on there. I'm going to take this pick and just work it under the hose to loosen the hose from the EVAD purge valve. Disconnect the electrical connector. Push and unlock. Actually, it's clipped into here. To give me a little more room to move, I'm going to pop the harness out of here. Push it in. Pull it off. There are two 8mm bolts holding it in. Going to loosen those with an 8mm socket. Carefully remove these. Don't drop them. Pull the valve out. It's got an O-ring sealing it in there. Wiggle it back and forth and pull out at the same time.
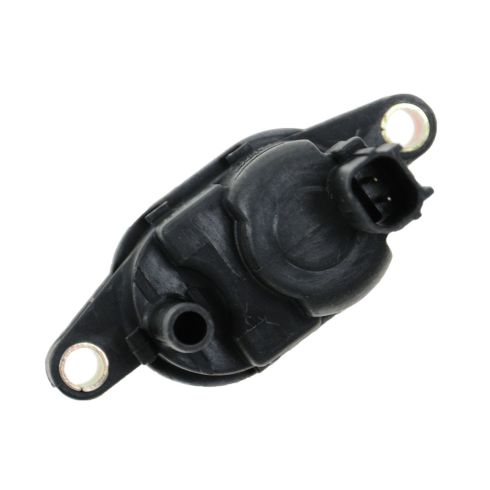
Here's our original EVAD purge valve from our vehicle, and brand new one from 1AAuto.com. Comes with a new O-ring on there. Same mounting holes. Same tube port. Same style electrical connector. This will fit in and work great in our vehicle.
To help with the install, taking a tiny bit of white grease. Going to put it around the O-ring. This way it slides back into place easier. Install it. Push it into the port. Get the screw installed. Don't worry if it doesn't push all the way in. These screws are pretty long. We're going to use those evenly. Just going back and forth, tightening it evenly. Once I feel it get tight, I'm just going to stop, because they're just going into aluminum and through plastic. I don't want to crack or strip them. Plug the electrical connector back in. It's key to only go in one way. You'll feel it click. You push this harness back into this spot here. Take our hose and put it back in place. Now, we're going to reinstall the clamp.
We're reinstalling the lower cowl piece. Slip that right into place. I'm going to start by installing the 10 millimeter bolts back in place. Since the bolts in the middle is really in there deep and I don't want to drop it, I'm going to take some masking tape and just stick it on the bolt head. It just helps the bolt stay in there. I'm going to use a driver handle with my extension. It's a little more control on it. I'm going to have to move this around a bit. If the tape stayed there no big deal. I'm going to install this one that's in here.
Now I'm going to work on the 12 millimeter bolts that were in here. Before I put the plastic trim back, I'm just going to take some glass cleaner and just clean up the base of the windshield. I'm going to reinstall the plastic trim. Don't forget to reconnect your windshield washers because otherwise they won't work for you. It will just be spraying windshield washer fluid underneath here. Plug the connector back in. Flip this back up. Get it lined up in place. Push your clips down.
Get this side lined up. Just got to reinstall the clips. One on the outside there. One in the middle. One here on the driver's side. I was just going to reinstall our under hood seal. You can see it's been contoured. It matches up with the contour of this. I'm going to put it in the same exact way. It just pushes right down over the plastic, just along, push it in place.
Thanks for watching. Visit us at 1AAuto.com for quality auto parts, fast and free shipping, and the best customer service in the industry.
911-763
In Stock
Product Reviews
Loading reviews
5.00/ 5.02
2 reviews
5 Stars
4 Stars
3 Stars
2 Stars
1 Star
2
0
0
0
0
Perfect fit and delivered on time
Joel
May 14, 2019
Exact replacement. Video enabled a dad and daughter project. Daughter saved $300. Dad got priceless memories.
Always the best
Sean
November 17, 2024
I have always had good experiences with the orders, delivery, and products. Thank you for providing such a good service!
Customer Q&A
No questions have been asked about this item.
Customer service
877-844-3393
Monday - Friday 8:00am - 9:30pm ET Saturday - Sunday 8:00am - 4:30pm ET
Enter Vehicle Year Make Model
Specify your vehicle's year, make and model to guarantee fit.
Year
Make
Model
Options
Drivetrain
This part doesn’t fit a . Select from parts that fit.