Replaces


Frequently bought together
Part Details
About TRQ:
TRQ is a trusted brand dedicated to making every repair a success story by combining premium parts with easy installation. Each TRQ part is engineered by a team of automotive experts to meet or exceed OEM standards, delivering enhanced performance and maximum longevity. With rigorous in-house testing, the brand ensures superior fit and function across every product line. TRQ also provides customers with best-in-class, step-by-step installation videos—so you can complete repairs with confidence, whether you're a first-time DIYer or an industry professional.
Product Features
TRQ suspension kits are manufactured using premium raw materials and coatings for extended service life. Each TRQ suspension component is designed to be a direct, maintenance-free replacement to the stock unit. To extend the life of your steering and suspension components, TRQ recommends replacing components in pairs, sets, or kits. All products are fit and road-tested in our Massachusetts R&D facility to ensure we deliver on our promise of Trusted Reliable Quality.
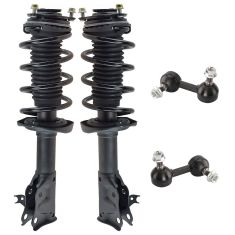
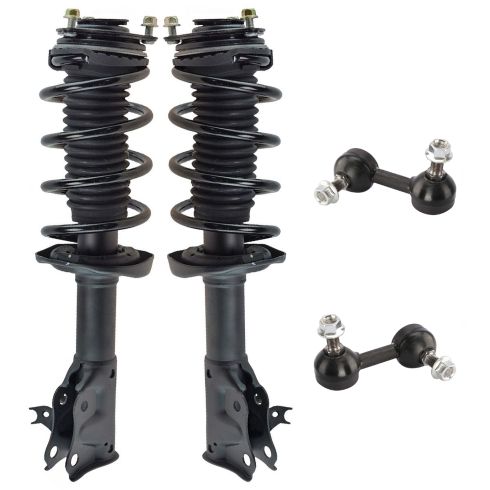
Replacing struts used to require specialized tools to compress, remove, and transfer the old spring and mount. Our Pre-assembled, complete strut & spring assemblies come with all new parts and make the job much quicker and easier for the do-it-yourself mechanic.
Strut & spring assembly contains:
Our steering and suspension components are pre-greased and sealed for long life and do not require the extra maintenance typically required by greaseable versions.
Attention California Customers:
 WARNING: This product can expose you to chemicals including Chromium (Hexavalent Compounds), which is known to the State of California to cause cancer, and birth defects or other reproductive harm. For more information, go to www.P65Warnings.ca.gov
Lifetime Warranty
This item is backed by our limited lifetime warranty. In the event that this item should fail due to manufacturing defects during intended use, we will replace the part free of charge. This warranty covers the cost of the part only.
FREE Shipping is standard on orders shipped to the lower 48 States (Contiguous United States). Standard shipping charges apply to Hawaii and Alaska.
Shipping is not available to a P.O. Box, APO/FPO/DPO addresses, US Territories, or Canada for this item.
Expedited is available on checkout to the United States, excluding Alaska, Hawaii.
Final shipping costs are available at checkout.
Created on:
Tools used
Hi, I’m Mike from 1A Auto. We’ve been selling auto parts for over 30 years!
With the vehicle on the ground, use a 19mm socket and a breaker bar to loosen the lug nuts. With all that loosened, and now we're going to raise and support the vehicle. The lug nuts are loosened. I should be able to use just the socket and finish removing them, and then I can take the wheel off. Last nut is removed, so I can take the wheel off.
Start by unclipping the EMS wire from the strut. Use some needle-nosed pliers to push together these tabs. Pull that out of the way. Take some rust penetrant, and spray on the bolt here that's holding on the brake line. It needs a 12mm box wrench to loosen this. Switch to a 12mm socket extension ratchet. Put this bolt aside. That can sit just like that. Now, loosen the strut bolts. Let’s spray some rust penetrant on here.
These bolts don't affect alignment, so we can remove them without fear of having to realign the car again. Using a 19mm socket and a larger breaker bar. I'm just going to try to loosen the nut first. And use a short extension—that's it there. Breaker bar in. It's usually easier to loosen these on the nut side rather than the bolt head side. And, see that's loose enough now that it's turning that bolt head. The bolt head is 17mm, so I'm going to use a 17mm socket on a breaker bar.
I'll take a ratchet. The ratchet will just make removing it quicker. Take that off and put it aside. Do the same for the bottom one. Finish taking it off with my fingers. Slide the bolt out. That one's in there a little tighter, but that's okay. I'm going to leave it in for now. I'm going to go up top and loosen the top strut bolts, and by leaving this bolt in, when you loosen the top strut bolts, the strut won't just fall down.
These are the top of the strut. There's this little door in the plastic cowl cover here. You just lift up on the rubber weatherstripping. You just kind of pull this out, and it'll pop out. Just put that up there. There's three nuts on the studs that are holding the strut up in the strut tower. These are 14mm. Use a 14mm socket and a ratchet with a bit of a swivel head. Can't quite fit a deep socket in here. With that one loose, move to the back. And there's one, it's in here. It's a little harder to see.
Let's go round and loosen them all. Got this one loose enough, I'll take it off with my fingers. Try not to drop it down the back. There it is. Plastic's really close to this one, so it kind of gets a little caught in the plastic trim. You just kind of have to pop it up and out of it. Need the last nut here. So as you loosen this, the strut might actually lower down out of the strut tower. The strut's loose. It'll come right out of there. I'm just kind of work the bolt out, just like that. Put that aside. Pull off the knuckle, turn it, and pull out the wheel well.
Right, so this strut's in good shape. We’re going to reuse it, but if you need a strut assembly, you can buy a brand new one from 1AAuto.com. We sell it as an assembly with the spring, top hat, everything all one piece. You don't have to deal with swapping over the spring, you can just take this out and swap the brand new one right in. But since this one's in working order, we're going to put it back in. I'm going to wind it. It’s going to go right up into the opening. You want to make sure that these bolt holes line up with the knuckle. Actually kind of rest it there and then come up here.
I'm going to lift it into place, just like that. I'm going to take one of the nuts and I'll just get it captured, then that can hang just like that. Take our strut bolts, and line that back up, kind of push it back up. Throw the nut on there. Do the same for the bottom one, you might have to move this around to get it to line up. Just going to reach in and install the other nuts. This trim's really close to this nut, so I had to kind of pull it out. Just get the nut started on there. And use our socket and 14mm socket and ratchet, and snug these up. I'm just going to get it snug. Torque these top nuts to 33 foot pounds, just when it clicks that's when you stop.
Now that we're done up here, you can put the little access door back on, it clips into the top. Don't forget to put the weatherstrip back down, it just snaps on. Then kind of hold the bolts. I'm going to snug these down and we'll come back and torque them. Kind of hold the bolts again. Take a torque wrench and torque these to 67 foot-pounds. Once it clicks, you're done.
Don't forget to put the brake line back in place. Reinstall the clip for the ABS. Reinstall the wheel. Thread the lug nuts on by hand. I'm just going to snug them down and when I put the car on the ground, I will torque them. Then torque the lug nuts to 80 foot-pounds. And they go in a cross pattern.
Thanks for watching. Visit us at 1AAuto.com for quality auto parts, fast and free shipping, and the best customer service in the industry.
Tools used
Tools used
Hi, I’m Mike from 1A Auto. We’ve been selling auto parts for over 30 years!
With the vehicle on the ground, I'm going to use a 19mm socket and a breaker bar to loosen the lug nuts. With those bolts loosened, I'm going to raise and support the vehicle. With the lug nuts loosened, I should be able to use just the socket to finish removing them. With that last lug nut removed, I can take the wheel off.
With our wheel off, we can get to the sway bar link. It's bolted to the bottom of the control arm here, and the sway bar on the top. I'm going to use a wire brush to knock off some of the rust and dirt. Help this nut spin off of here. I'm also going to spray these with some rust penetrant. Use a 14mm box wrench, break these free first. That's just turning, but I know it'll spin. Do the same to this one. So those are spinning, because this is basically a little ball joint, so I need to take a 5mm Allen key and hold it. Both are going to be the same way. So they go in here like this. And we use our wrench to loosen it and hold it with this.
To get the 5mm Allen key into the top part of the sway bar link, doesn't quite line up evenly, it's at an angle. We're going to use this floor jack to lift up on the suspension arm. It's going to level it out. Before I do that, I have to put the box wrench on here. Put this on the breaker bar, wrench is in. Hold it and loosen it. If it starts to get harder, stop, spray some more rust penetrant, try to take your wire brush, and clean up some of the threads.
Now we're going to turn the nut back on like we're tightening it. You don't have to tighten it all the way back down. Spray some more rust penetrant, and clean the threads up a little more with the wire brush. Just slowly, but surely, working the nut off of there. Now I have that sway bar link loose, and nut off, I'm going to take the tension off this, just lowering the jack. So that'll come right out. So, both sides will be identical to this, so now I'm going to go after this lower one. I'm going to get this box wrench on here first, put the Allen key in here so I can counter hold it. There it is. That's the sway bar link.
Here's our original sway bar link out of the vehicle. This is our brand new one from 1AAuto.com. It's the same style design. These are left and right, when you go to install them. It comes with new locking nuts. This should fit in here and work great for us.
Take our new one, and slide it up in here. Capture the top nut, and you might have to push this up and in, just like that. These are 17mm, so use the 17mm box wrench to tighten them up. Once it starts to spin with the lock part, so it's turning the stud on the ball joint here, grab our 5mm Allen key again to counter-hold it and tighten this up. Just bring it down nice and snug. Going to do the same for the top. This ones actually tightening without turning the sway bar link on the stud. Let's get it nice and tightened down. Sway bar link is installed.
Reinstall the wheel. Thread the lug nuts on by hand. I'm just going to snug them down. And when I put the car on the ground, I will torque them. I'm going to torque the lug nuts to 80 foot pounds. And then you want to cross pattern.
Thanks for watching. Visit us at 1AAuto.com for quality auto parts, fast and free shipping, and the best customer service in the industry.
Tools used

SCA67239