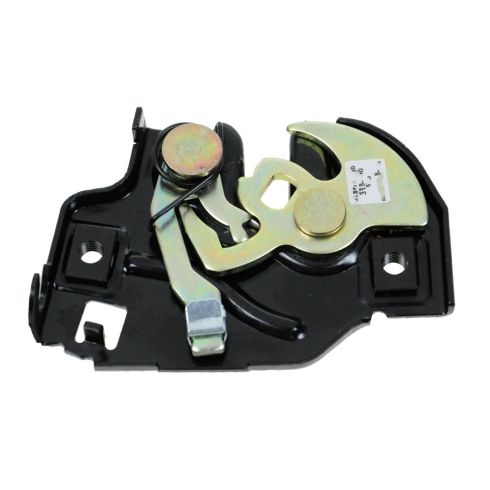
This hood latch is a new, aftermarket replacement part. It is just what you need to repair or replace a bent or defective hood latch and bring back the safety and integrity of a safely latched hood.
If, traveling down the highway, the hood latch fails and the safety latch lets go, the hood can actually fly off the vehicle posing a serious hazard to you and anyone behind you. So don't hesitate to replace a questionable hood latch and keep your vehicle safe.
This hood latch has the following specifications:
Replaces dealer part number: 15757371
Mounts to radiator support
Built to strict quality control standards
The hood latch makes a great replacement and has good cost saving over a dealer hood catch.
Item Condition:New
Attention California Customers:
WARNING: This product can expose you to chemicals including Lead and Lead Compounds, which are known to the State of California to cause cancer, and birth defects or other reproductive harm. For more information, go to www.P65Warnings.ca.gov.
Lifetime Warranty
This item is backed by our limited lifetime warranty. In the event this item should fail due to manufacturing defects during intended use, we will replace the part free of charge. This warranty covers the cost of the part only.
FREE Shipping is standard on Orders shipped to the lower 48 States (Contiguous United States). Standard shipping charges apply to Hawaii, Alaska and US Territories. Shipping is not available to Canada.
Expedited is available on checkout to the United States, excluding Alaska, Hawaii and US Territories as well as P.O. Boxes and APO/FPO/DPO addresses. Final shipping costs are available at checkout.
How to Replace Hood Latch 1994-2005 Chevy Blazer S10
How to Replace Hood Latch 1995-99 Chevy Tahoe
Created on:
Tools used
Flat Blade Screwdriver
13mm Wrench
1. Removing the Hood Latch
Remove the two 13mm bolts securing the hood latch.
Pry the hood latch cable up and out of the hood latch.
2. Replacing the Hood Latch
Pull back the spring and reconnect the hood latch cable.
Line up the hood latch and put it down into place.
Replace the two 13mm bolts.
3. Adjusting Hood Height
Loosen the 13mm bolts and slide the latch up or down to adjust the height of the center.
Turn the rubber knobs on either side of the engine to adjust the height of the sides.
Brought to you by 1AAuto.com. Your source for quality replacement parts, and the best service on the internet.
Hi, I'm Mike Green. I'm one of the owners at 1A Auto. I want to help you save time and money repairing and maintaining your vehicle. I'm going to use my 20 plus years' experience restoring and repairing cars and trucks like this to show you the correct way to install parts from 1AAuto.com. The right parts installed correctly. That's going to save you time and money. Thank you, and enjoy the video.
In this video we're going to be showing you how to replace the front hood latch on this 2000 S10 Blazer same as any Blazer or the GMC Jimmy as well as the Pickups. The only tools you need are 13m wrench and small flat blade screwdriver.
Hood latch, here's actually a new one. You see they mount on the car like this, but turn around, and you can see here what happens is when you pull your cable, you pull that, and the hood pops up. Then when the hood comes down there is a bar that pushes right into here, it pushes that down until it latches. What can happen is if you don't lubricate them, theses can get worn around here, worn around here, and they don't work. This can wear out here so it doesn't latch as well. So, that's why you might need to replace it.
Replacing is pretty easy. 13mm wrench and two 13mm bolts. Undo them. Okay and we'll just hit a little bit of fast forward here as we just remove those two bolts. Once you get that up and out, you just want to pull that cable out of that bracket, and then get a flat blade screwdriver and pry that cable right up out of there. That spring just keeps the cable like that. You see that this latch is in good shape. So, I actually will just reinstall it.
Reinstalling, just put the cable in. Take you spring pull it back this way. Slide the cable right into your clip here. Now put the bolts in. You can see how nicely the bolts have a nice dark circle here. You can use those first time you tighten it up. Just tighten it up so the bolts go right back into the original footprint, and that's a good place to start as far as lining up your hood. A little bit of fast-forward here again as we just put those in and tighten them up. Obviously, you can loosen this up and move it down if you want the center of your hood further down, or up if you want the center of the hood further up. On each side you have rubber bumpers here. You can move these up by turning them counter-clockwise or down by turning them clockwise. Those will control where the level of your hood is, so, you can line up your hood by using the bumpers on the side and moving your latch mechanisms up and down.
We hope this helps you out. Brought to you by www.1AAuto.com, your source for quality replacement parts, and the best service on the internet. Please feel free to call us toll-free 888-844-3393. We're the company that's her for you on the internet and in person.
Tools used
13mm Socket
Flat Blade Screwdriver
Ratchet
1. Removing the Hood Latch
Raise the hood
Remove the two 13mm bolts from the hood latch
Pry the hood release cable out of the hood latch clip with a flat blade screwdriver
Pry the hood release cable out of its bracket
2. Installing the Hood Latch
Push the hood release cable into the clip on the hood latch
Put the hood release cable onto its bracket
Push the hood latch into place
Start the two 13mm bolts by hand
Tighten the two 13mm bolts
Brought to you by 1AAuto.com, your source for quality replacement parts and the best service on the Internet.
Hi, I'm Don from 1A Auto. I hope this how-to video helps you out, and next time you need parts for your vehicle, think of 1AAuto.com. Thanks.
In this video, we're going to show you how to replace the hood latch on this 1996 Chevy Tahoe. It's the same part and process on these Tahoes from '95 to '99. The items you'll need for this are a new hood latch from 1AAuto.com, a 13mm socket and ratchet, and a flat blade screwdriver.
Raise your hood and then remove these two 13mm bolts right here. We'll just fast forward as Don does that. Pull the hood latch out and then you want to just pry out your hood release cable. To do that, pry up that tab and pull the cable free. Then, you want to pry the hood release cable out of this bracket on the side.
On the left is the old hood latch, on the right is the new one from 1A Auto. You can see they're identical and they're going to mount exactly the same. Take your new hood latch and just push your hood release cable back into that clip and slide the larger end into that bracket. You want to make sure that it's pushed all the way down. Now, just put the latch into place and replace those two 13mm bolts and tighten them up.
We hope this video helps you out. Brought to you by www.1AAuto.com, your source for quality replacement parts and the best service on the Internet. Please feel free to call us toll-free, 888-844-3393. We're the company that's here for you on the Internet and in person.
315-100
In Stock
Product Reviews
Loading reviews
There are no reviews for this item.
Customer Q&A
No questions have been asked about this item.
Customer service
877-844-3393
Monday - Friday 8:00am - 9:30pm ET Saturday - Sunday 8:00am - 4:30pm ET
Chevrolet is a registered trademark of General Motors Company. 1A Auto is not affiliated with or sponsored by Chevrolet or General Motors Company.See all trademarks.
Enter Vehicle Year Make Model
Specify your vehicle's year, make and model to guarantee fit.
Year
Make
Model
Options
Drivetrain
This part doesn’t fit a . Select from parts that fit.