All of our auto parts are intended for Left Hand Drive USDM vehicles. If your vehicle is Right Hand Drive, please ensure the part is correct for your specific vehicle.
Item Condition:New
Attention California Customers:
WARNING: This product can expose you to chemicals including Lead and Lead Compounds, which are known to the State of California to cause cancer, and birth defects or other reproductive harm. For more information, go to www.P65Warnings.ca.gov.
Lifetime Warranty
This item is backed by our limited lifetime warranty. In the event that this item should fail due to manufacturing defects during intended use, we will replace the part free of charge. This warranty covers the cost of the part only.
Returns: Parts with electrical components cannot be returned once installed.
FREE Shipping is standard on Orders shipped to the lower 48 States (Contiguous United States). Standard shipping charges apply to Hawaii, Alaska and US Territories. Shipping is not available to Canada.
Expedited is available on checkout to the United States, excluding Alaska, Hawaii and US Territories as well as P.O. Boxes and APO/FPO/DPO addresses. Final shipping costs are available at checkout.
How to Replace Blend Door Actuator 2000-03 Chevy Monte Carlo
Created on:
Tools used
Flat Blade Screwdriver
7mm Socket
Ratchet
7/32 Inch Socket
1. Removing the Glove Box
Push in the lower dash panel clips
Pull down the panel
Twist the light bulb socket out of the panel
Pull the bulb out of the socket
Remove the 7mm bolts from the glove box
Pull down the glove box
Remove any items from the glove box
Pry the pin out of the passenger side of the glove box with a flat blade screwdriver
Unclip the driver side of the glove box
Pull the glove box down and out
2. Removing the Temperature Door Actuator
Disconnect the temperature door actuator wiring harness
Remove the two 7/32 inch bolts from the actuator
Pull off the actuator
3. Installing the New Temperature Door Actuator
Line up the shaft with the new actuator
Push the actuator into place
Insert the two 7/32 inch bolts into the actuator
Connect the actuator wiring harness
Test the actuator by moving the temperature control and watching the actuator
4. Reinstalling the Glove Box
Put the glove box into place
Push the pin into the passenger side of the glove box
Clip the driver side of the glove box
Close the glove box
Insert the 7mm bolts into the glove box
Push the light bulb into its socket
Twist the socket into the dash panel
Push the dash panel into place
Brought to you by 1AAuto.com, your source for quality replacement parts and the best service on the Internet.
Hi, I'm Mike from 1A Auto. I hope this how-to video helps you out, and next time you need parts for your vehicle, think of 1AAuto.com. Thanks.
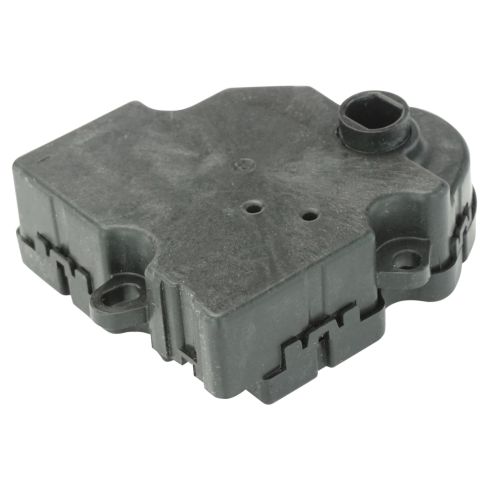
In this video, we're going to show you how to replace the temperature door actuator on this 2003 Chevy Monte Carlo and it's the same part and similar process on these Monte Carlos from 2000 to 2003. The items you'll need for this are a new temperature door actuator from 1AAuto.com, 7 millimeter socket and ratchet, a 7/32 inch socket and a flat blade screwdriver.
Start off by just pushing in these tabs. You can see we're missing one, but you just want to push in both of them and pull the panel down. Then twist the socket out and pull your bulb free and then remove these 7 millimeter bolts right here. We'll fast forward as Mike does that. Pull down your glove box, and remove the stuff inside the glove box, and you want to just pry out on the pin over here. Once you pull that out, it will just pull free from inside of the glove box. Then, for this one which is on a hook, just pull it down and free and then just pull your glove box down and slide it straight back and out.
Your actuator is located right here and it's held in with two bolts. Just push the tab on the harness and disconnect it and then remove those two 7/32 inch bolts. We'll fast forward as Mike does this. Now, just pull the temperature door actuator forward and off.
On the left, is the old temperature door actuator; on the right, is a new one from 1A Auto. You can see they're identical and will fit exactly the same. Now, you want to just turn this so that it's lined up with your temperature door actuator and then push the temperature door actuator into place and replace those screws. It's easier to just start them by hand and then tighten them up. Now, reconnect your harness and then just test it real quick, slide the temperature up and down and if that center is spinning, then it's all set. It's hard to tell, but it is spinning.
Now, feed your glove box back into place and push this side in, and then, push the pin through that will secure it into place. Then for this side just reclip it and then just close your glove box and replace these bolts along the bottom of it. Push your bulb back into the socket and twist it back into the panel and then push the panel back and then up into place. You're all set.
We hope this video helps you out. Brought to you by www.1AAuto.com, your source for quality replacement parts and the best service on the Internet. Please feel free to call us toll-free, 888-844-3393. We're the company that's here for you on the Internet and in person.
HCA40134
In Stock
Product Reviews
Loading reviews
5.00/ 5.01
1review
5 Stars
4 Stars
3 Stars
2 Stars
1 Star
1
0
0
0
0
2 thumps up
Spencer
May 23, 2023
Worked like a charm.
Customer Q&A
98 buick century passenger side temperature blend door actuator. how can you tell if it is manual or automatic?August 14, 2016
Brian M
10
Manual A/C means you use a dial or slide for AC operation. Automatic means there is normally a digital temp control. Set the temp to a desired temp and the A/C maintains that temp automatically.
August 15, 2016
Brian F
Will this work for the drivers side of my 03 Monte Carlo with dual climate control?October 5, 2016
Alexander R
10
I would make sure it is compatible for your vehicle
October 6, 2016
Anthony R
10
Yes it is!
October 12, 2016
Derek C
Is this part also used to control the mode function? ie, dash air, floor, defrost, etc?May 23, 2017
Brian D
10
Depending on your vehicle it will control the doors for multiple functions.
May 24, 2017
Tim K
10
Yes, that's where I installed this part.
June 3, 2017
Robert M
What is part number for this if you have pins 5,6,&7 instead of the pictured pin out???November 17, 2021
Stephen S
10
It has been a long time since I replaced this part and I no longer have this vehicle. From my recollection, this part fit exactly for my 1996 chevy silverado 5.3 liter V8 extended cab. I had this truck for 23 years before I sold it. I hope this helps with your question...
November 17, 2021
David D
10
Do you know the job of the actuator you need replaced? Is is a blend door, air inlet or vent mode actuator? What is the year, make and model of your vehicle?
November 17, 2021
T I
As always , you will need one actuator per vent of the dash. Will this part work for all four vents ?May 29, 2023
Yvonne R
How many of these do you need ?July 1, 2023
Yvonne R
10
I believe theres two in my Monte Carlo 2002 but I heard one working so I just replaced the one
July 1, 2023
Dominic B
How many blend door actuators do I need for my 98 GMC Sierra? And are all the same?July 10, 2024
Lazaro R
10
Our parts are exact replacements for your vehicle's OEM parts. As long as your vehicle specifications match up with our listing, these parts will directly fit and function like the originals.
July 11, 2024
Jean O
Customer service
877-844-3393
Monday - Friday 8:00am - 9:30pm ET Saturday - Sunday 8:00am - 4:30pm ET
Pontiac is a registered trademark of General Motors Company. 1A Auto is not affiliated with or sponsored by Pontiac or General Motors Company.See all trademarks.
Enter Vehicle Year Make Model
Specify your vehicle's year, make and model to guarantee fit.
Year
Make
Model
Options
Drivetrain
This part doesn’t fit a . Select from parts that fit.